Introduction
Butternut and Feta Tartlets: A Perfect Little Bite!
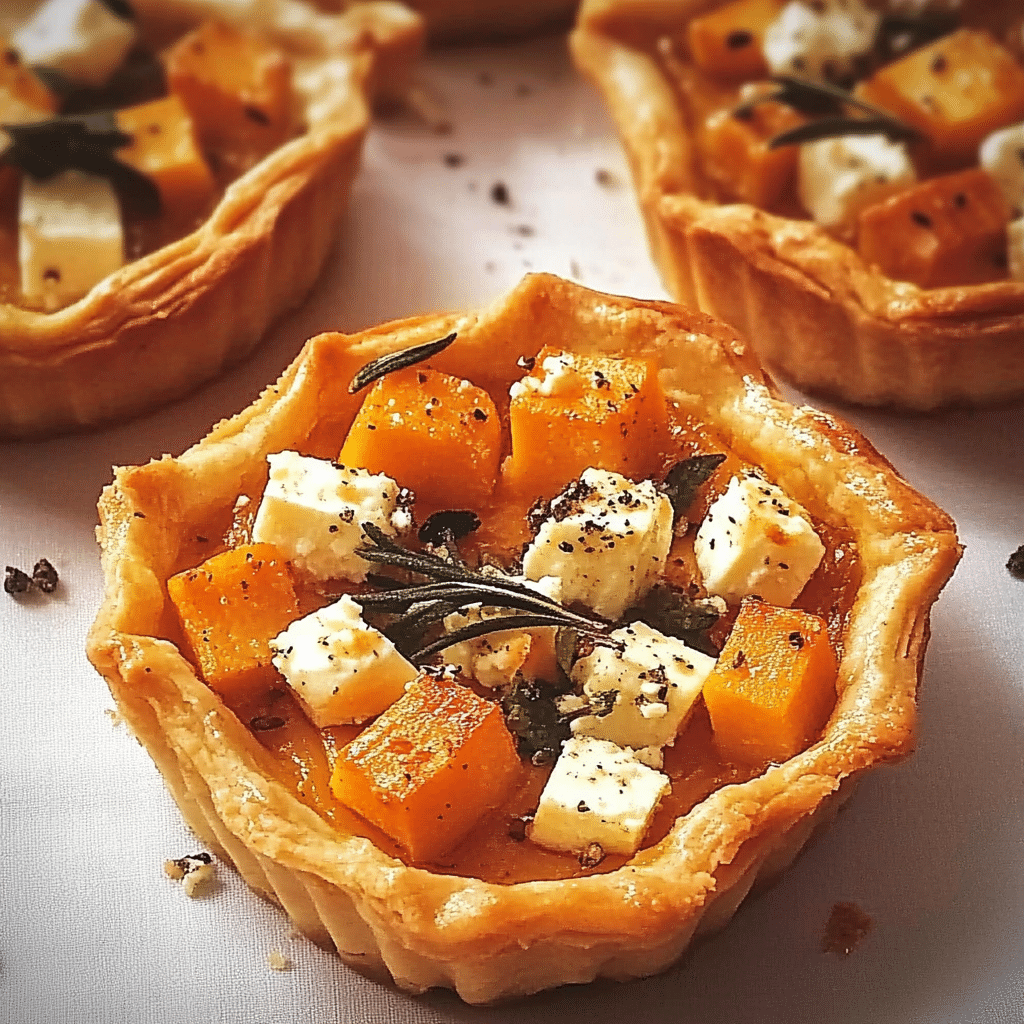
Get ready to impress your guests with these Butternut and Feta Tartlets! Trust me, they’re a total game changer when it comes to appetizers, brunch, or even a light dinner. Picture this: the sweet, nutty flavor of roasted butternut squash, paired with the creamy, tangy goodness of feta cheese, all nestled in a flaky pastry shell. It’s like a cozy hug for your taste buds!
I first tried making these tartlets when I was looking for a fun dish to bring to a friend’s gathering. I was a bit nervous since I was still getting the hang of cooking back then, but the recipe looked easy and the flavors sounded amazing. Let me tell you, they turned out to be a hit! Everyone raved about them, and I felt like a total rockstar in the kitchen.
What I love most about these tartlets is how versatile they are. You can serve them warm or at room temperature, making them perfect for any occasion. Plus, they’re visually stunning, which means they’ll get your guests talking before they even take a bite! The hint of herbs and spices really elevates the dish, making it feel fancy without all the fuss.
If you’re new to cooking, don’t worry! These tartlets are super easy to whip up, and I promise you can do it. Just follow the steps, and you’ll be amazed at how quickly they come together. So, gather your ingredients and get ready to wow your friends and family with these delightful little bites!

Why You’ll Love This Recipe
Here are several reasons to fall in love with Butternut and Feta Tartlets:
- Flavorful Combination: The blend of roasted butternut squash and feta creates a mouthwatering flavor profile.
- Easy to Make: Simple steps and minimal prep make these tartlets accessible for any home cook.
- Perfect for Any Occasion: Whether it’s a casual brunch or a fancy dinner party, these tartlets fit right in.
- Vegetarian Delight: A great option for vegetarians and those looking to enjoy a meat-free dish.
- Impressive Presentation: Their individual servings and beautiful colors make them visually appealing.
- Quick Assembly: With pre-made pastry shells, you can whip these up in no time.
- Customizable: Feel free to add your favorite herbs or spices for a personal touch.
- Make Ahead Option: Prepare the filling in advance for easy assembly on the day of serving.
- Healthy Ingredients: Packed with nutrients from butternut squash and the goodness of feta.
- Crowd Pleaser: Perfect for sharing and guaranteed to be a hit with friends and family.
Preparation Time and Cook Time
- Total Time: 1 hour
- Preparation Time: 25 minutes
- Cook Time: 30 minutes
- Servings: 12 tartlets
- Calories per tartlet: Approximately 180 calories
- Key Nutrients: Fiber: 2g, Fat: 9g, Carbohydrates: 22g, Protein: 4g
Ingredients
Gather the following ingredients to create your Butternut and Feta Tartlets:
For the Filling:
- 2 cups butternut squash, diced
- 1 tablespoon olive oil
- Salt and pepper to taste
- 1 teaspoon dried thyme (or fresh thyme, if available)
- 1/2 cup feta cheese, crumbled
- 2 large eggs
- 1/2 cup heavy cream
For the Tartlet Shells:
- 12 pre-made pastry shells (store-bought or homemade)
Ingredient Highlights
- Butternut Squash: Adds natural sweetness and a creamy texture when roasted.
- Feta Cheese: Offers a tangy flavor that perfectly complements the squash.
- Herbs: Thyme adds a lovely aromatic quality to the filling.
Step-by-Step Instructions
Follow these steps to create your Butternut and Feta Tartlets:
Prepare the Filling
- Preheat Oven: Preheat your oven to 400°F (200°C).
- Roast the Squash: Toss the diced butternut squash with olive oil, salt, pepper, and thyme. Spread it on a baking sheet and roast for 25-30 minutes, or until tender and slightly caramelized. Remove from the oven and let cool slightly.
- Mix Filling: In a mixing bowl, combine the roasted butternut squash, crumbled feta cheese, eggs, and heavy cream. Mix until well blended.
Assemble the Tartlets
- Prepare Pastry Shells: Place the pre-made pastry shells on a baking tray.
- Fill the Shells: Spoon the butternut squash and feta mixture into each pastry shell, filling them about three-quarters full.
Bake the Tartlets
- Bake: Place the filled tartlets in the preheated oven and bake for 20-25 minutes, or until the filling is set and the tops are lightly golden.
- Cool: Remove from the oven and let cool for a few minutes before serving.
How to Serve
Here are some fun serving ideas for your Butternut and Feta Tartlets:
- Display on a Platter: Arrange the tartlets on a beautiful serving platter for an elegant presentation.
- Garnish with Herbs: Sprinkle fresh herbs on top before serving for a pop of color.
- Pair with Salad: Serve alongside a fresh green salad for a light meal.
- Offer Dipping Sauce: Consider a yogurt or tzatziki sauce for a flavorful dip.
- Create a Tasting Menu: Include these tartlets as part of a larger appetizer spread.
- Individual Servings: Serve each tartlet on small plates with a garnish for an upscale feel.
- Warm or Room Temperature: These tartlets can be enjoyed warm or at room temperature, making them versatile.
- Engage Guests: Allow guests to top their tartlets with extra feta or herbs for a fun interactive element.
- Enjoy with Wine: Pair with a crisp white wine for a delightful flavor combination.
- Festive Touch: Add a sprinkle of pomegranate seeds on top for a festive look.
Additional Tips
Maximize your enjoyment of Butternut and Feta Tartlets with these helpful tips:
- Use Fresh Ingredients: Fresh butternut squash and herbs will enhance the flavors of the dish.
- Make Ahead: Prepare the filling in advance and fill the tartlet shells just before baking.
- Adjust Seasoning: Taste the filling before baking and adjust the seasoning as needed.
- Experiment with Cheese: Try goat cheese or ricotta for a different flavor profile.
- Store Properly: Leftover tartlets can be stored in an airtight container in the fridge for up to 2 days.
- Reheat: Reheat in the oven to restore crispness before serving.
- Try Different Pastries: Use phyllo dough or puff pastry for a flakier texture.
- Add Vegetables: Mix in sautéed spinach or kale for added nutrients.
- Control Portion Size: Use mini pastry shells for bite-sized appetizers.
- Experiment with Spices: Add nutmeg or paprika for an extra layer of flavor.
Recipe Variations
Consider these creative variations for your Butternut and Feta Tartlets:
- Add Nuts: Sprinkle toasted pine nuts or walnuts for added crunch.
- Different Squash: Substitute butternut squash with acorn squash or pumpkin for variety.
- Herb Variations: Experiment with different herbs like rosemary or basil for unique flavor twists.
- Spicy Kick: Add a pinch of red pepper flakes for a bit of heat.
- Meat Option: Incorporate cooked bacon or sausage into the filling for a savory touch.
- Use Sweet Pastry: Create a sweet version by mixing in a bit of brown sugar and cinnamon.
- Mini Tartlets: Use mini pastry shells for appetizers that are perfect for parties.
- Savory Crust: Make a savory crust using whole wheat flour or add herbs to the pastry dough.
- Cheesy Variation: Mix in shredded mozzarella or cheddar for a gooey texture.
- Top with Greens: Add fresh arugula or spinach on top before serving for added freshness.
Freezing and Storage
Ensure proper storage to maintain the quality of your Butternut and Feta Tartlets:
- Storage: Keep any leftover tartlets in an airtight container in the refrigerator for up to 2 days.
- Freezing: Unbaked tartlets can be frozen for up to 3 months. Assemble them, then wrap tightly in plastic wrap and place in a freezer-safe bag.
- Thawing: Thaw frozen tartlets in the refrigerator overnight before baking.
- Reheating: Reheat baked tartlets in a 350°F (175°C) oven until warmed through.
Special Equipment
You may need these kitchen tools to create your Butternut and Feta Tartlets:
- Baking Tray: For roasting the squash and baking the tartlets.
- Mixing Bowl: To mix the filling ingredients.
- Measuring Cups and Spoons: For accurate ingredient measurements.
- Knife: To dice the butternut squash.
- Whisk: For blending the egg and cream mixture.
- Serving Platter: To beautifully display the finished tartlets.
FAQ Section
Here are answers to common questions about Butternut and Feta Tartlets:
- Can I use fresh butternut squash?
Yes, fresh butternut squash is ideal for this recipe, but you can also use frozen if needed. - How long can I store the tartlets?
They can be stored in the refrigerator for up to 2 days. - Can I freeze these tartlets?
Yes, you can freeze them unbaked. Just wrap well and bake from frozen. - What if I can’t find feta cheese?
Substitute with goat cheese or ricotta for a different flavor. - How can I make these tartlets gluten-free?
Use gluten-free pastry shells or make your own crust with gluten-free flour.

Butternut and Feta Tartlets
- Total Time: 1 hour
Ingredients
For the Filling:
- 2 cups butternut squash, diced
- 1 tablespoon olive oil
- Salt and pepper to taste
- 1 teaspoon dried thyme (or fresh thyme, if available)
- 1/2 cup feta cheese, crumbled
- 2 large eggs
- 1/2 cup heavy cream
For the Tartlet Shells:
- 12 pre-made pastry shells (store-bought or homemade)
Instructions
Prepare the Filling
- Preheat Oven: Preheat your oven to 400°F (200°C).
- Roast the Squash: Toss the diced butternut squash with olive oil, salt, pepper, and thyme. Spread it on a baking sheet and roast for 25-30 minutes, or until tender and slightly caramelized. Remove from the oven and let cool slightly.
- Mix Filling: In a mixing bowl, combine the roasted butternut squash, crumbled feta cheese, eggs, and heavy cream. Mix until well blended.
Assemble the Tartlets
- Prepare Pastry Shells: Place the pre-made pastry shells on a baking tray.
- Fill the Shells: Spoon the butternut squash and feta mixture into each pastry shell, filling them about three-quarters full.
Bake the Tartlets
- Bake: Place the filled tartlets in the preheated oven and bake for 20-25 minutes, or until the filling is set and the tops are lightly golden.
- Cool: Remove from the oven and let cool for a few minutes before serving.
- Prep Time: 25 min.
- Cook Time: 30 min.
Nutrition
- Serving Size: 12 tartlets
- Calories: 180 kcal
- Fat: 9g
- Carbohydrates: 22g
- Fiber: 2g
- Protein: 4g
Conclusion
I can’t wait for you to try these Butternut and Feta Tartlets! They’re not just a treat for your taste buds; they’re also a wonderful way to impress your friends and family with your culinary skills. The combination of the sweet butternut squash and the tangy feta creates a delightful flavor explosion that’s perfect for any occasion.
As you make these tartlets, remember to have fun with the process! Cooking is all about experimentation and enjoying the journey, so feel free to add your own twist. Whether you decide to spice them up with some herbs or serve them alongside a fresh salad, the possibilities are endless.
Once you’ve whipped up your own batch, I’d love to hear all about your experience! Did you make any delicious adjustments? What did your friends and family think? Leave a comment below and let’s share in the joy of cooking together. And of course, don’t forget to snap a photo and tag me on social media—I love seeing your delicious creations! Your kitchen adventures inspire me and our community, and I can’t wait to see how your tartlets turn out. Happy cooking!

