Introduction
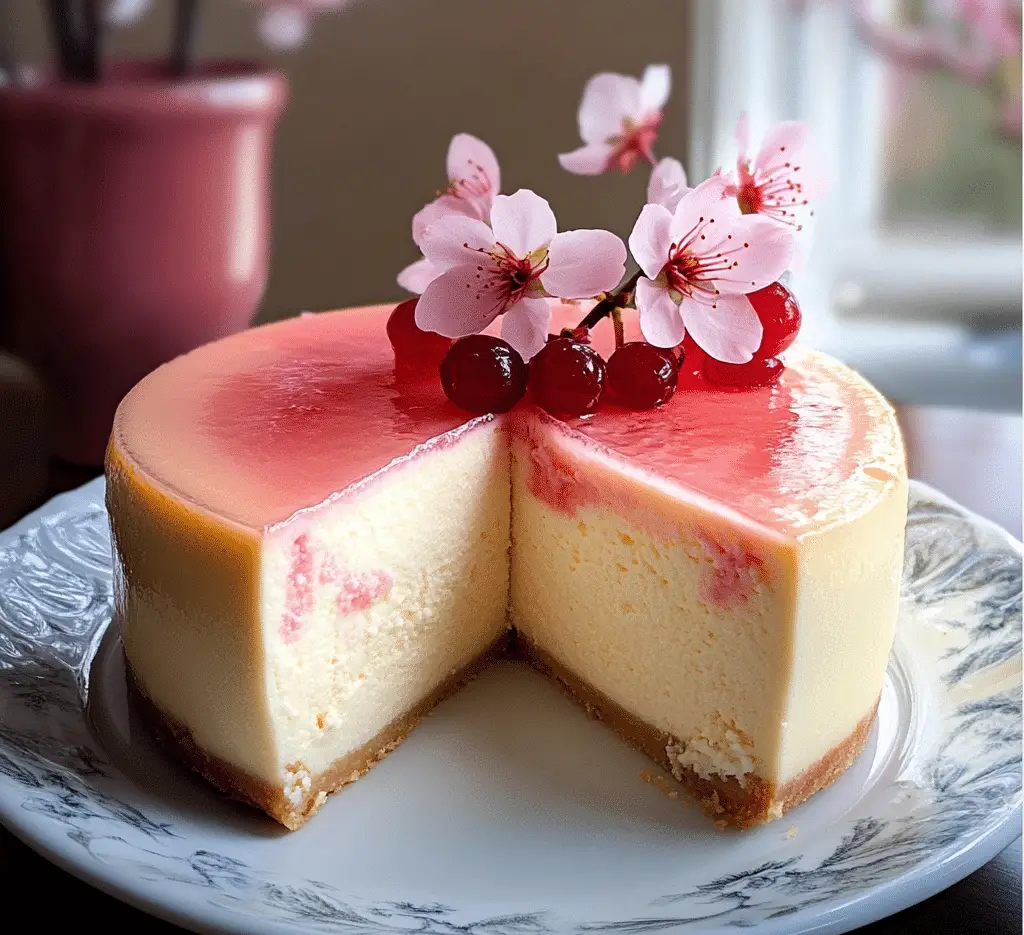
Imagine sinking your fork into a creamy, velvety slice of Cherry Blossom Cheesecake, where every bite is a delicate balance of tangy and sweet, with a hint of floral elegance. This cheesecake is not your typical dessert; it’s an experience, one that transports you to a serene garden filled with cherry blossoms in full bloom. Whether you’re celebrating a special occasion or just want to treat yourself to something beautiful and indulgent, this cherry blossom-infused cheesecake will surely become your new favorite. With a buttery graham cracker crust, a rich and smooth cream cheese filling, and a fragrant cherry blossom glaze, it’s a perfect blend of lightness and indulgence. Let’s dive into why this cheesecake is truly special!
Why You’ll Love This Recipe
There are countless reasons to fall in love with Cherry Blossom Cheesecake:
- Unique Flavor Profile: Cherry blossom brings a delicate, floral essence that pairs perfectly with the creamy richness of the cheesecake.
- Visually Stunning: The soft pink hue of the cherry blossom glaze adds a touch of elegance to the cheesecake’s appearance.
- Perfect for Spring and Summer: This dessert is ideal for any seasonal gathering, evoking the refreshing feeling of spring.
- Simple Ingredients: You don’t need anything too fancy to create this delightful dessert—just a few key ingredients that come together beautifully.
- Impress Your Guests: Whether it’s a dinner party or a family gathering, this cheesecake will be the centerpiece of your dessert table.
- Make-Ahead Convenience: Cheesecake tastes even better when allowed to set overnight, making it a great option for stress-free party prep.
- Customizable: While the cherry blossom flavor is stunning on its own, you can experiment with other fruit glazes or toppings to suit your taste.
- A Touch of Luxury: The unique addition of cherry blossom makes this dessert feel like a luxurious treat.
- Suitable for Any Skill Level: Don’t worry if you’re not an experienced baker—this cheesecake is easy to assemble, and the results are impressive.
- Perfect for Celebrations: Whether it’s a birthday, anniversary, or any other special event, this cheesecake is bound to make it unforgettable.
Preparation Time and Cook Time
- Total Time: 6 hours (includes chilling time)
- Preparation Time: 20 minutes
- Cook Time: 1 hour
- Chilling Time: 4-6 hours or overnight
- Servings: 10-12 slices
- Calories per serving: Approximately 350 calories
- Key Nutrients: Protein: 8g, Fat: 24g, Carbohydrates: 32g, Fiber: 1g
Ingredients
Before you get started, gather these ingredients for the Cherry Blossom Cheesecake:
For the Crust:
- 1 ½ cups graham cracker crumbs
- ¼ cup granulated sugar
- ½ cup unsalted butter, melted
the Cheesecake Filling:
- 3 (8-ounce) packages cream cheese, softened
- 1 cup granulated sugar
- 3 large eggs
- 1 teaspoon vanilla extract
- ½ cup sour cream
- 1 tablespoon all-purpose flour
For the Cherry Blossom Glaze:
- 1 cup cherry juice (fresh or bottled)
- 2 tablespoons dried cherry blossoms (or cherry blossom extract, if available)
- ¼ cup granulated sugar
- 1 tablespoon cornstarch mixed with 2 tablespoons water (for thickening)
Ingredient Highlights
- Graham Cracker Crust: The buttery crunch of the graham cracker crust perfectly complements the creamy filling of the cheesecake.
- Cherry Blossom: The subtle floral flavor of cherry blossoms brings a refreshing and exotic twist to the classic cheesecake.
- Cream Cheese: A key ingredient for the rich, smooth texture that makes this cheesecake so irresistible.
- Sour Cream: Adds an extra layer of creaminess and tang, balancing the sweetness of the glaze.
- Eggs and Flour: These ingredients help create the perfect dense yet smooth texture for the cheesecake filling.
Step-by-Step Instructions
Ready to create your Cherry Blossom Cheesecake? Follow these easy steps for a flawless result.
Prepare the Crust
- Preheat Oven: Preheat your oven to 325°F (160°C). Grease a 9-inch springform pan with butter or non-stick spray.
- Mix the Crust: In a medium-sized bowl, combine graham cracker crumbs, sugar, and melted butter. Stir until well combined.
- Press into Pan: Press the mixture evenly into the bottom of the prepared pan. Use the back of a spoon to compact the crumbs tightly.
- Bake the Crust: Bake the crust in the preheated oven for 10-12 minutes, or until it’s golden brown. Let it cool while you prepare the filling.
the Cheesecake Filling
- Beat the Cream Cheese: In a large mixing bowl, beat the softened cream cheese and sugar together until smooth and fluffy, about 3-5 minutes.
- Add Eggs: Add the eggs one at a time, beating well after each addition. Make sure each egg is fully incorporated before adding the next.
- Add Vanilla and Sour Cream: Stir in the vanilla extract and sour cream. Add the flour and mix until just combined.
- Pour into Pan: Pour the cheesecake filling over the cooled graham cracker crust. Use a spatula to smooth the top.
- Bake: Bake at 325°F (160°C) for 50-60 minutes, or until the edges are set and the center is just slightly jiggly. Turn off the oven and leave the cheesecake in the oven for 1 hour to cool gradually.
- Chill: After the cheesecake has cooled to room temperature, cover and refrigerate for at least 4-6 hours, or overnight, to allow the flavors to set.
Prepare the Cherry Blossom Glaze
- Make the Glaze: In a small saucepan, combine cherry juice, dried cherry blossoms, and sugar. Bring the mixture to a simmer over medium heat and cook for 5-7 minutes to infuse the flavor.
- Thicken the Glaze: Add the cornstarch and water mixture to the pan, stirring constantly until the glaze thickens and becomes glossy.
- Cool the Glaze: Remove the saucepan from the heat and let the glaze cool to room temperature.
Assemble the Cheesecake
- Top with Glaze: Once the cheesecake has fully chilled, pour the cooled cherry blossom glaze over the top, spreading it evenly with a spatula.
- Chill Again: Place the cheesecake back into the fridge for another 30 minutes to let the glaze set before serving.

How to Serve
Now that your Cherry Blossom Cheesecake is ready, here are some serving suggestions:
- Serve Chilled: Cheesecake is best enjoyed chilled, so make sure to keep it refrigerated until ready to serve.
- Garnish with Fresh Fruit: For an extra touch, garnish the top of the cheesecake with fresh cherries or other berries that pair well with the cherry blossom flavor.
- Create a Dessert Display: Serve slices of cheesecake on elegant plates with a drizzle of extra cherry glaze for a beautiful presentation.
- Pair with Tea: This cheesecake pairs wonderfully with a cup of green tea or chamomile for a calming, sophisticated dessert experience.
- Personalize the Toppings: Add a sprinkle of crushed pistachios, a few edible flowers, or even a dusting of powdered sugar for added flair.
Additional Tips
Here are some tips to ensure your Cherry Blossom Cheesecake turns out perfectly every time:
- Softening the Cream Cheese: Make sure your cream cheese is fully softened before mixing to avoid lumps in the filling.
- Prevent Cracking: To prevent cracks in the cheesecake, avoid overmixing the filling, and make sure to cool the cheesecake gradually in the oven before chilling.
- Use a Springform Pan: A springform pan makes it much easier to remove the cheesecake without damaging the sides.
- Serve at Room Temperature: Let the cheesecake sit out for 10-15 minutes before serving for the best flavor and texture.
- Infuse the Glaze: If you can’t find dried cherry blossoms, try using cherry blossom extract or simply make a fruity glaze using cherries and a hint of floral essence.
- Bake the Cheesecake in a Water Bath: For an ultra-smooth texture, bake your cheesecake in a water bath by wrapping the springform pan in foil and placing it in a larger pan with water. This will help create a moist environment during baking.
- Decorate for Special Occasions: This cheesecake makes a stunning dessert for weddings, birthdays, or even a garden party. Top it with edible flowers for a truly special touch.
Recipe Variations
Feel free to experiment with different twists on the classic Cherry Blossom Cheesecake:
- Lavender-Infused Cheesecake: Swap the cherry blossom glaze for a lavender syrup for a floral yet slightly different flavor.
- Lemon-Infused Filling: Add a teaspoon of lemon zest to the filling for a citrusy contrast to the floral notes.
- Berry Glaze: Instead of cherry blossom, use a mixed berry glaze for a vibrant, fruity topping.
- Chocolate Crust: For a decadent twist, use crushed chocolate cookies instead of graham crackers for the crust.
- Mini Cheesecakes: Make individual cheesecakes by using muffin tins or mini springform pans.
faq section
If you’re wondering about any details or tips for making your Cherry Blossom Cheesecake, this FAQ section has you covered. Here are some common questions and answers to help you create the perfect cheesecake every time:
- Can I use a different type of flower for the glaze?
- Yes! While cherry blossoms provide a unique floral flavor, you can experiment with other edible flowers like lavender, rose, or hibiscus to create your own signature glaze.
- How do I know when the cheesecake is done baking?
- The cheesecake is done when the edges are set and the center is still slightly jiggly. You can also check by gently shaking the pan—the center should wobble like jelly but not be liquid.
- Can I make this cheesecake in advance?
- Absolutely! In fact, cheesecake tastes even better after it has chilled for several hours or overnight. This makes it a great make-ahead dessert.
- What if I can’t find dried cherry blossoms?
- No worries! If dried cherry blossoms are hard to find, you can use cherry blossom extract or simply make a cherry glaze using fresh or bottled cherry juice. It’ll still taste amazing.

Cherry Blossom Cheesecake
- Total Time: 6 hrs.
Ingredients
For the Crust:
- 1 ½ cups graham cracker crumbs
- ¼ cup granulated sugar
- ½ cup unsalted butter, melted
For the Cheesecake Filling:
- 3 (8-ounce) packages cream cheese, softened
- 1 cup granulated sugar
- 3 large eggs
- 1 teaspoon vanilla extract
- ½ cup sour cream
- 1 tablespoon all-purpose flour
For the Cherry Blossom Glaze:
- 1 cup cherry juice (fresh or bottled)
- 2 tablespoons dried cherry blossoms (or cherry blossom extract, if available)
- ¼ cup granulated sugar
- 1 tablespoon cornstarch mixed with 2 tablespoons water (for thickening)
Instructions
Prepare the Crust
- Preheat Oven: Preheat your oven to 325°F (160°C). Grease a 9-inch springform pan with butter or non-stick spray.
- Mix the Crust: In a medium-sized bowl, combine graham cracker crumbs, sugar, and melted butter. Stir until well combined.
- Press into Pan: Press the mixture evenly into the bottom of the prepared pan. Use the back of a spoon to compact the crumbs tightly.
- Bake the Crust: Bake the crust in the preheated oven for 10-12 minutes, or until it’s golden brown. Let it cool while you prepare the filling.
Prepare the Cheesecake Filling
- Beat the Cream Cheese: In a large mixing bowl, beat the softened cream cheese and sugar together until smooth and fluffy, about 3-5 minutes.
- Add Eggs: Add the eggs one at a time, beating well after each addition. Make sure each egg is fully incorporated before adding the next.
- Add Vanilla and Sour Cream: Stir in the vanilla extract and sour cream. Add the flour and mix until just combined.
- Pour into Pan: Pour the cheesecake filling over the cooled graham cracker crust. Use a spatula to smooth the top.
- Bake: Bake at 325°F (160°C) for 50-60 minutes, or until the edges are set and the center is just slightly jiggly. Turn off the oven and leave the cheesecake in the oven for 1 hour to cool gradually.
- Chill: After the cheesecake has cooled to room temperature, cover and refrigerate for at least 4-6 hours, or overnight, to allow the flavors to set.
Prepare the Cherry Blossom Glaze
- Make the Glaze: In a small saucepan, combine cherry juice, dried cherry blossoms, and sugar. Bring the mixture to a simmer over medium heat and cook for 5-7 minutes to infuse the flavor.
- Thicken the Glaze: Add the cornstarch and water mixture to the pan, stirring constantly until the glaze thickens and becomes glossy.
- Cool the Glaze: Remove the saucepan from the heat and let the glaze cool to room temperature.
Assemble the Cheesecake
- Top with Glaze: Once the cheesecake has fully chilled, pour the cooled cherry blossom glaze over the top, spreading it evenly with a spatula.
- Chill Again: Place the cheesecake back into the fridge for another 30 minutes to let the glaze set before serving.
- Prep Time: 20 min.
- Chill Time: 4-6 hours
- Cook Time: 1 hr
Nutrition
- Serving Size: 10-12 slices
- Calories: 350 kcal
- Fat: 24g
- Carbohydrates: 32g
- Fiber: 1g
- Protein: 8g
Conclusion
This Cherry Blossom Cheesecake isn’t just a dessert—it’s a celebration of flavor, texture, and beauty. Whether you’re treating yourself or sharing it with loved ones, this cheesecake is bound to impress. Don’t forget to snap a photo and tag me on social media—I love seeing your delicious creations!

