Introduction
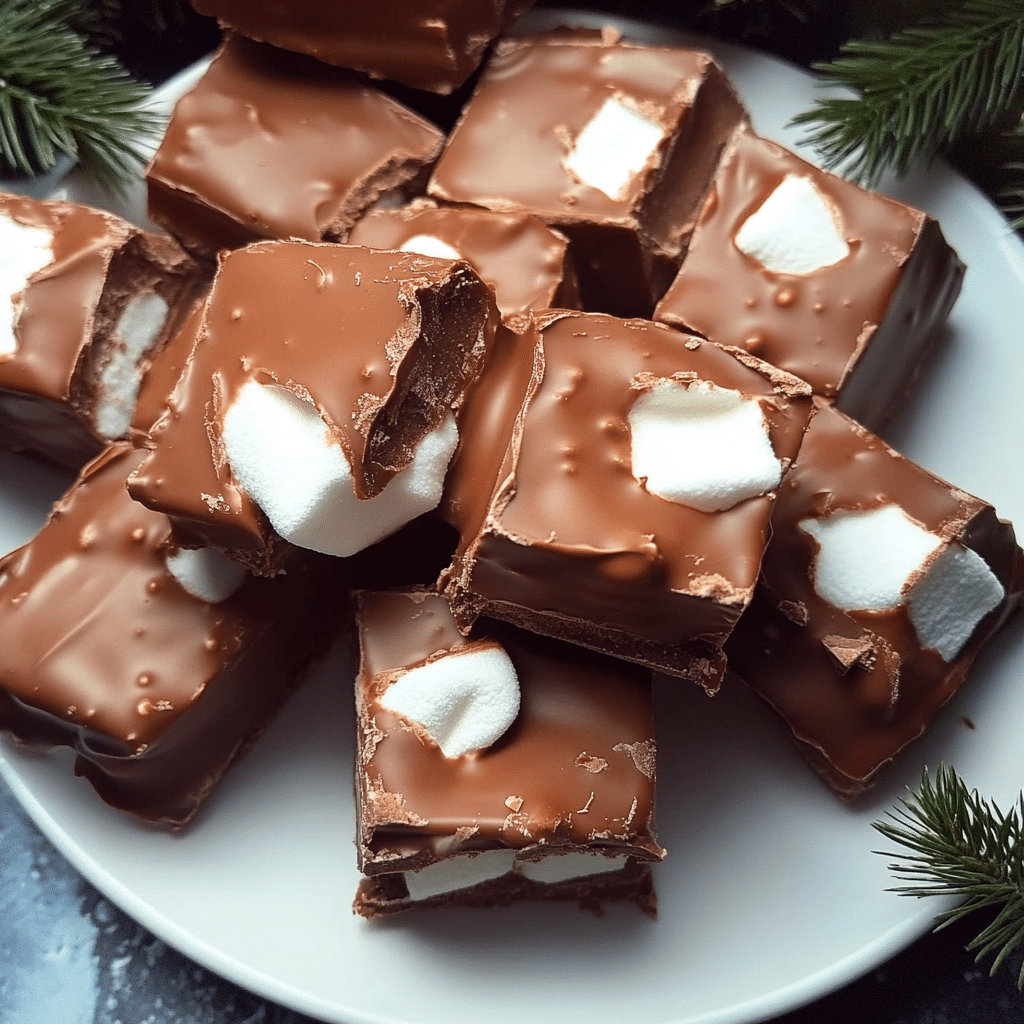
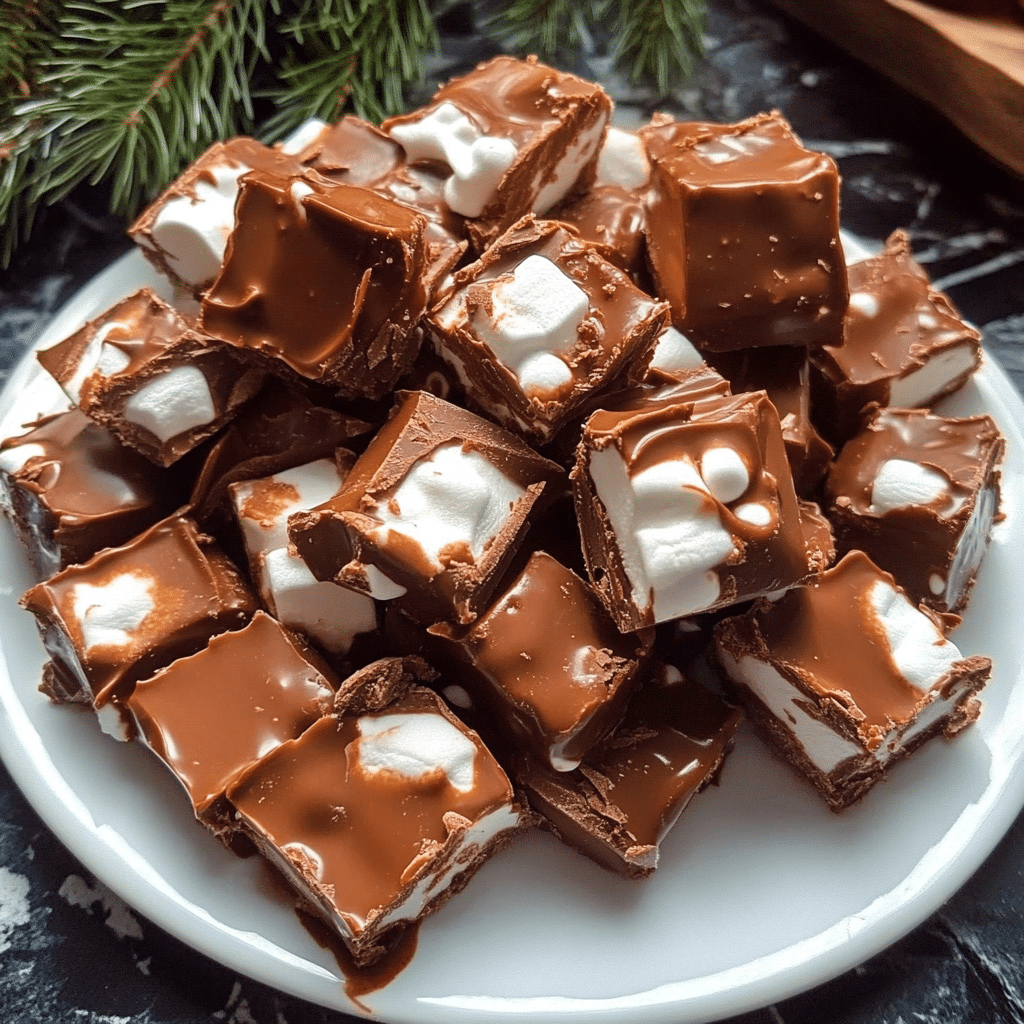
If you’re looking for a simple, yet irresistibly delicious dessert that will please everyone, Chocolate Marshmallow Squares are the perfect choice! This treat combines the richness of chocolate with the light, fluffy texture of marshmallows, making each bite a heavenly experience. Whether you’re preparing for a party, craving something sweet, or just want to indulge in a fun kitchen project, these squares are easy to make, customizable, and incredibly satisfying. Plus, they’re sure to be a hit with kids and adults alike!
In this recipe, we’ll guide you step-by-step through the process of making these scrumptious squares. You won’t need any fancy equipment, and the ingredients are simple and easy to find, so you can start right away. Whether you’re a seasoned baker or a beginner, this recipe is fun and approachable, ensuring that you’ll have a treat that tastes like it came straight from a bakery. Let’s dive in!
Why You’ll Love This Recipe
There’s no shortage of reasons to love Chocolate Marshmallow Squares. Here are just a few:
- Quick and Easy: With only a handful of ingredients and no baking required, this is the perfect last-minute dessert.
- Versatile: You can make these squares your own by adding toppings, mix-ins, or changing the chocolate variety.
- No-Bake: Perfect for those hot days when you don’t want to turn on the oven.
- Kid-Friendly: The marshmallow texture is a fun hit with kids, and it’s an easy recipe to let them help with.
- Crowd-Pleaser: Whether you’re bringing them to a party, family gathering, or enjoying them at home, these squares will be devoured in no time.
- Customizable: Feel free to experiment with flavors or add some nuts, candies, or even crushed cookies for an extra crunch.
- Perfect for Sharing: Slice them up and watch as everyone reaches for a piece—these squares are great for any occasion!
Preparation Time and Cook Time
- Total Time: 1 hour
- Preparation Time: 15 minutes
- Chill Time: 45 minutes
- Servings: 16 squares
- Calories per square: Approximately 220 calories
- Key Nutrients: Fiber: 1g, Fat: 10g, Carbohydrates: 31g, Protein: 2g
Ingredients
Gather these simple ingredients to make your Chocolate Marshmallow Squares:
For the Base:
- 2 cups graham cracker crumbs
- 1/4 cup sugar
- 1/2 cup unsalted butter (melted)
- 1 teaspoon vanilla extract
the Chocolate Layer:
- 2 cups semi-sweet chocolate chips
- 1/2 cup heavy cream
For the Marshmallow Layer:
- 2 cups mini marshmallows
Ingredient Highlights
- Graham Cracker Crumbs: These form the perfect crunchy base for the squares, providing a nice contrast to the creamy chocolate and fluffy marshmallows.
- Semi-Sweet Chocolate Chips: The rich chocolate layer is the star of this dessert, balancing perfectly with the sweetness of the marshmallows.
- Mini Marshmallows: Soft and gooey, the marshmallows add a chewy texture that makes these squares so addictive.
Step-by-Step Instructions
Here’s how you can create your own batch of Chocolate Marshmallow Squares:
Prepare the Base
- Mix the Graham Cracker Crumbs: In a medium-sized bowl, combine the graham cracker crumbs and sugar.
- Add Butter and Vanilla: Pour in the melted butter and vanilla extract, and stir until everything is well combined. The mixture should feel slightly wet but crumbly.
- Press Into the Pan: Transfer the graham cracker mixture into an 8×8-inch baking dish (lined with parchment paper for easy removal). Press the mixture firmly into the bottom to form an even base. You can use the back of a spoon or your hands to do this.
- Chill: Place the pan in the fridge for 15-20 minutes to allow the base to set before adding the next layer.
Make the Chocolate Layer
- Melt the Chocolate: In a microwave-safe bowl, combine the semi-sweet chocolate chips and heavy cream. Microwave in 20-30 second intervals, stirring in between, until the chocolate is smooth and fully melted.
- Pour the Chocolate: Once melted, pour the chocolate over the graham cracker base. Use a spatula to spread it evenly, covering the entire surface.
- Chill Again: Place the pan back in the fridge for 15-20 minutes, or until the chocolate layer has firmed up slightly.
Add the Marshmallows
- Top with Marshmallows: Once the chocolate layer has set, remove the pan from the fridge. Sprinkle the mini marshmallows evenly over the chocolate layer.
- Press Down Gently: Press the marshmallows into the chocolate layer slightly so they don’t just sit on top. This will help them stay in place when you slice the squares later.
- Final Chill: Put the pan back into the fridge for at least 45 minutes or until the squares are firm enough to cut.
How to Serve
Once your Chocolate Marshmallow Squares have set and are ready to slice, here are some fun ways to serve them:
- Slice into Squares: Using a sharp knife, cut the dessert into 16 small squares. Serve them on a large platter for everyone to enjoy.
- Party Platter: Arrange the squares on a festive serving tray for a fun party treat.
- Individual Servings: For a more personal touch, wrap each square in cellophane or place them on small plates with napkins.
- Pair with Drinks: These squares go wonderfully with milk, hot chocolate, or even a cup of coffee for a special treat.
Additional Tips
Make the most out of your Chocolate Marshmallow Squares with these helpful tips:
- Make Ahead: These squares can be prepared in advance and stored in the fridge for a few days, making them an excellent option for pre-party prep.
- Customize the Flavor: Try different types of chocolate, such as milk chocolate or dark chocolate, for a different twist.
- Use a Double Boiler: If you prefer, you can melt the chocolate over a double boiler instead of using the microwave for a smoother consistency.
- Add Nuts: Add chopped nuts, such as walnuts or pecans, to the graham cracker base for a bit of extra crunch.
- Marshmallow Alternatives: Experiment with flavored marshmallows like vanilla, strawberry, or chocolate for added fun!
- Store Properly: Keep the squares stored in an airtight container in the fridge for up to 5 days. These squares are best enjoyed chilled!
- Warm It Up: For a gooey, melty treat, warm up a square in the microwave for a few seconds before serving.
Recipe Variations
These Chocolate Marshmallow Squares are incredibly versatile, and you can switch up the recipe to suit your tastes or dietary preferences. Here are some fun variations:
- Peanut Butter Layer: Add a layer of creamy peanut butter between the graham cracker crust and chocolate for a rich, nutty twist.
- Gluten-Free Version: Swap the graham crackers for gluten-free graham cracker crumbs or another gluten-free crumb base.
- Nutty Topping: Sprinkle crushed nuts, such as almonds, peanuts, or hazelnuts, on top of the marshmallow layer for added texture.
- Mint Chocolate: Use mint chocolate chips or add a drop of mint extract to the melted chocolate for a refreshing twist.
- S’mores Style: For an extra campfire feel, add a layer of crushed graham crackers on top of the marshmallows for a crunchier finish.
- Caramel Drizzle: Drizzle caramel sauce over the marshmallows for a gooey, sweet topping.
- Vegan Version: Use dairy-free chocolate and marshmallows for a vegan-friendly treat.
Freezing and Storage
To preserve the freshness of your Chocolate Marshmallow Squares, follow these storage tips:
- Refrigerate: Keep your squares in an airtight container in the fridge for up to 5 days. They will maintain their texture and flavor when chilled.
- Freezing: If you need to store them for longer, freeze the squares! Just wrap them individually in plastic wrap and place them in a freezer-safe bag. They’ll stay fresh in the freezer for up to 3 months.
- Thawing: Allow the squares to thaw at room temperature for about 10-15 minutes before serving.
Special Equipment
Here are a few kitchen tools that will come in handy when making Chocolate Marshmallow Squares:
- Baking Dish: An 8×8-inch baking dish works perfectly for this recipe.
- Parchment Paper: For easy removal, line your baking dish with parchment paper before pressing the graham cracker mixture.
- Microwave-Safe Bowl: For melting the chocolate chips and heavy cream.
- Spatula: To spread the chocolate layer evenly.
FAQ Section
Here are answers to some common questions about Chocolate Marshmallow Squares:
- Can I use regular marshmallows instead of mini marshmallows?
Yes! Regular-sized marshmallows can be used, just cut them into smaller pieces before topping the chocolate layer. - Do I have to refrigerate the squares?
Yes, the refrigerator helps set the layers and makes it easier to slice the squares. Without chilling, they may be too soft to cut neatly. - Can I add other toppings or mix-ins?
Absolutely! Feel free to experiment with different toppings like crushed candy bars, coconut flakes, or sprinkles for a fun twist. - How long do these squares last?
When stored properly in the fridge, they will last for up to 5 days. You can also freeze them for up to 3 months.

Chocolate Marshmallow Squares
- Total Time: 1 hour
Ingredients
For the Base:
- 2 cups graham cracker crumbs
- 1/4 cup sugar
- 1/2 cup unsalted butter (melted)
- 1 teaspoon vanilla extract
For the Chocolate Layer:
- 2 cups semi-sweet chocolate chips
- 1/2 cup heavy cream
For the Marshmallow Layer:
- 2 cups mini marshmallows
Instructions
Prepare the Base
- Mix the Graham Cracker Crumbs: In a medium-sized bowl, combine the graham cracker crumbs and sugar.
- Add Butter and Vanilla: Pour in the melted butter and vanilla extract, and stir until everything is well combined. The mixture should feel slightly wet but crumbly.
- Press Into the Pan: Transfer the graham cracker mixture into an 8×8-inch baking dish (lined with parchment paper for easy removal). Press the mixture firmly into the bottom to form an even base. You can use the back of a spoon or your hands to do this.
- Chill: Place the pan in the fridge for 15-20 minutes to allow the base to set before adding the next layer.
Make the Chocolate Layer
- Melt the Chocolate: In a microwave-safe bowl, combine the semi-sweet chocolate chips and heavy cream. Microwave in 20-30 second intervals, stirring in between, until the chocolate is smooth and fully melted.
- Pour the Chocolate: Once melted, pour the chocolate over the graham cracker base. Use a spatula to spread it evenly, covering the entire surface.
- Chill Again: Place the pan back in the fridge for 15-20 minutes, or until the chocolate layer has firmed up slightly.
Add the Marshmallows
- Top with Marshmallows: Once the chocolate layer has set, remove the pan from the fridge. Sprinkle the mini marshmallows evenly over the chocolate layer.
- Press Down Gently: Press the marshmallows into the chocolate layer slightly so they don’t just sit on top. This will help them stay in place when you slice the squares later.
- Final Chill: Put the pan back into the fridge for at least 45 minutes or until the squares are firm enough to cut.
- Prep Time: 15 min.
- Chill Time: 45 min.
Nutrition
- Serving Size: 16 squares
- Calories: 200 kcal
- Fat: 10g
- Carbohydrates: 31g
- Fiber: 1g
- Protein: 2g
Conclusion
There’s nothing quite like a Chocolate Marshmallow Square to satisfy your sweet tooth! With their gooey marshmallow top, creamy chocolate layer, and crunchy graham cracker base, these squares are a dessert everyone can agree on. They’re perfect for any occasion, and you can make them ahead of time, too!
So go ahead—give this recipe a try! Your family and friends are sure to love them. Don’t forget to snap a photo and tag me on social media—I love seeing your delicious creations!

