Introduction
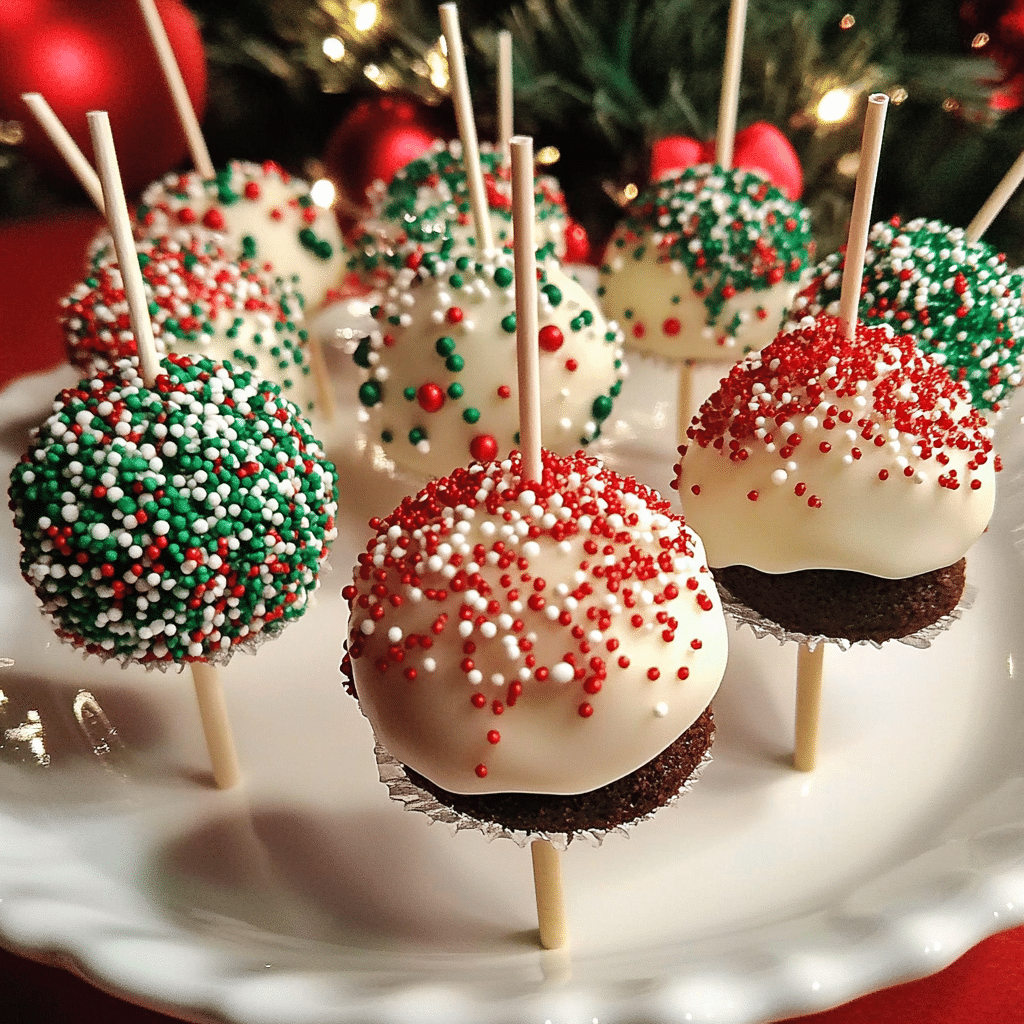
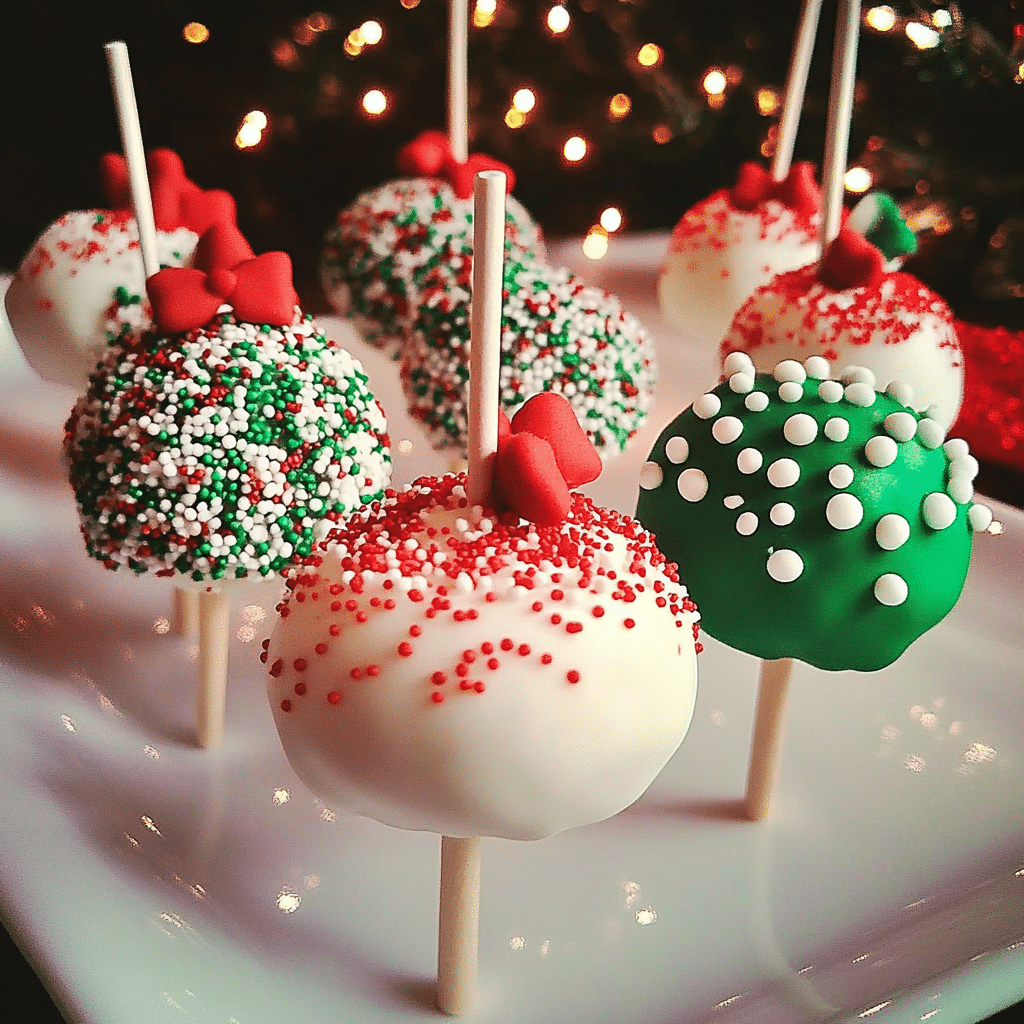
Get ready to spread some holiday cheer with Christmas Cake Pops! These adorable, festive bites are the perfect way to enjoy cake in a fun, portable form. Covered in colorful coatings and topped with sprinkles, they’re sure to be the star of any holiday gathering. Whether you’re attending a holiday party, having a cozy family night, or gifting a homemade treat, these cake pops will bring smiles to everyone’s face.
The best part? These little treats are as fun to make as they are to eat! With just a handful of ingredients and a dash of holiday spirit, you can whip up a batch of merry cake pops in no time. You’ll start by baking your favorite cake, then crumble it up and mix it with frosting for that perfect, cake-pop consistency. After rolling them into balls and dipping them into colorful coatings (think red, green, and even white chocolate!), top them off with festive sprinkles, mini candy canes, or even a drizzle of extra chocolate for that little finishing touch.
These cake pops are not only a visual delight but also a bite-sized party for your taste buds. The rich cake and creamy frosting combo will have everyone coming back for more. Whether you’re making them for your own holiday celebration or gifting them to someone special, these Christmas Cake Pops are sure to become a new tradition. Let’s get baking, and get ready to share some holiday sweetness!
Why You’ll Love This Recipe
Here’s why Christmas Cake Pops will be your new holiday favorite:
- Festive and Fun: These cake pops are perfect for the holiday season, featuring bright colors and festive designs.
- Kid-Friendly: Let the little ones get involved! Rolling the cake pops is a fun activity for kids to help with.
- Super Customizable: From snowflakes to Santa hats, the decorations are endless – make them as simple or as elaborate as you like.
- Perfect for Gifting: Package these cake pops in little treat bags for a sweet and thoughtful homemade gift.
- Simple Ingredients: You only need a few ingredients to make these cake pops, and they’re easy to assemble.
- No Special Tools Required: You don’t need any fancy equipment – just basic kitchen items to create these delightful treats.
- Great for Parties: Serve them on a festive tray or display them in a cute holiday jar for your next celebration.
- Portable and Mess-Free: These bite-sized treats are easy to take on the go, with no mess or fuss.
- Perfect for All Ages: Whether you’re hosting a family gathering or a holiday office party, everyone will enjoy these treats.
- Make-Ahead Option: Bake the cake and form the pops ahead of time, then dip and decorate them just before serving for convenience.
Preparation Time and Cook Time
- Total Time: 1 hour
- Preparation Time: 25 minutes
- Cook Time: 30 minutes
- Cooling Time: 10 minutes
- Servings: 12 cake pops
- Calories per cake pop: Approximately 150 calories
- Key Nutrients: Fiber: 1g, Fat: 7g, Carbohydrates: 20g, Protein: 2g
Ingredients
Gather the following ingredients to create your Christmas Cake Pops:
For the Cake:
- 1 box vanilla or chocolate cake mix
- 3 large eggs
- 1 cup water
- 1/2 cup vegetable oil
the Frosting:
- 1 cup buttercream frosting (store-bought or homemade)
For the Coating:
- 1 1/2 cups white or milk chocolate, melted (for dipping)
- Holiday sprinkles or decorations (like edible glitter, mini candy canes, or colored sugar)
Ingredient Highlights
- Cake Mix: A quick way to create a soft, moist cake base without any fuss.
- Buttercream Frosting: Adds richness and moisture, making the cake pops soft and flavorful.
- White or Milk Chocolate: Coating the cake pops in chocolate creates a beautiful and delicious outer shell.
- Holiday Sprinkles: Sprinkles, colored sugars, or mini candies give the cake pops a cheerful and festive look.
Step-by-Step Instructions
Follow these steps to create your Christmas Cake Pops:
Prepare the Cake
- Preheat Oven: Preheat your oven to 350°F (175°C). Grease and flour a cake pan, or line it with parchment paper.
- Mix the Cake Batter: In a large mixing bowl, combine the cake mix, eggs, water, and vegetable oil. Mix until smooth and well combined.
- Bake the Cake: Pour the batter into the prepared pan and bake for 25-30 minutes, or until a toothpick inserted comes out clean.
- Cool the Cake: Allow the cake to cool completely in the pan before removing it.
Make the Cake Pop Mixture
- Crumble the Cake: Once the cake has cooled, use your hands or a fork to crumble the cake into small pieces in a large bowl.
- Add Frosting: Add buttercream frosting to the crumbled cake a little at a time, mixing until you have a dough-like consistency.
- Form the Cake Pops: Roll small portions of the cake mixture into bite-sized balls and place them on a baking sheet lined with parchment paper.
Coat the Cake Pops
- Melt the Chocolate: Melt the white or milk chocolate in the microwave, stirring every 20 seconds until smooth.
- Dip the Cake Pops: Carefully dip the end of each cake pop stick into the melted chocolate and then insert it into the center of each cake ball. This helps the stick stay in place.
- Dip and Decorate: Dip each cake pop into the melted chocolate, coating it completely. While the chocolate is still wet, add your favorite holiday sprinkles, edible glitter, or mini candy canes for a festive touch.
How to Serve
Here are some creative ideas for serving your Christmas Cake Pops:
- Display in a Festive Jar: Stand your cake pops upright in a jar or vase filled with holiday-themed filler, like fake snow or colorful beads.
- Serve on a Platter: Arrange the cake pops on a beautiful holiday platter for a charming display.
- Gift-Wrapped Goodies: Package individual cake pops in clear bags tied with festive ribbon for a cute and personalized holiday gift.
- Create a Cake Pop Tree: Arrange the pops in a cone-shaped foam structure to create a cake pop Christmas tree.
- On a Dessert Table: Add these cake pops to your holiday dessert table for a sweet touch among cookies, cupcakes, and other treats.
- Pair with Hot Cocoa: Serve with a warm cup of hot chocolate for the ultimate holiday treat experience.
- Cake Pop Bouquet: Arrange the cake pops in a bouquet style in a vase for a unique, edible centerpiece.
- Holiday Cookie Exchange: Share them at a holiday cookie exchange for a fun twist on the traditional event.
Additional Tips
Maximize your enjoyment of Christmas Cake Pops with these helpful tips:
- Bake Ahead: Bake the cake and form the cake pops a day in advance, then dip and decorate them on the day of your event for convenience.
- Use Quality Chocolate: For the best coating, opt for high-quality chocolate or candy melts.
- Let Cake Pops Cool Completely: Make sure your cake pops are fully cool before dipping them into the chocolate to prevent melting.
- Store Properly: Keep the cake pops in an airtight container at room temperature for up to a week.
- Play with Flavors: Try different cake flavors, like red velvet or spice cake, to add variety to your pops.
- Get Creative with Decorations: Use fun holiday decorations, like mini marshmallows for snowballs, to give each cake pop a unique look.
- Freeze for Later: You can freeze uncoated cake pops for up to a month. Just thaw and dip them in chocolate when you’re ready to serve.
- Make Mini Pops: Use smaller portions of cake to make mini cake pops for bite-sized fun.
- Personalize: Add a little message or tag to each cake pop for a personalized touch at holiday parties or as gifts.
Recipe Variations
Consider these fun variations for your Christmas Cake Pops:
- Gingerbread Cake Pops: Use gingerbread cake mix for a spiced, festive twist.
- Chocolate Mint Cake Pops: Add peppermint extract to the cake or frosting for a refreshing flavor.
- Red Velvet Cake Pops: Swap the vanilla cake for red velvet for a rich, festive look.
- Mini Pops: Make mini cake pops with smaller portions of cake for a bite-sized treat.
- Filled Cake Pops: Add a surprise filling like caramel, chocolate ganache, or fruit jam inside the cake ball.
- Vegan Option: Use a dairy-free cake mix and vegan frosting for a plant-based version.
Freezing and Storage
Ensure proper storage to maintain the quality of your Christmas Cake Pops:
- Storage: Store leftover cake pops in an airtight container at room temperature for up to a week.
- Refrigerate: If you live in a warm climate, store cake pops in the fridge to keep the coating firm.
- Freezing: Uncoated cake pops can be frozen for up to a month. Wrap them individually in plastic wrap and place them in a freezer-safe bag.
- Thawing: Thaw frozen cake pops at room temperature before dipping in chocolate.
Special Equipment
You may need these kitchen tools to create your Christmas Cake Pops:
- Cake Pan: For baking the cake.
- Mixing Bowls: For mixing the cake batter and frosting.
- Cake Pop Sticks: For dipping and decorating the cake pops.
- Microwave Safe Bowl: For melting the chocolate coating.
- Spatula or Knife: For dipping and decorating the cake pops.
- Serving Tray or Vase: For displaying your cake pops.
FAQ Section
Here are answers to common questions about Christmas Cake Pops:
- What other coatings can I use? You can use white chocolate, dark chocolate, or candy melts. Experiment with different flavors to create unique pops.
- How do I prevent the cake pops from falling off the stick? Dip the stick in melted chocolate before inserting it into the cake pop to help it stay in place.

Christmas Cake Pops
- Total Time: 1 hour
Ingredients
For the Cake:
- 1 box vanilla or chocolate cake mix
- 3 large eggs
- 1 cup water
- 1/2 cup vegetable oil
For the Frosting:
- 1 cup buttercream frosting (store-bought or homemade)
For the Coating:
- 1 1/2 cups white or milk chocolate, melted (for dipping)
- Holiday sprinkles or decorations (like edible glitter, mini candy canes, or colored sugar)
Instructions
Prepare the Cake
- Preheat Oven: Preheat your oven to 350°F (175°C). Grease and flour a cake pan, or line it with parchment paper.
- Mix the Cake Batter: In a large mixing bowl, combine the cake mix, eggs, water, and vegetable oil. Mix until smooth and well combined.
- Bake the Cake: Pour the batter into the prepared pan and bake for 25-30 minutes, or until a toothpick inserted comes out clean.
- Cool the Cake: Allow the cake to cool completely in the pan before removing it.
Make the Cake Pop Mixture
- Crumble the Cake: Once the cake has cooled, use your hands or a fork to crumble the cake into small pieces in a large bowl.
- Add Frosting: Add buttercream frosting to the crumbled cake a little at a time, mixing until you have a dough-like consistency.
- Form the Cake Pops: Roll small portions of the cake mixture into bite-sized balls and place them on a baking sheet lined with parchment paper.
Coat the Cake Pops
- Melt the Chocolate: Melt the white or milk chocolate in the microwave, stirring every 20 seconds until smooth.
- Dip the Cake Pops: Carefully dip the end of each cake pop stick into the melted chocolate and then insert it into the center of each cake ball. This helps the stick stay in place.
- Dip and Decorate: Dip each cake pop into the melted chocolate, coating it completely. While the chocolate is still wet, add your favorite holiday sprinkles, edible glitter, or mini candy canes for a festive touch.
- Prep Time: 25 min.
- Cook Time: 30 min.
Nutrition
- Serving Size: 12 cake pops
- Calories: 150 kcal
- Fat: 7g
- Carbohydrates: 20g
- Fiber: 1g
- Protein: 2g
Conclusion
These Christmas Cake Pops are the perfect way to add a festive touch to your holiday celebrations. With their moist, flavorful cake center and colorful decorations, they’re a fun and easy treat that everyone will love. Whether you’re creating them for a party, a family gathering, or as a homemade gift, these adorable cake pops are sure to brighten anyone’s day.
The best part? You can get as creative as you want with your decorations, making each pop uniquely yours. From sprinkles to candy canes, the possibilities are endless!
Don’t forget to snap a photo and tag me on social media – I love seeing your delicious creations! Happy holidays and happy baking!

