Introduction
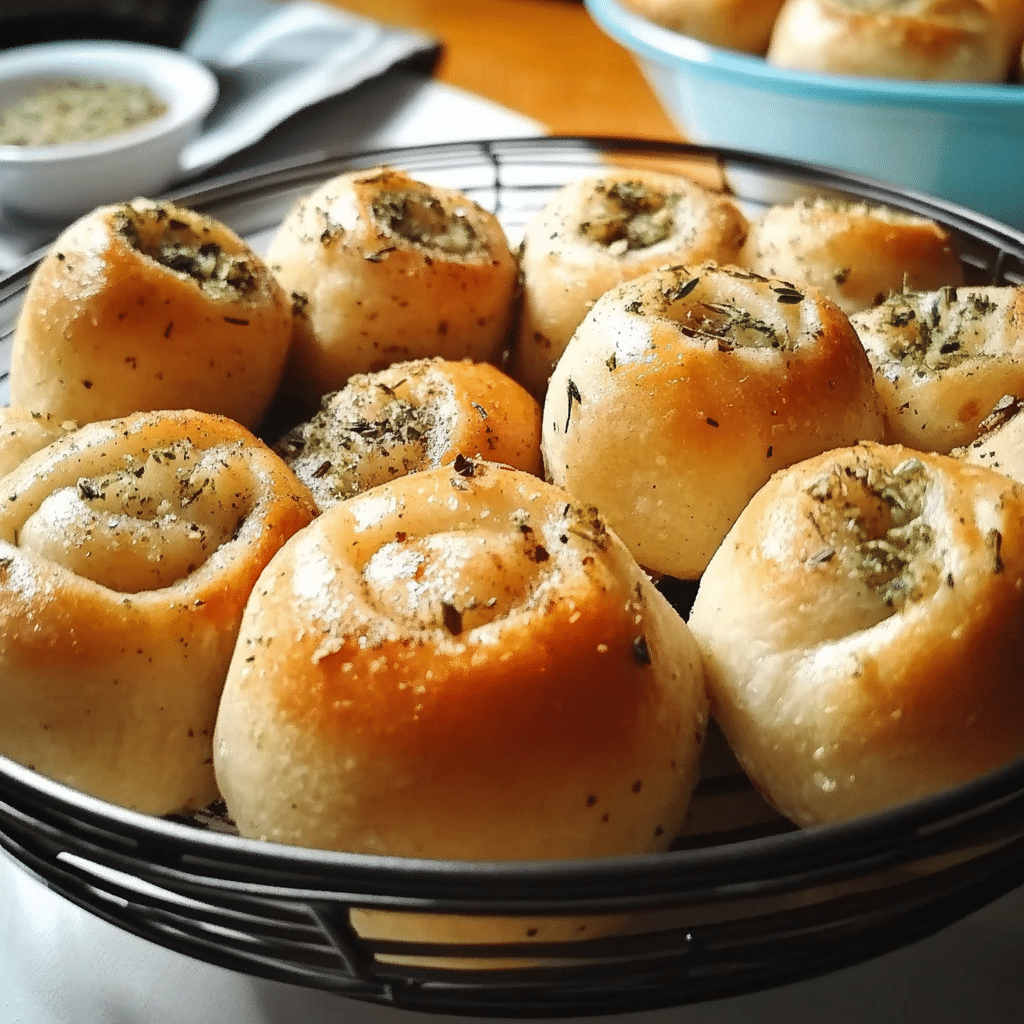
Get ready to elevate your mealtime with these delightful Herb Rolls! Soft, fluffy, and packed with aromatic herbs, these rolls are perfect for any occasion—from family dinners to festive gatherings. They’re easy to make and bring a touch of homemade warmth to your table. Serve them alongside soups, salads, or as a delicious base for sandwiches. With simple ingredients and a little time, you can whip up a batch of these heavenly rolls that are sure to impress your family and friends!

Why You’ll Love This Recipe
Here are several reasons to fall in love with Herb Rolls:
- Aromatic Flavor: Fresh herbs add a burst of flavor that complements any meal.
- Soft and Fluffy: The texture of these rolls is light and airy, making them irresistible.
- Versatile: Perfect for pairing with soups, salads, or as a sandwich base.
- Easy to Make: Simple ingredients and clear instructions make this a hassle-free recipe.
- Great for Meal Prep: Bake a batch and enjoy them throughout the week.
- Customizable: Feel free to mix and match herbs to suit your taste.
- Perfect for Any Occasion: Whether it’s a holiday feast or a casual dinner, these rolls fit right in.
- No Special Equipment Needed: You can make these rolls with basic kitchen tools.
- Family-Friendly: Kids and adults alike will enjoy the fresh flavors of these rolls.
- Impressive Homemade Touch: Homemade bread adds a personal touch to your meals.
Preparation Time and Cook Time
- Total Time: 2 hours
- Preparation Time: 30 minutes
- Cook Time: 25 minutes
- Rising Time: 1 hour
- Servings: 12 rolls
- Calories per roll: Approximately 150 calories
- Key Nutrients: Fiber: 1g, Fat: 3g, Carbohydrates: 27g, Protein: 4g
Ingredients
Gather the following ingredients to create your Herb Rolls:
For the Dough:
- 4 cups all-purpose flour
- 2 1/4 teaspoons (1 packet) active dry yeast
- 1 tablespoon sugar
- 1 teaspoon salt
- 1 cup warm water (110°F/45°C)
- 1/4 cup olive oil
- 1/4 cup fresh herbs (such as rosemary, thyme, or parsley), chopped
Ingredient Highlights
- Active Dry Yeast: This helps the dough rise and gives the rolls their fluffy texture.
- Fresh Herbs: A mix of herbs adds depth of flavor and a fragrant aroma to the rolls.
- Olive Oil: Provides moisture and richness to the dough.
Step-by-Step Instructions
Follow these steps to create your Herb Rolls:
Prepare the Dough
- Activate Yeast: In a small bowl, combine warm water, sugar, and yeast. Let it sit for about 5-10 minutes until frothy.
- Mix Dry Ingredients: In a large mixing bowl, whisk together the flour and salt.
- Combine Ingredients: Add the yeast mixture and olive oil to the flour mixture. Stir until a dough begins to form.
- Add Herbs: Fold in the chopped fresh herbs until evenly distributed.
- Knead the Dough: Transfer the dough to a floured surface and knead for about 5-7 minutes until smooth and elastic.
- First Rise: Place the dough in a lightly greased bowl, cover with a clean cloth, and let it rise in a warm place for about 1 hour or until doubled in size.
Shape the Rolls
- Preheat Oven: Preheat your oven to 375°F (190°C).
- Punch Down Dough: Once the dough has risen, punch it down to release air.
- Divide the Dough: Cut the dough into 12 equal pieces and shape each piece into a ball.
- Second Rise: Place the rolls on a greased baking sheet, cover them with a cloth, and let them rise for another 30 minutes.
Bake the Rolls
- Bake: Bake the rolls in the preheated oven for 20-25 minutes, or until golden brown.
- Cool: Remove from the oven and allow the rolls to cool on a wire rack.
How to Serve
Here are some fun serving ideas for your Herb Rolls:
- Warm from the Oven: Serve rolls warm for the best flavor and texture.
- Butter or Olive Oil: Provide softened butter or olive oil for dipping.
- Serve with Soups: Pair with your favorite soups or stews for a comforting meal.
- Make Mini Sandwiches: Use rolls to create mini sandwiches with deli meats and cheeses.
- Garnish with Extra Herbs: Sprinkle additional fresh herbs on top for a beautiful presentation.
- Add Cheese: Top the rolls with grated cheese before baking for a cheesy twist.
- Serve with Salad: Pair with a fresh garden salad for a complete meal.
- Create a Bread Basket: Arrange rolls in a bread basket lined with a cloth for an inviting touch.
- Wrap for Gifts: Wrap rolls in parchment paper and tie with twine for a thoughtful gift.
- Perfect for Picnics: Pack rolls for a delicious addition to a picnic or potluck.
Additional Tips
Maximize your enjoyment of Herb Rolls with these helpful tips:
- Use Fresh Herbs: Fresh herbs will provide the best flavor. Adjust the amount based on your taste preference.
- Experiment with Flavors: Try different herb combinations like basil, chives, or dill for variety.
- Make Ahead: Prepare the dough in advance and store it in the fridge for up to 24 hours before baking.
- Check for Doneness: The rolls are done when they sound hollow when tapped on the bottom.
- Store Properly: Keep leftover rolls in an airtight container at room temperature for up to 2 days.
- Reheat Rolls: Warm leftover rolls in the oven at 350°F (175°C) for a few minutes to refresh them.
- Use Bread Flour: For a chewier texture, substitute bread flour for all-purpose flour.
- Add Garlic: Incorporate minced garlic for an extra layer of flavor.
- Use a Baking Stone: For a crustier exterior, bake rolls on a preheated baking stone.
- Top with Sea Salt: Sprinkle sea salt on top before baking for a delightful finish.
Recipe Variations
Consider these creative variations for your Herb Rolls:
- Cheesy Herb Rolls: Add shredded cheese into the dough for a cheesy surprise.
- Whole Wheat Option: Substitute half the all-purpose flour with whole wheat flour for a healthier twist.
- Spicy Kick: Incorporate red pepper flakes or minced jalapeños for a spicy version.
- Sweet Herb Rolls: Add a tablespoon of honey to the dough for a hint of sweetness.
- Stuffed Rolls: Fill the rolls with pesto or olive tapenade before shaping them.
- Herb Butter: Brush warm rolls with herb-infused butter for an extra flavor boost.
- Dried Herbs: Use dried herbs if fresh ones aren’t available—just use less, as they’re more concentrated.
- Garlic Herb Rolls: Mix in minced garlic and Italian seasoning for a garlicky flavor.
- Herb Garlic Butter Rolls: Spread herb-infused garlic butter over the rolls after baking.
- Mini Rolls: Create smaller rolls for bite-sized treats.
Freezing and Storage
Ensure proper storage to maintain the quality of your Herb Rolls:
- Storage: Keep any leftover rolls in an airtight container at room temperature for up to 2 days.
- Refrigerate: If you live in a warm climate, store rolls in the refrigerator to keep them fresh.
- Freezing: Freeze unfrosted rolls in an airtight container for up to 3 months. Thaw at room temperature when ready to eat.
- Reheat Frozen Rolls: For best results, reheat frozen rolls in the oven to restore their texture.
Special Equipment
You may need these kitchen tools to create your Herb Rolls:
- Mixing Bowls: For combining the dough ingredients.
- Baking Sheet: For baking the rolls.
- Measuring Cups and Spoons: To accurately measure ingredients.
- Mixing Spoon or Dough Hook: For mixing and kneading the dough.
- Plastic Wrap: To cover the dough while it rises.
- Wire Rack: For cooling the rolls after baking.
FAQ Section
Here are answers to common questions about Herb Rolls:
- Can I use instant yeast instead of active dry yeast?
Yes, use instant yeast without the need for activation—just mix it with the dry ingredients. - How long can I store the rolls?
They can be stored at room temperature for up to 2 days or in the refrigerator for up to a week. - Can I freeze these rolls?
Yes, unfrosted rolls can be frozen. Just make sure to wrap them well. - How do I know when the rolls are done?
The rolls are done when they’re golden brown on top and sound hollow when tapped on the bottom. - Can I add other ingredients to the dough?
Absolutely! Feel free to add in things like cheese, olives, or sundried tomatoes for added flavor. - Can I make these rolls ahead of time?
Yes, you can prepare the dough in advance and store it in the refrigerator for up to 24 hours before shaping and baking.

Herb Rolls
- Total Time: 2 hrs.
Ingredients
For the Dough:
- 4 cups all-purpose flour
- 2 1/4 teaspoons (1 packet) active dry yeast
- 1 tablespoon sugar
- 1 teaspoon salt
- 1 cup warm water (110°F/45°C)
- 1/4 cup olive oil
- 1/4 cup fresh herbs (such as rosemary, thyme, or parsley), chopped
Instructions
Prepare the Dough
- Activate Yeast: In a small bowl, combine warm water, sugar, and yeast. Let it sit for about 5-10 minutes until frothy.
- Mix Dry Ingredients: In a large mixing bowl, whisk together the flour and salt.
- Combine Ingredients: Add the yeast mixture and olive oil to the flour mixture. Stir until a dough begins to form.
- Add Herbs: Fold in the chopped fresh herbs until evenly distributed.
- Knead the Dough: Transfer the dough to a floured surface and knead for about 5-7 minutes until smooth and elastic.
- First Rise: Place the dough in a lightly greased bowl, cover with a clean cloth, and let it rise in a warm place for about 1 hour or until doubled in size.
Shape the Rolls
- Preheat Oven: Preheat your oven to 375°F (190°C).
- Punch Down Dough: Once the dough has risen, punch it down to release air.
- Divide the Dough: Cut the dough into 12 equal pieces and shape each piece into a ball.
- Second Rise: Place the rolls on a greased baking sheet, cover them with a cloth, and let them rise for another 30 minutes.
Bake the Rolls
- Bake: Bake the rolls in the preheated oven for 20-25 minutes, or until golden brown.
- Cool: Remove from the oven and allow the rolls to cool on a wire rack.
- Prep Time: 25 min.
- Cook Time: 30 min.
Nutrition
- Serving Size: 12 rolls
- Calories: 150 kcal
- Fat: 3g
- Carbohydrates: 27g
- Fiber: 1g
- Protein: 4g
Conclusion
I can’t wait for you to try these Herb Rolls! They’re not just about flavor; they’re about creating moments around the dinner table. Imagine the smiles as you pull them from the oven, their warm aroma filling your kitchen and enticing everyone to gather ’round. I’d love to hear how your rolls turn out! Did you stick with the classic herbs, or did you add your own twist?
Don’t forget to snap a photo of your delicious creations and share them on social media! You can tag me on Instagram—I genuinely enjoy seeing how you put your own spin on the recipes. And if you have any questions along the way or need a little encouragement, feel free to drop a comment. Let’s celebrate the joy of baking together! Happy rolling!

