Introduction
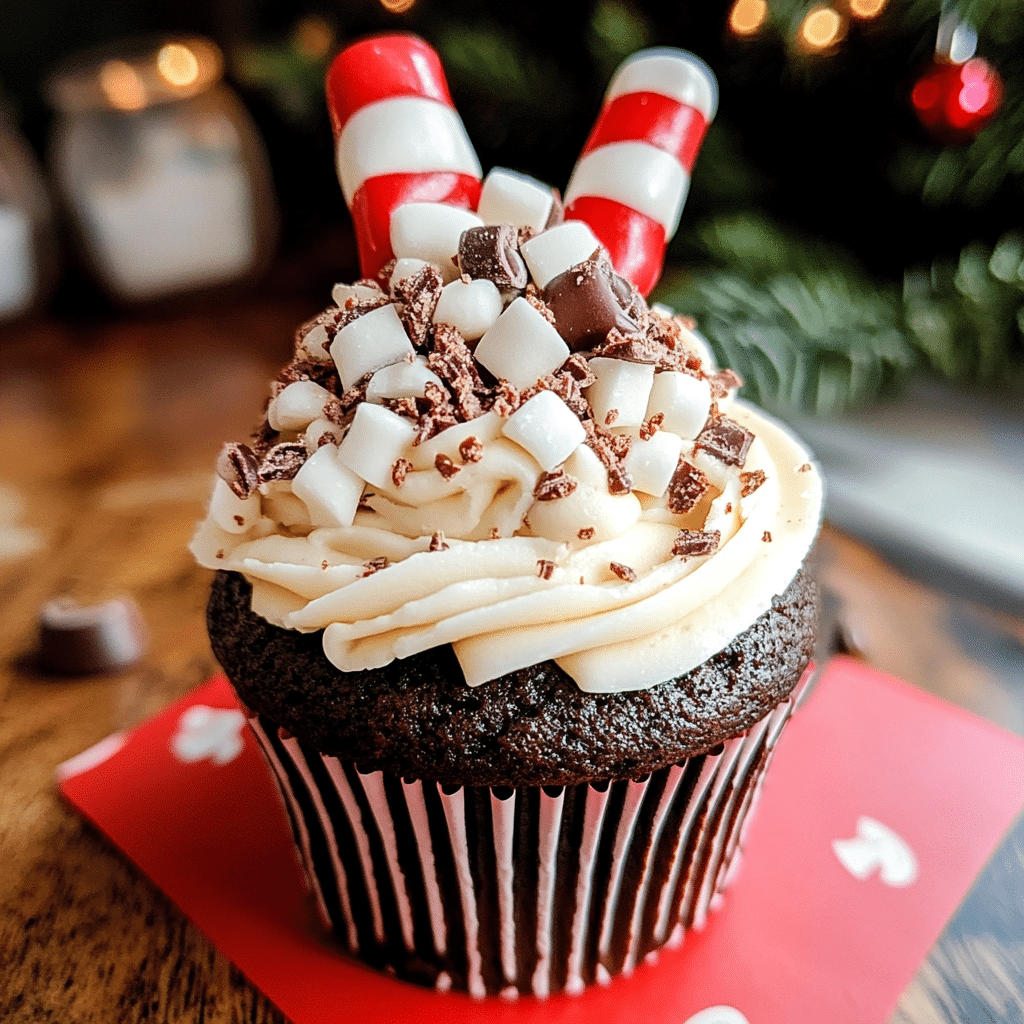
There’s something magical about a warm mug of hot cocoa on a chilly day, and these Hot Cocoa Cupcake Mugs bring that cozy feeling to a whole new level! Imagine enjoying the rich, comforting taste of hot cocoa, but in cupcake form – complete with marshmallow “mugs” to hold it all together. Perfect for cold-weather gatherings, holiday parties, or simply indulging in a sweet treat that feels like a hug in dessert form, these cupcakes are sure to steal the show. Whether you’re a seasoned baker or just starting out, this simple yet creative recipe will have you serving up deliciously warm smiles in no time!
Why You’ll Love This Recipe
Here’s why Hot Cocoa Cupcake Mugs will quickly become your new favorite dessert:
- Perfect for Cozy Days: They’re the ideal treat to make on a cold day when all you want is something comforting.
- Unique Presentation: The idea of turning hot cocoa into cupcakes – complete with marshmallows as handles – is as creative as it is fun.
- Deliciously Chocolatey: The cupcakes are moist, chocolatey, and topped with rich frosting, making every bite feel like the ultimate indulgence.
- Kid-Friendly Fun: Kids will love helping to decorate and “drink” their cupcakes. It’s a great family activity!
- Quick and Easy: The ingredients are simple, and the steps are straightforward, meaning you don’t need to spend hours in the kitchen.
- Customizable: You can decorate the cupcakes to match your theme or personal taste, from sprinkles to different frosting colors.
- No Special Equipment Needed: You only need basic baking tools to make these cupcakes, making it a hassle-free experience.
- Perfect for Holiday Treats: These cupcakes are perfect for Christmas, winter parties, or just when you need a little extra cheer in your life.
Preparation Time and Cook Time
- Total Time: 1 hour
- Preparation Time: 15 minutes
- Cook Time: 20-25 minutes
- Cooling Time: 10-15 minutes
- Servings: 12 cupcakes
- Calories per cupcake: Approximately 280 calories
- Key Nutrients: Fiber: 2g, Fat: 12g, Carbohydrates: 38g, Protein: 3g
Ingredients
Gather the following ingredients to make your Hot Cocoa Cupcake Mugs:
For the Cupcakes:
- 1 box chocolate cake mix
- 3 large eggs
- 1 cup water
- 1/2 cup vegetable oil
- 1 teaspoon vanilla extract
- 1/2 cup mini marshmallows (for the cupcakes)
the Frosting:
- 1 cup chocolate buttercream frosting (store-bought or homemade)
- 1/2 cup mini marshmallows (for topping)
For the Mug Handles:
- 12 marshmallow sticks (large marshmallows cut in half, or use mini marshmallows and pretzel sticks)
Ingredient Highlights
- Chocolate Cake Mix: A convenient base for these cupcakes that ensures rich, moist results every time.
- Chocolate Buttercream Frosting: A sweet, creamy frosting that adds extra indulgence to the cupcakes.
- Mini Marshmallows: These fluffy treats are a nod to the classic hot cocoa topping and add both texture and sweetness.
- Marshmallow Sticks: The perfect way to mimic a cup handle, making the cupcakes even more fun and festive!
Step-by-Step Instructions
Follow these simple steps to create your Hot Cocoa Cupcake Mugs:
Prepare the Cupcakes
- Preheat the Oven: Preheat your oven to 350°F (175°C). Line a cupcake pan with paper liners.
- Mix the Batter: In a large mixing bowl, combine the chocolate cake mix, eggs, water, vegetable oil, and vanilla extract. Mix until smooth and fully combined.
- Add Marshmallows: Stir in the mini marshmallows. They will melt slightly during baking, adding a soft, gooey texture to the cupcakes.
- Fill the Cupcake Liners: Pour the batter into the cupcake liners, filling each about two-thirds full.
- Bake: Bake in the preheated oven for 20-25 minutes, or until a toothpick inserted into the center comes out clean.
- Cool: Allow the cupcakes to cool in the pan for 10 minutes before transferring them to a wire rack to cool completely.
Frost the Cupcakes
- Prepare the Frosting: Once the cupcakes have cooled, spread a generous amount of chocolate buttercream frosting on top of each cupcake.
- Top with Marshmallows: Place mini marshmallows on top of the frosting, gently pressing them in to create a “mug” look.
Assemble the Mug Handles
- Prepare the Marshmallow Sticks: Cut the large marshmallows in half (or use mini marshmallows and pretzel sticks for a sturdier option).
- Attach the Handles: Gently press the marshmallow halves into the sides of the cupcakes to create the mug handles. Make sure they’re secure but don’t push too hard, as you want them to look like they’re attached to the frosting.
- Optional Touches: You can also dip the edges of the marshmallows in chocolate or sprinkle with cocoa powder for a little extra flair.
How to Serve
Here are some fun ways to serve your Hot Cocoa Cupcake Mugs:
- Display on a Holiday Dessert Table: These cupcakes are perfect for a festive dessert table at holiday parties or winter gatherings.
- Serve with Hot Chocolate: Serve each cupcake with a cup of hot chocolate to truly capture the essence of a cozy, winter treat.
- Use Festive Plates: Place each cupcake on a cute, holiday-themed plate for added charm.
- Set Up a Cupcake Bar: Allow guests to decorate their cupcakes with extra marshmallows, sprinkles, or drizzle with chocolate sauce.
- Wrap for Gift Giving: Wrap each cupcake in clear bags with a holiday ribbon and give them as sweet, homemade gifts.
Additional Tips
Maximize your enjoyment of Hot Cocoa Cupcake Mugs with these helpful tips:
- Bake Ahead: You can bake the cupcakes a day ahead and store them in an airtight container. Frost and decorate just before serving.
- Use Homemade Frosting: For an extra indulgent treat, make your own chocolate buttercream frosting. It’s easy and adds a homemade touch.
- Don’t Overbake: Keep an eye on the cupcakes while they bake to avoid drying them out. They’re done when a toothpick comes out clean or with just a few crumbs.
- Keep Marshmallows Fresh: To keep the marshmallows fluffy and fresh, avoid storing them in a humid environment.
- Decorate with Extras: Add a drizzle of caramel or melted chocolate for an extra indulgent treat. Or, top with crushed candy canes for a holiday twist!
Recipe Variations
Switch things up with these fun variations on your Hot Cocoa Cupcake Mugs:
- Peppermint Cupcakes: Add a hint of peppermint extract to the cupcake batter and frosting for a refreshing twist on hot cocoa.
- Mini Cupcakes: Make mini versions of these cupcakes for bite-sized treats that are perfect for parties or snack time.
- Nutella Frosting: Swap out the chocolate frosting for Nutella frosting for a hazelnut chocolate flavor that’s irresistible.
- Gluten-Free Option: Use a gluten-free chocolate cake mix to make these cupcakes gluten-free.
- Add Nuts: Fold chopped nuts, such as pecans or walnuts, into the batter for added texture and flavor.
- Hot Cocoa Filling: Create a hot cocoa filling by adding a spoonful of hot cocoa mix to the batter for an extra chocolatey surprise.
Freezing and Storage
To make sure your Hot Cocoa Cupcake Mugs stay fresh, follow these storage tips:
- Storage: Keep cupcakes in an airtight container at room temperature for up to 3 days.
- Refrigerate Frosted Cupcakes: If you live in a warm climate, store the frosted cupcakes in the refrigerator to prevent the frosting from melting.
- Freezing: Unfrosted cupcakes can be frozen for up to 3 months. Wrap them tightly in plastic wrap and store in a freezer-safe bag.
- Thawing: Allow frozen cupcakes to thaw at room temperature before frosting and serving.
Special Equipment
You’ll need the following kitchen tools to create your Hot Cocoa Cupcake Mugs:
- Cupcake Pan: For baking the cupcakes.
- Paper Liners: To line the cupcake pan.
- Mixing Bowls: For combining the cupcake batter and frosting.
- Whisk or Electric Mixer: To mix the cake batter and frosting.
- Spatula or Knife: For frosting the cupcakes.
- Marshmallows: To create the mug handles.
- Serving Platter: To display your delicious cupcakes.
FAQ Section
Here are answers to common questions about Hot Cocoa Cupcake Mugs:
- Can I use homemade cake instead of box mix?
Yes, you can use your favorite homemade chocolate cake recipe instead of a box mix. Just make sure the batter is thick enough to hold the marshmallows. - How do I make the marshmallow handles stay on?
To make sure the marshmallow handles stay put, gently press them into the frosting, and allow the frosting to set before handling the cupcakes. - Can I add hot cocoa powder to the batter?
Yes, for an extra cocoa flavor, you can add a tablespoon or two of hot cocoa powder to the cupcake batter. - How do I store leftover cupcakes?
Store leftover cupcakes in an airtight container at room temperature for up to 3 days.

Hot Cocoa Cupcake Mugs
- Total Time: 1 hour
Ingredients
For the Cupcakes:
- 1 box chocolate cake mix
- 3 large eggs
- 1 cup water
- 1/2 cup vegetable oil
- 1 teaspoon vanilla extract
- 1/2 cup mini marshmallows (for the cupcakes)
For the Frosting:
- 1 cup chocolate buttercream frosting (store-bought or homemade)
- 1/2 cup mini marshmallows (for topping)
For the Mug Handles:
- 12 marshmallow sticks (large marshmallows cut in half, or use mini marshmallows and pretzel sticks)
Instructions
Prepare the Cupcakes
- Preheat the Oven: Preheat your oven to 350°F (175°C). Line a cupcake pan with paper liners.
- Mix the Batter: In a large mixing bowl, combine the chocolate cake mix, eggs, water, vegetable oil, and vanilla extract. Mix until smooth and fully combined.
- Add Marshmallows: Stir in the mini marshmallows. They will melt slightly during baking, adding a soft, gooey texture to the cupcakes.
- Fill the Cupcake Liners: Pour the batter into the cupcake liners, filling each about two-thirds full.
- Bake: Bake in the preheated oven for 20-25 minutes, or until a toothpick inserted into the center comes out clean.
- Cool: Allow the cupcakes to cool in the pan for 10 minutes before transferring them to a wire rack to cool completely.
Frost the Cupcakes
- Prepare the Frosting: Once the cupcakes have cooled, spread a generous amount of chocolate buttercream frosting on top of each cupcake.
- Top with Marshmallows: Place mini marshmallows on top of the frosting, gently pressing them in to create a “mug” look.
Assemble the Mug Handles
- Prepare the Marshmallow Sticks: Cut the large marshmallows in half (or use mini marshmallows and pretzel sticks for a sturdier option).
- Attach the Handles: Gently press the marshmallow halves into the sides of the cupcakes to create the mug handles. Make sure they’re secure but don’t push too hard, as you want them to look like they’re attached to the frosting.
- Optional Touches: You can also dip the edges of the marshmallows in chocolate or sprinkle with cocoa powder for a little extra flair.
- Prep Time: 15 min.
- Cooling Time: 10-15 min.
- Cook Time: 20-25 min.
Nutrition
- Serving Size: 12 cupcakes
- Calories: 280 kcal
- Fat: 12g
- Carbohydrates: 38g
- Fiber: 2g
- Protein: 3g
Conclusion
Hot Cocoa Cupcake Mugs are the ultimate winter treat! Whether you’re baking for a holiday party, a cozy family night, or just because you’re craving something sweet and comforting, these cupcakes are sure to impress. The rich, chocolatey cupcakes topped with marshmallow “mugs” bring the spirit of hot cocoa to life in the most delicious way. They’re easy to make, fun to decorate, and perfect for sharing with loved ones.
So, what are you waiting for? Try these Hot Cocoa Cupcake Mugs and don’t forget to snap a photo and tag me on social media – I love seeing your delicious creations!


