


Introduction
If you’re looking to add a bit of comfort and tradition to your meal, look no further than Korean Rice Balls (Jumeokbap). This simple yet flavorful dish is a staple in Korean households and provides a delightful balance of texture and taste. These rice balls, often made with a mix of warm rice, savory seasonings, and various fillings, are perfect for picnics, quick snacks, or even as a side dish to complement a larger meal. What makes these rice balls so special? They’re not just about the ingredients, but the love and care that go into shaping them by hand. Plus, they’re incredibly customizable, meaning you can experiment with different fillings and flavors to suit your tastes. Whether you’re new to Korean cuisine or a longtime fan, these rice balls are sure to become a favorite in your recipe collection.
Why You’ll Love This Recipe
Here’s why you’re going to love making Korean Rice Balls at home:
- Versatile: You can easily customize these rice balls with your favorite fillings and seasonings.
- Quick and Simple: With just a few ingredients, these rice balls come together quickly, making them perfect for busy days.
- Balanced Flavor: The combination of seasoned rice, savory fillings, and a touch of sesame oil creates a harmonious balance of flavors.
- Kid-Friendly: These rice balls are a fun and interactive dish for kids to help prepare, whether it’s shaping the rice or choosing their own fillings.
- Healthy Option: Packed with wholesome rice, vegetables, and lean proteins, these rice balls offer a nourishing and satisfying meal.
- Portable: Perfect for lunchboxes, picnics, or even as a grab-and-go snack.
- No Special Equipment Required: You don’t need fancy gadgets or complicated techniques—just your hands and a bowl.
- Perfect for Leftovers: Use leftover rice to create a meal the next day.
- Impressive Presentation: Despite their simplicity, these rice balls look great on any plate, adding a touch of elegance to any meal.
- Great for Meal Prep: These rice balls can be made ahead of time and stored for a few days in the fridge, making them a great meal prep option.
Preparation Time and Cook Time
- Total Time: 30 minutes
- Preparation Time: 10 minutes
- Cook Time: 20 minutes
- Servings: 10 rice balls
- Calories per rice ball: Approximately 180 calories
- Key Nutrients: Protein: 5g, Carbohydrates: 35g, Fat: 5g, Fiber: 2g
Ingredients
Here’s what you’ll need to make your own Korean Rice Balls:
For the Rice Balls:
- 2 cups cooked short-grain rice (preferably warm)
- 1/2 tablespoon sesame oil
- 1 tablespoon soy sauce
- 1 teaspoon sugar
- 1 tablespoon roasted seaweed (gim), crumbled
- 1 tablespoon sesame seeds
For the Fillings (Optional, but Recommended):
- 1/2 cup cooked ground beef or pork (optional)
- 1/4 cup finely chopped kimchi
- 1/4 cup cooked vegetables (spinach, carrots, or zucchini)
- 1 boiled egg (chopped)
- A pinch of salt (for seasoning)
Ingredient Highlights
- Short-Grain Rice: The sticky texture of short-grain rice is key to holding the rice balls together. It’s the perfect base for this dish.
- Sesame Oil: Adds a rich, nutty flavor that makes the rice balls irresistible.
- Roasted Seaweed: A common Korean seasoning, this brings a salty umami flavor that perfectly complements the rice.
- Soy Sauce: Adds depth and a savory touch to the rice mixture.
- Kimchi: A spicy, tangy addition that gives the rice balls a zingy kick.
Step-by-Step Instructions


Prepare the Rice
- Cook the Rice: Start by cooking 2 cups of short-grain rice. If you have leftover rice from a previous meal, it works great here! Warm rice is best for making rice balls as it sticks together more easily.
- Season the Rice: In a large bowl, combine the warm rice with sesame oil, soy sauce, and sugar. Mix gently to avoid mashing the rice while ensuring each grain is coated.
- Add the Seaweed and Sesame Seeds: Crumble the roasted seaweed into small pieces and stir it into the rice. Sprinkle in sesame seeds for added crunch and flavor. Set the rice mixture aside to cool slightly before shaping.
Prepare the Fillings (Optional)
While your rice cools slightly, prepare the fillings:
- Cook the Ground Meat: If you’re using ground beef or pork, sauté it in a pan with a little oil, seasoning it with salt, pepper, and soy sauce to taste. Once cooked, set it aside.
- Chop Vegetables and Kimchi: Finely chop any vegetables like spinach, carrots, or zucchini. If you’re using kimchi, chop it finely to incorporate into the rice easily.
- Boil the Egg: Boil an egg for about 10 minutes, then chop it into small pieces.
Shape the Rice Balls
Once your rice has cooled slightly (it should still be warm but not too hot to handle), it’s time to form the rice balls:
- Take a Portion of Rice: Using your hands, scoop out about 2 tablespoons of the seasoned rice. If you’re using fillings, press a little bit of your chosen filling into the center of the rice before closing it up.
- Form the Ball: Gently mold the rice into a round shape. You want them to be compact enough to hold together but not too tight that they become mushy. If you prefer, you can also shape them into an oval or triangular shape.
- Repeat: Continue forming rice balls until you’ve used all the rice and fillings.
Serve and Enjoy
Now that your Korean Rice Balls are ready, it’s time to serve them:
- Garnish with Seaweed: For an extra touch, you can sprinkle some extra crumbled seaweed or sesame seeds on top of the rice balls.
- Plate: Arrange the rice balls on a plate, or pack them in a lunchbox for a portable meal.
- Enjoy: Take a bite and enjoy the balance of savory, crunchy, and soft textures!

How to Serve
Here are a few ways you can serve your Korean Rice Balls:
- With a Side of Kimchi: Serve these rice balls with a side of spicy kimchi for a complete Korean meal.
- Lunchbox: These rice balls are perfect for lunchboxes, especially when you’re on the go or need something quick and satisfying.
- Picnics: They’re easy to transport and make an excellent picnic food. Just pack them in a container and you’re good to go.
- As a Snack: Enjoy them as a midday snack that’s both filling and nutritious.
- With Soup: Pair your rice balls with a bowl of miso soup or a warm broth for a comforting meal.
Additional Tips
To make your Korean Rice Balls even better, consider these tips:
- Use Fresh Rice: While leftover rice works, freshly cooked rice holds together better and has a softer texture.
- Cool the Rice Before Shaping: Allow the rice to cool slightly to avoid burning your hands while shaping the rice balls.
- Experiment with Fillings: Don’t be afraid to get creative with the fillings! Try using different types of pickled vegetables, tofu, or even cooked fish.
- Make Smaller Bites: If you’re serving a crowd, make mini rice balls for easy snacking.
- Try Seaweed Wraps: For an added touch, wrap the rice balls in a strip of roasted seaweed for extra flavor and a traditional touch.
Recipe Variations
Try these variations to mix things up:
- Spicy Rice Balls: Add some gochujang (Korean chili paste) to the rice mixture for a spicy kick.
- Vegetarian Version: Skip the meat and use a variety of vegetables like mushrooms, spinach, or radishes for a hearty vegetarian option.
- Sweet Rice Balls: For a sweeter version, mix a little honey or brown sugar into the rice and use sweet fillings like fruit or sweet red bean paste.
- Rice Ball Skewers: Thread the rice balls onto skewers for a fun and interactive meal, perfect for a picnic or barbecue.
Freezing and Storage
To store or freeze your Korean Rice Balls:
- Refrigerate: Store any leftover rice balls in an airtight container in the fridge for up to 3 days.
- Freeze: You can freeze the rice balls for up to a month. To freeze, place the rice balls on a baking sheet in a single layer and freeze until firm. Then transfer to a freezer-safe bag.
- Thawing: Thaw frozen rice balls at room temperature for a couple of hours, or reheat them in the microwave for a quick meal.
Special Equipment
No special equipment is required to make these rice balls, but you might find the following helpful:
- Rice Cooker: For perfectly cooked rice every time.
- Bowl: For mixing the rice with seasonings.
- Spoon or Scoop: For easily portioning the rice into even amounts.
- Plastic Wrap: If you want to keep your hands clean, lightly coat your hands with plastic wrap when shaping the rice balls.
Frequently Asked Questions (FAQ)
If you’re new to making Korean Rice Balls, you might have a few questions about the recipe or how to customize it. Below are some common queries to help guide you in creating the perfect rice balls every time!
Can I use any type of rice for this recipe?
It’s best to use short-grain rice, as it’s stickier and helps the rice balls hold together. However, you can use medium-grain rice if needed. Just avoid long-grain rice, as it doesn’t stick well.
Can I make the rice balls in advance?
Yes, you can make them ahead of time! Store them in an airtight container in the fridge for up to 3 days. If you’re making them for a picnic or lunchbox, they can be enjoyed cold or at room temperature.
What are some filling ideas besides ground meat and vegetables?
Feel free to get creative! Try using tofu, pickled radish, cooked fish, or even sweet red bean paste for a unique twist.
Print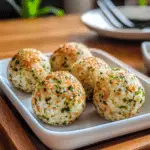
Korean Rice Balls
- Total Time: 30 min.
Ingredients
For the Rice Balls:
- 2 cups cooked short-grain rice (preferably warm)
- 1/2 tablespoon sesame oil
- 1 tablespoon soy sauce
- 1 teaspoon sugar
- 1 tablespoon roasted seaweed (gim), crumbled
- 1 tablespoon sesame seeds
For the Fillings (Optional, but Recommended):
- 1/2 cup cooked ground beef or pork (optional)
- 1/4 cup finely chopped kimchi
- 1/4 cup cooked vegetables (spinach, carrots, or zucchini)
- 1 boiled egg (chopped)
- A pinch of salt (for seasoning)
Instructions
Prepare the Rice
- Cook the Rice: Start by cooking 2 cups of short-grain rice. If you have leftover rice from a previous meal, it works great here! Warm rice is best for making rice balls as it sticks together more easily.
- Season the Rice: In a large bowl, combine the warm rice with sesame oil, soy sauce, and sugar. Mix gently to avoid mashing the rice while ensuring each grain is coated.
- Add the Seaweed and Sesame Seeds: Crumble the roasted seaweed into small pieces and stir it into the rice. Sprinkle in sesame seeds for added crunch and flavor. Set the rice mixture aside to cool slightly before shaping.
Prepare the Fillings (Optional)
While your rice cools slightly, prepare the fillings:
- Cook the Ground Meat: If you’re using ground beef or pork, sauté it in a pan with a little oil, seasoning it with salt, pepper, and soy sauce to taste. Once cooked, set it aside.
- Chop Vegetables and Kimchi: Finely chop any vegetables like spinach, carrots, or zucchini. If you’re using kimchi, chop it finely to incorporate into the rice easily.
- Boil the Egg: Boil an egg for about 10 minutes, then chop it into small pieces.
Shape the Rice Balls
Once your rice has cooled slightly (it should still be warm but not too hot to handle), it’s time to form the rice balls:
- Take a Portion of Rice: Using your hands, scoop out about 2 tablespoons of the seasoned rice. If you’re using fillings, press a little bit of your chosen filling into the center of the rice before closing it up.
- Form the Ball: Gently mold the rice into a round shape. You want them to be compact enough to hold together but not too tight that they become mushy. If you prefer, you can also shape them into an oval or triangular shape.
- Repeat: Continue forming rice balls until you’ve used all the rice and fillings.
Serve and Enjoy
Now that your Korean Rice Balls are ready, it’s time to serve them:
- Garnish with Seaweed: For an extra touch, you can sprinkle some extra crumbled seaweed or sesame seeds on top of the rice balls.
- Plate: Arrange the rice balls on a plate, or pack them in a lunchbox for a portable meal.
- Enjoy: Take a bite and enjoy the balance of savory, crunchy, and soft textures!
- Prep Time: 10 min.
- Cook Time: 20 min.
Nutrition
- Serving Size: 10 rice balls
- Calories: 180 kcal
- Fat: 5g
- Carbohydrates: 35g
- Fiber: 2g
- Protein: 5g
Conclusion
Making Korean Rice Balls is a simple, fun, and delicious way to enjoy a traditional dish that’s packed with flavor. Whether you’re making them for lunch, a snack, or a picnic, these rice balls will surely be a hit! Feel free to customize them with your favorite fillings and experiment with different seasonings to make them your own. Don’t forget to snap a photo and tag me on social media—I love seeing your delicious creations! Happy cooking!


