Introduction
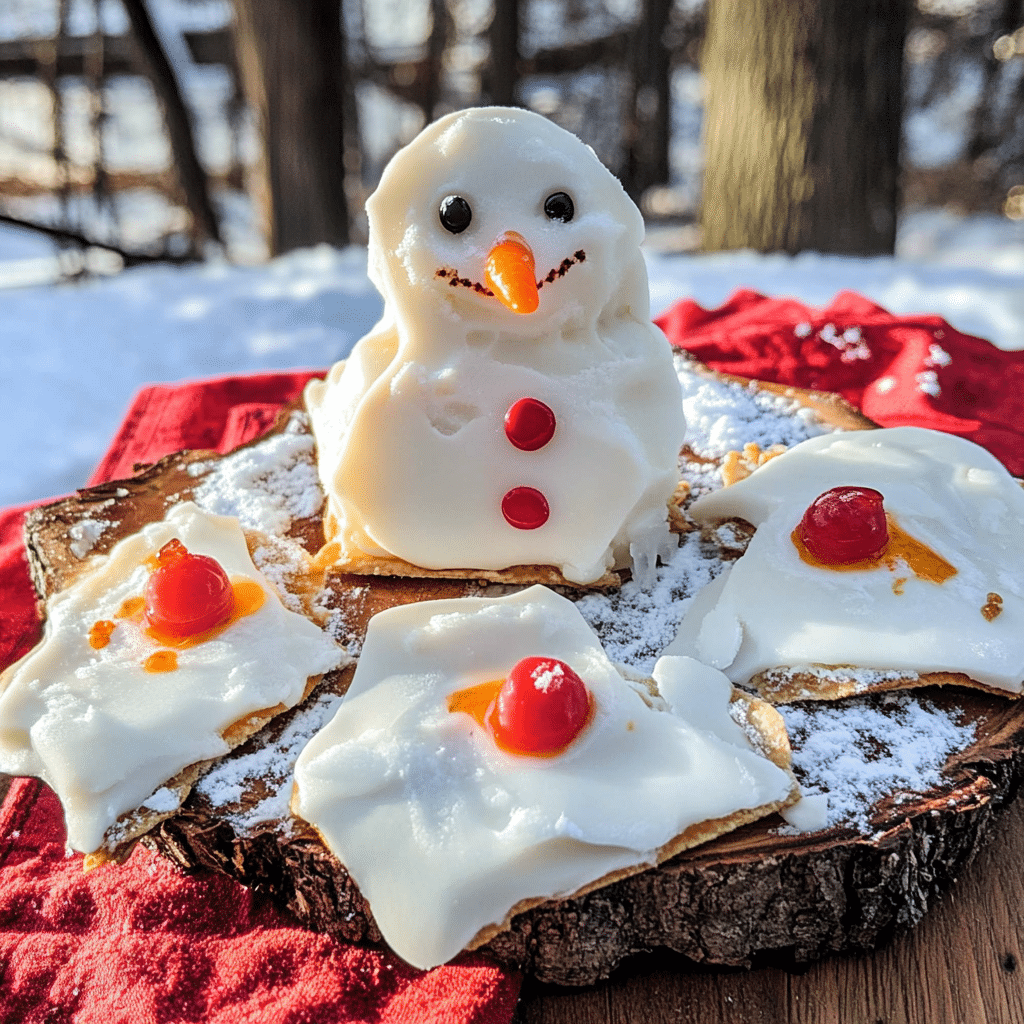
Melted Snowman Bark: A Whimsical Winter Treat
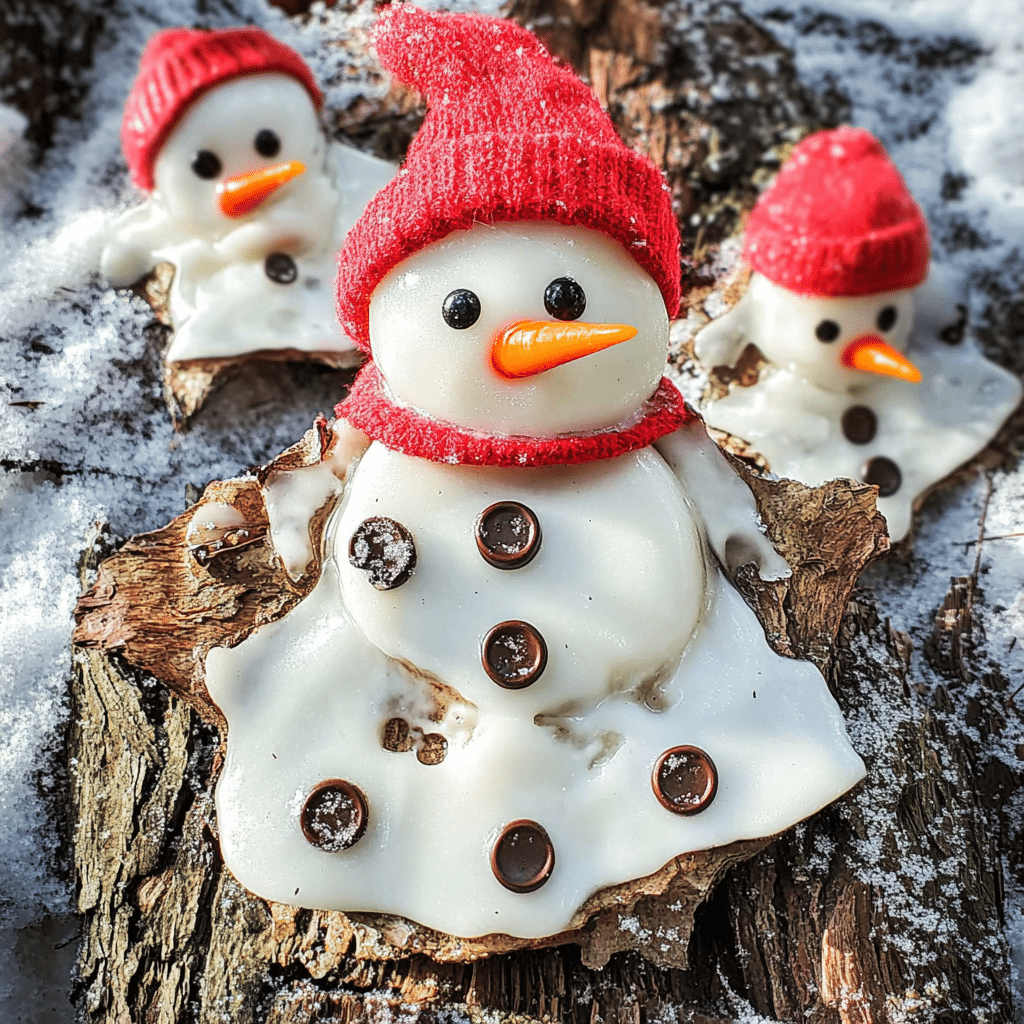
Let’s chat about one of my absolute favorite winter treats: Melted Snowman Bark! Seriously, this delightful dessert is like a hug in chocolate form, and it brings a smile to everyone’s face. Picture this: you’re gathered around the table with family or friends, and there it is—this adorable bark that looks like little snowmen having a snow day. It’s almost too cute to eat!
What I love about this recipe is how easy it is. You don’t need to be a master chef to whip it up. All you need is some white chocolate, pretzels, and a handful of colorful candies. You can get the kids involved, too; they’ll love helping you decorate the snowmen! I remember one year, my niece and nephew were visiting, and we turned this into a mini baking party. We melted the chocolate, spread it out, and let them go wild with the toppings. The kitchen was a mess, but the laughter and fun we had? Totally worth it!
This bark isn’t just a treat; it’s a memory-maker. Whether you’re serving it at a holiday gathering, packing it into gift bags for friends, or just enjoying it while watching a cozy movie, it adds a touch of whimsy to everything. Plus, it’s a no-bake recipe, so it comes together in no time, leaving you plenty of room to sip on hot cocoa and enjoy the festivities. Trust me, once you try making this with your loved ones, it’s bound to become a favorite tradition in your household, just like it has in mine!
Why You’ll Love This Recipe
Reasons to fall in love with Melted Snowman Bark:
- Festive and Fun: A playful take on a winter treat that adds character to any dessert table.
- No-Bake: Skip the oven—this recipe only requires melting chocolate, making it quick and easy.
- Kid-Friendly: Little ones will enjoy decorating each melted snowman.
- Perfect for Gifting: Makes a cute, homemade gift that spreads holiday cheer.
- Customizable: Change up the candies and decorations to make each snowman unique.
- Great for All Ages: Ideal for holiday gatherings where everyone can join in the fun.
- Simple Ingredients: Uses common pantry items, making it budget-friendly.
- Holiday Memories: Create a fun holiday tradition that everyone will remember.
Preparation Time
- Total Time: 30 minutes
- Preparation Time: 20 minutes
- Cooling Time: 10 minutes
- Servings: 15-20 pieces
- Calories per piece: Approximately 120 calories
- Key Nutrients: Fat: 5g, Carbohydrates: 15g, Protein: 1g
Ingredients
Gather the following ingredients to create your Melted Snowman Bark:
- 12 oz white chocolate (bars or chips)
- 1/2 cup mini pretzel sticks (for snowman arms)
- 1/4 cup mini chocolate chips (for eyes)
- 1/4 cup orange sprinkles or candies (for noses)
- 1/4 cup mini marshmallows (for snowman bodies)
- 1/4 cup colored sprinkles (optional, for decoration)
Ingredient Highlights
- White Chocolate: Forms the base of the bark, giving it a sweet, creamy flavor.
- Mini Pretzels: Adds a crunchy texture and serves as the snowman’s “arms.”
- Mini Chocolate Chips: Perfect for creating the snowman’s eyes.
- Mini Marshmallows: Adds fun “melting” shapes to the bark, making it look like melting snow.
- Orange Sprinkles: The snowman’s nose—look for any small orange candy or sprinkle shape.
Step-by-Step Instructions
Follow these steps to create your Melted Snowman Bark:
Prepare the Bark Base
- Line a Baking Sheet: Line a baking sheet with parchment paper to prevent sticking.
- Melt the White Chocolate: In a microwave-safe bowl, melt the white chocolate in 20-second intervals, stirring between each, until smooth.
- Spread the Chocolate: Pour the melted white chocolate onto the lined baking sheet, using a spatula to spread it into an even layer about 1/4 inch thick.
Add the Snowman Decorations
- Create the Snowman Shapes: While the chocolate is still melted, place mini marshmallows randomly on the chocolate for each snowman’s body.
- Add Eyes and Noses: Place two mini chocolate chips above each marshmallow to form eyes, and add one orange sprinkle for the nose.
- Add Pretzel Arms: Stick mini pretzels on either side of the marshmallows to form the snowman’s arms.
- Decorate: Sprinkle with colored sprinkles if desired for extra color.
Set and Break into Pieces
- Let It Cool: Place the baking sheet in the refrigerator for about 10 minutes or until the chocolate is fully set.
- Break into Pieces: Once hardened, break the bark into pieces, ensuring each piece has at least one snowman.
How to Serve
Here are some fun serving ideas for your Melted Snowman Bark:
- Holiday Dessert Table: Arrange pieces on a festive platter for a cheerful addition to dessert spreads.
- Gift Bags: Place a few pieces in clear bags, tied with holiday ribbon, as thoughtful homemade gifts.
- Add to Cookie Boxes: Include in holiday cookie boxes for variety.
- Holiday Movie Night: Serve as a snack during a holiday movie marathon.
- Party Treats: Share at winter gatherings or kids’ parties.
- Serve with Hot Chocolate: Pair with a cozy drink for a complete holiday treat.
- Individual Wrapping: Wrap each piece individually for grab-and-go treats.
- Table Decoration: Use as edible decor on a holiday table.
- Themed Parties: Perfect for Frozen-themed parties or snow-themed gatherings.
- Pair with Peppermint Bark: Add a few pieces of peppermint bark for a festive combination.
Additional Tips
Maximize your enjoyment of Melted Snowman Bark with these helpful tips:
- Work Quickly: Decorate while the chocolate is still melted to ensure decorations stick.
- Use Quality Chocolate: High-quality white chocolate melts smoother and has a richer flavor.
- Experiment with Colors: Use colorful candy pieces for noses, scarves, or hats on the snowmen.
- Keep Chocolate Warm: If the chocolate begins to set while decorating, briefly reheat it to keep it smooth.
- Room Temperature Storage: Store at room temperature for up to 5 days in an airtight container.
- Add Candy Buttons: Use small round candies as buttons on each snowman.
- Create Snow Scenery: Sprinkle some coconut shavings to resemble snow.
- Plan for Clean-Up: Have wet wipes nearby for little hands during decorating.
- Refrigerate for Faster Setting: Place in the refrigerator to set the chocolate quickly.
- Make It a Family Activity: Get everyone involved to decorate their own melted snowman.
Recipe Variations
Try these creative variations for your Melted Snowman Bark:
- Dark Chocolate Base: Swap white chocolate for dark or milk chocolate for a different flavor profile.
- Peppermint Bark: Add crushed peppermint candies for a minty twist.
- Colorful Snowmen: Use food coloring to tint white chocolate light blue or green.
- Add Coconut Flakes: Sprinkle on top for a snowy effect.
- Sprinkle Snowman Accessories: Use red candies for scarves or blue sprinkles for hats.
- Holiday Shapes: Use candy molds to create individual snowmen shapes if desired.
- Nutty Bark: Add chopped nuts for extra crunch and flavor.
- Gluten-Free Option: Ensure gluten-free pretzels are used for a gluten-free version.
- Candy Cane Arms: Use mini candy canes instead of pretzels for festive arms.
- Vegan Option: Use dairy-free white chocolate and vegan marshmallows for a vegan-friendly bark.
Freezing and Storage
Keep your Melted Snowman Bark fresh with these storage tips:
- Storage: Store in an airtight container at room temperature for up to a week.
- Refrigerate: If kept in a warm area, refrigerate to prevent the chocolate from softening.
- Freezing: Wrap individual pieces in plastic wrap and place in a freezer-safe container for up to 2 months.
- Thawing: Let thaw at room temperature for a few minutes before serving.
Special Equipment
You may need these kitchen tools to create your Melted Snowman Bark:
- Baking Sheet: To spread and cool the bark.
- Parchment Paper: To line the baking sheet for easy removal.
- Microwave-Safe Bowl: For melting the chocolate.
- Spatula: To spread the chocolate evenly.
- Measuring Cups: For portioning out ingredients.
- Storage Containers: For keeping leftovers fresh.
FAQ Section
Here are answers to common questions about Melted Snowman Bark:
- Can I use milk chocolate instead of white chocolate?
Yes, you can use any type of chocolate you prefer. - How long can it be stored?
It can be stored at room temperature for up to a week or frozen for up to two months. - Can I add flavors to the chocolate?
Yes, try a drop of peppermint or almond extract for added flavor. - Can I make this ahead of time?
Yes, make it a day or two ahead and store in an airtight container. - Can I make it gluten-free?
Absolutely, use gluten-free pretzels for a gluten-free version.

Melted Snowman Bark
- Total Time: 30 min.
Ingredients
- 12 oz white chocolate (bars or chips)
- 1/2 cup mini pretzel sticks (for snowman arms)
- 1/4 cup mini chocolate chips (for eyes)
- 1/4 cup orange sprinkles or candies (for noses)
- 1/4 cup mini marshmallows (for snowman bodies)
- 1/4 cup colored sprinkles (optional, for decoration)
Instructions
Prepare the Bark Base
- Line a Baking Sheet: Line a baking sheet with parchment paper to prevent sticking.
- Melt the White Chocolate: In a microwave-safe bowl, melt the white chocolate in 20-second intervals, stirring between each, until smooth.
- Spread the Chocolate: Pour the melted white chocolate onto the lined baking sheet, using a spatula to spread it into an even layer about 1/4 inch thick.
Add the Snowman Decorations
- Create the Snowman Shapes: While the chocolate is still melted, place mini marshmallows randomly on the chocolate for each snowman’s body.
- Add Eyes and Noses: Place two mini chocolate chips above each marshmallow to form eyes, and add one orange sprinkle for the nose.
- Add Pretzel Arms: Stick mini pretzels on either side of the marshmallows to form the snowman’s arms.
- Decorate: Sprinkle with colored sprinkles if desired for extra color.
Set and Break into Pieces
- Let It Cool: Place the baking sheet in the refrigerator for about 10 minutes or until the chocolate is fully set.
- Break into Pieces: Once hardened, break the bark into pieces, ensuring each piece has at least one snowman.
- Prep Time: 20 min.
- Cook Time: 10 min.
Nutrition
- Serving Size: 15-20 pieces
- Calories: 120 kcal
- Fat: 5g
- Carbohydrates: 15g
- Protein: 1g
Conclusion
Melted Snowman Bark is such a delightful and whimsical treat that adds a touch of fun to your holiday festivities! As you whip up this easy, no-bake recipe, you’re not just creating a tasty snack but also wonderful memories with family and friends. Whether you’re making it for a holiday gathering or gifting it to loved ones, this adorable treat is bound to spread joy and smiles all around.
I can’t wait to see how your melted snowman bark turns out! I encourage you to get creative—add your own twist to the designs or ingredients. It’s a perfect way to make the recipe your own while having fun in the kitchen. After you’ve crafted your charming creations, please share your experience! Leave a comment below to let me know how it went or any special touches you added.
And don’t forget to snap a photo and tag me on social media—I love seeing your delicious creations! Your holiday baking adventures inspire others, and I’d love to celebrate with you. So gather those ingredients, invite your loved ones to join in the fun, and let’s spread some holiday cheer together!

