Introduction
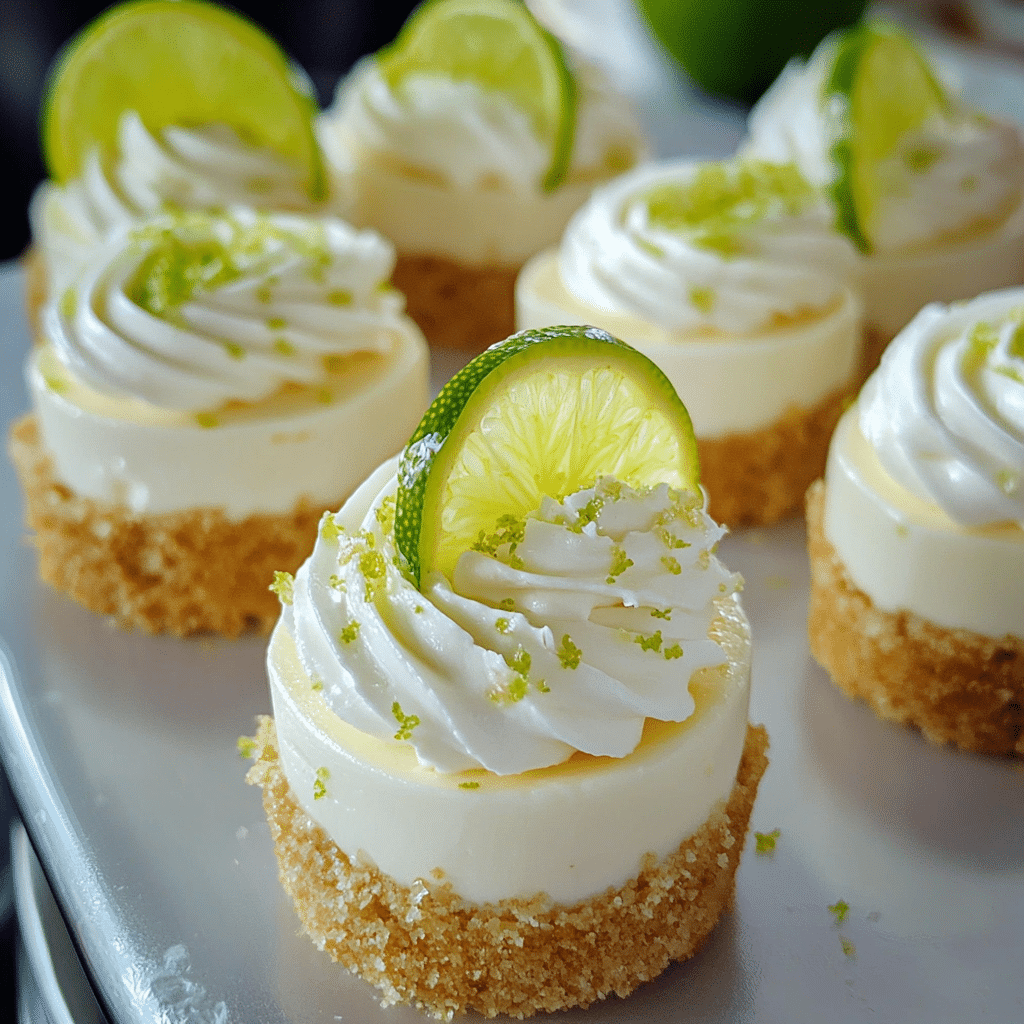
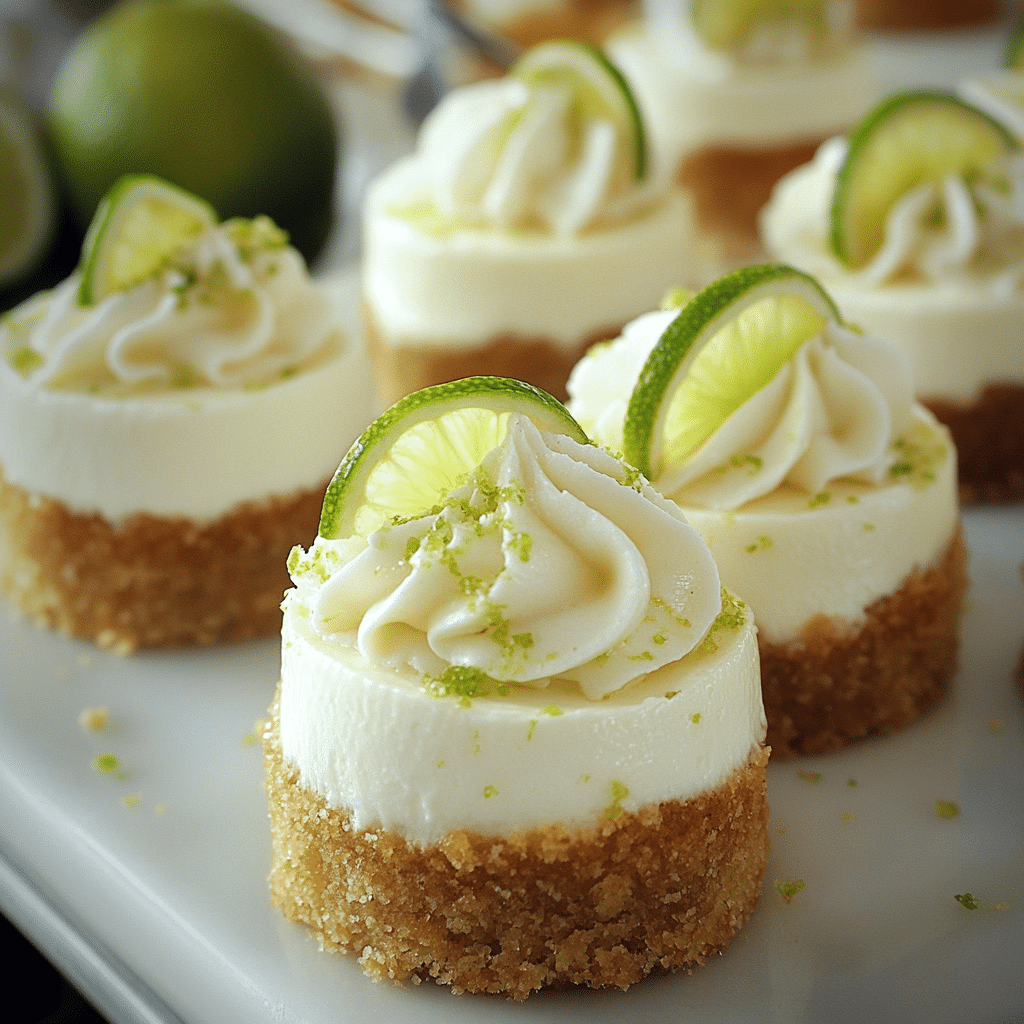
Mini Lime Pie Cheesecakes are the ultimate combination of tangy and creamy, delivering all the zesty goodness of lime pie in a perfectly portioned bite. These little desserts are as delightful to eat as they are to look at, with their buttery graham cracker crusts and rich lime-flavored cheesecake filling. They’re the perfect treat for any occasion, from summer barbecues to cozy nights in.
What makes these cheesecakes so special is their balance of flavors. The tart lime cuts through the luscious creaminess, creating a refreshing yet indulgent dessert. And their mini size? Absolutely perfect for serving at parties or savoring as a midweek pick-me-up.
The best part? They’re surprisingly easy to make! With simple ingredients and straightforward steps, you can whip up these cuties in no time. Add a dollop of whipped cream, a slice of lime, or even a sprinkle of zest on top to dress them up for any occasion.
Get ready to impress your family, friends, or just treat yourself to a little bit of lime heaven. Let’s dive into this recipe and make these bite-sized delights!
Why You’ll Love This Recipe
Here’s why you’ll fall in love with these Mini Lime Pie Cheesecakes:
- Perfectly Portion-Controlled: Mini size means no messy slicing and perfect serving portions.
- Tangy and Sweet: The refreshing lime flavor pairs beautifully with the creamy cheesecake.
- Simple to Make: No fancy techniques or equipment required!
- Crowd-Pleasing: Ideal for parties, potlucks, or any gathering.
- Make-Ahead Friendly: You can prepare these cheesecakes in advance.
- Versatile Toppings: Top them with whipped cream, lime zest, or even a drizzle of honey for variety.
- Kid-Friendly: The small size and fun lime flavor make them a hit with kids.
- Summer-Ready: Perfect for warm-weather gatherings with their refreshing flavor.
- Elegant Yet Easy: They look fancy enough for a dinner party but are simple to whip up.
- Great for Gifting: Package these mini treats for a sweet, thoughtful gift.
Preparation Time and Cook Time
- Total Time: 3 hours (includes cooling and chilling)
- Preparation Time: 20 minutes
- Cook Time: 20 minutes
- Cooling and Chilling Time: 2 hours
- Servings: 12 mini cheesecakes
- Calories per cheesecake: Approximately 210 calories
- Key Nutrients: Calcium: 5%, Vitamin C: 10%, Protein: 3g
Ingredients
Here’s what you’ll need to make these delightful cheesecakes:
For the Crust:
- 1 cup graham cracker crumbs
- 3 tablespoons granulated sugar
- 4 tablespoons unsalted butter, melted
For the Lime Cheesecake Filling:
- 8 oz cream cheese, softened
- 1/3 cup granulated sugar
- 1/4 cup sour cream
- 1/4 cup freshly squeezed lime juice
- 1 tablespoon lime zest
- 1 teaspoon vanilla extract
- 1 large egg
Optional Toppings:
- Whipped cream
- Lime slices or zest for garnish
Step-by-Step Instructions
Prepare the Crust
- Preheat the Oven: Preheat your oven to 325°F (160°C). Line a 12-cup muffin tin with paper liners.
- Mix the Crust Ingredients: In a medium bowl, combine the graham cracker crumbs, sugar, and melted butter. Stir until the mixture resembles wet sand.
- Press into the Muffin Tin: Spoon about 1 tablespoon of the crust mixture into each liner, pressing it firmly into the bottom. Use the back of a spoon or your fingers for even coverage.
- Bake: Bake the crusts for 5 minutes, then set aside to cool slightly.
Make the Lime Cheesecake Filling
- Beat the Cream Cheese: In a large mixing bowl, beat the softened cream cheese until smooth and creamy.
- Add the Sugar and Sour Cream: Mix in the sugar and sour cream until well combined.
- Incorporate the Lime: Stir in the lime juice, lime zest, and vanilla extract.
- Add the Egg: Finally, beat in the egg until just combined. Be careful not to overmix to avoid adding air bubbles.
Assemble and Bake
- Fill the Cups: Spoon the cheesecake filling evenly over the prepared crusts, filling each liner almost to the top.
- Bake: Bake for 15-18 minutes, or until the edges are set and the centers are slightly jiggly.
- Cool: Remove from the oven and let the cheesecakes cool in the pan for 30 minutes.
- Chill: Transfer the cheesecakes to the refrigerator and chill for at least 2 hours, or until fully set.
Add Toppings
- Whip It Up: Just before serving, top each mini cheesecake with a dollop of whipped cream.
- Garnish: Add a sprinkle of lime zest or a thin slice of lime for a finishing touch.
How to Serve
Serve these Mini Lime Pie Cheesecakes in style with these fun ideas:
- Dessert Platters: Arrange them on a decorative platter with colorful garnishes.
- Individual Plates: Serve each cheesecake on its own dessert plate for an elegant presentation.
- Buffet Style: Set them up at a dessert buffet for guests to grab and enjoy.
- With Beverages: Pair with iced tea, coffee, or a citrusy cocktail for a refreshing treat.
- Gift Presentation: Package them in a box lined with parchment paper for a sweet gift.
Additional Tips
Make the most of your baking experience with these helpful tips:
- Room Temperature Ingredients: Ensure your cream cheese, egg, and sour cream are at room temperature for a smooth filling.
- Don’t Skip the Liners: Paper liners make removing the cheesecakes from the pan much easier.
- Zest First: Zest your limes before juicing them for convenience.
- Test for Doneness: The centers should jiggle slightly when the cheesecakes are ready. They’ll firm up as they cool.
- Chill Thoroughly: Don’t rush the chilling process—it’s essential for the cheesecakes to set properly.
- Make Ahead: These cheesecakes can be made a day in advance and stored in the fridge.
Recipe Variations
Try these creative twists to make this recipe your own:
- Key Lime Cheesecakes: Swap regular limes for key limes for a classic key lime pie flavor.
- Chocolate Lime Cheesecakes: Add a chocolate layer to the crust for a rich contrast to the tangy lime filling.
- Gluten-Free Option: Use gluten-free graham crackers for the crust.
- Coconut Lime Cheesecakes: Add shredded coconut to the crust for a tropical twist.
- Mini Lemon Cheesecakes: Replace lime juice and zest with lemon for a citrusy alternative.
Freezing and Storage
Keep your cheesecakes fresh with these storage tips:
- Refrigerate: Store in an airtight container in the fridge for up to 4 days.
- Freeze: Freeze individual cheesecakes without toppings for up to 2 months. Wrap tightly in plastic wrap, then place in a freezer-safe bag.
- Thaw: Let frozen cheesecakes thaw in the refrigerator overnight before serving.
Special Equipment
Here’s what you’ll need to make these mini cheesecakes:
- Muffin tin
- Paper liners
- Electric mixer or whisk
- Mixing bowls
- Zester or grater
- Measuring cups and spoons
FAQ Section
Got questions? No worries! Here are some common queries and answers to help ensure your Mini Lime Pie Cheesecakes turn out perfect every time. Whether you’re wondering about ingredient substitutions, storage tips, or how to make these cheesecakes your own, we’ve got you covered. Let’s dive into some of the most frequently asked questions!
- Can I use bottled lime juice?
Fresh lime juice is best, but bottled juice works in a pinch. - Can I double this recipe?
Yes, you can easily double it for a larger batch. - What if I don’t have a muffin tin?
Try using silicone molds for a similar result. - How do I prevent cracks?
Avoid overmixing and overbaking the filling. - Can I use a different type of citrus for the filling?
- Absolutely! While lime gives these cheesecakes that fresh, tangy twist, you can experiment with other citrus fruits. Try lemon, orange, or even a mix of citrus fruits for a unique flavor. Just remember to adjust the sweetness level to balance out the tartness of the fruit.
- Can I make these cheesecakes ahead of time?
- Yes! These Mini Lime Pie Cheesecakes actually taste even better when made ahead. You can prepare them a day or two in advance and store them in the fridge until you’re ready to serve. This makes them a perfect make-ahead dessert for parties or gatherings.
- What’s the best way to store leftover cheesecakes?
- If you have any leftovers (which is unlikely because these are so delicious!), store them in an airtight container in the fridge. They will stay fresh for up to 3-4 days. Be sure to cover the tops with plastic wrap or a lid to prevent them from absorbing any odors from other foods in the fridge.
Mini Lime Pie Cheesecakes
- Total Time: 3 hrs.
Ingredients
For the Crust:
- 1 cup graham cracker crumbs
- 3 tablespoons granulated sugar
- 4 tablespoons unsalted butter, melted
For the Lime Cheesecake Filling:
- 8 oz cream cheese, softened
- 1/3 cup granulated sugar
- 1/4 cup sour cream
- 1/4 cup freshly squeezed lime juice
- 1 tablespoon lime zest
- 1 teaspoon vanilla extract
- 1 large egg
Optional Toppings:
- Whipped cream
- Lime slices or zest for garnish
Instructions
Prepare the Crust
- Preheat the Oven: Preheat your oven to 325°F (160°C). Line a 12-cup muffin tin with paper liners.
- Mix the Crust Ingredients: In a medium bowl, combine the graham cracker crumbs, sugar, and melted butter. Stir until the mixture resembles wet sand.
- Press into the Muffin Tin: Spoon about 1 tablespoon of the crust mixture into each liner, pressing it firmly into the bottom. Use the back of a spoon or your fingers for even coverage.
- Bake: Bake the crusts for 5 minutes, then set aside to cool slightly.
Make the Lime Cheesecake Filling
- Beat the Cream Cheese: In a large mixing bowl, beat the softened cream cheese until smooth and creamy.
- Add the Sugar and Sour Cream: Mix in the sugar and sour cream until well combined.
- Incorporate the Lime: Stir in the lime juice, lime zest, and vanilla extract.
- Add the Egg: Finally, beat in the egg until just combined. Be careful not to overmix to avoid adding air bubbles.
Assemble and Bake
- Fill the Cups: Spoon the cheesecake filling evenly over the prepared crusts, filling each liner almost to the top.
- Bake: Bake for 15-18 minutes, or until the edges are set and the centers are slightly jiggly.
- Cool: Remove from the oven and let the cheesecakes cool in the pan for 30 minutes.
- Chill: Transfer the cheesecakes to the refrigerator and chill for at least 2 hours, or until fully set.
Add Toppings
- Whip It Up: Just before serving, top each mini cheesecake with a dollop of whipped cream.
- Garnish: Add a sprinkle of lime zest or a thin slice of lime for a finishing touch.
- Prep Time: 20 minutes
- Cooling Time: 2 hrs
- Cook Time: 20 min.
Nutrition
- Serving Size: 12 mini cheesecakes
- Calories: 210 kcal
- Protein: 3g
Conclusion
These Mini Lime Pie Cheesecakes are the ultimate treat when you want something refreshing and indulgent all at once. The creamy cheesecake paired with the tangy lime flavor is a match made in dessert heaven. Perfect for summer parties, casual get-togethers, or just when you’re in the mood for something sweet, these little bites are sure to be the star of the show.
So, gather your ingredients, let your creativity shine with your favorite toppings, and dive into making these irresistible mini cheesecakes. Don’t forget to snap a photo and tag me on social media—I love seeing your delicious creations! Enjoy every bite!

