Introduction
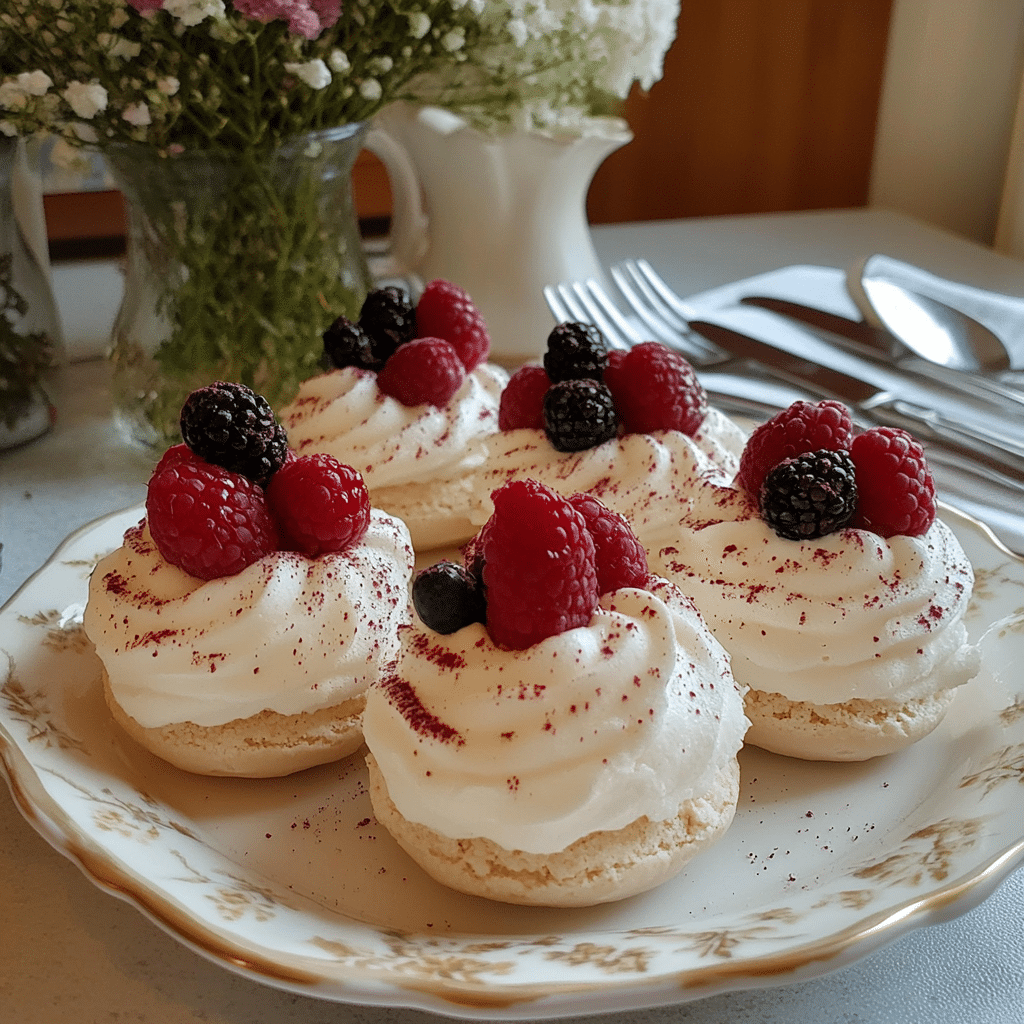
If you’re searching for a dessert that’s as beautiful as it is delicious, Mini Pavlovas are the perfect choice. These airy, crisp meringue shells filled with whipped cream and fresh fruit are an absolute crowd-pleaser. Whether you’re hosting a gathering, attending a party, or simply want a light treat to enjoy with loved ones, mini pavlovas will add elegance and a burst of flavor to any occasion.
Pavlova is often considered a special dessert, and it’s no wonder. The combination of crispy meringue, creamy filling, and juicy fruit makes every bite a delightful experience. The best part? These mini pavlovas are so easy to make and can be customized to your taste, with a variety of fruits and toppings to choose from. And because they’re individual servings, they’re perfect for portion control while still being satisfying.
In this recipe, we’ll guide you through making mini pavlovas from scratch, with tips for achieving the perfect texture, sweetness, and flavor balance. Whether you’re a beginner or an experienced baker, these mini pavlovas are sure to impress.
Why You’ll Love This Recipe
Here are just a few reasons why you’ll fall head over heels for Mini Pavlovas:
- Elegant and Festive: Their beautiful appearance makes them perfect for any celebration, from birthdays to holidays.
- Light and Crispy: The meringue base has a crunchy exterior and a soft, marshmallow-like interior—perfect for those who love a light, airy dessert.
- Versatile: You can top them with any fruit of your choice—berries, citrus, or tropical fruits.
- Easy to Make: Despite their fancy appearance, these pavlovas are surprisingly simple to make and require just a few ingredients.
- Customizable: You can make your pavlovas as big or small as you like and choose your favorite fruit and toppings.
- Great for Sharing: Mini pavlovas are perfect for individual servings, making them ideal for parties or gatherings.
- Gluten-Free: Since the base is made from meringue (just egg whites and sugar), pavlovas are naturally gluten-free, making them a great dessert option for guests with dietary restrictions.
Preparation Time and Cook Time
- Total Time: 2 hours 15 minutes
- Preparation Time: 15 minutes
- Cook Time: 1 hour 30 minutes
- Cooling Time: 30 minutes
- Servings: 6 mini pavlovas
- Calories per pavlova: Approximately 160 calories
- Key Nutrients: Protein: 2g, Fat: 7g, Carbohydrates: 28g, Sugar: 26g
Ingredients
Gather these simple ingredients to make your Mini Pavlovas:
For the Meringue:
- 4 large egg whites, at room temperature
- 1 cup granulated sugar
- 1 teaspoon vanilla extract
- 1 teaspoon cornstarch
- 1 teaspoon white vinegar
- A pinch of salt
the Whipped Cream Filling:
- 1 cup heavy whipping cream
- 2 tablespoons powdered sugar
- 1 teaspoon vanilla extract
For the Topping:
- Fresh fruit of your choice (such as berries, kiwi, or passionfruit)
- Mint leaves (optional, for garnish)
Ingredient Highlights
- Egg Whites: The key to a perfect meringue. They give the pavlova its light, airy texture.
- Sugar: Sweetens the meringue while helping it hold its shape.
- Cornstarch and Vinegar: These ingredients stabilize the meringue, helping it achieve that perfect crisp exterior with a marshmallow-like center.
- Heavy Cream: A rich, creamy filling that balances out the sweetness of the meringue.
- Fresh Fruit: Adds a burst of flavor and color to the pavlova, making it as refreshing as it is beautiful.
Step-by-Step Instructions
Follow these simple steps to create your Mini Pavlovas:
Prepare the Meringue
- Preheat Oven: Preheat your oven to 250°F (120°C). Line a baking sheet with parchment paper and lightly mark out six circles (about 3 inches in diameter) to guide your meringue.
- Whip the Egg Whites: In a clean mixing bowl, beat the egg whites with a pinch of salt until soft peaks form. This means the egg whites will form a peak that gently folds back down when you lift the beater.
- Add Sugar: Gradually add the sugar, one tablespoon at a time, while continuing to beat the egg whites. This will help create a smooth, glossy meringue. Once all the sugar is added, continue beating until stiff peaks form and the meringue is thick and shiny.
- Add the Cornstarch and Vinegar: Sprinkle the cornstarch over the meringue and add the vinegar and vanilla extract. Gently fold these into the meringue with a spatula until fully incorporated.
- Shape the Meringues: Spoon the meringue onto the prepared parchment paper, using the circles as guides. Shape the meringue into little nests with a well in the center, where the whipped cream and fruit will go.
- Bake: Place the baking sheet in the preheated oven and bake for 1 hour to 1 hour 30 minutes, or until the meringues are crisp on the outside and slightly golden. Turn off the oven and let the meringues cool in the oven with the door ajar for about 30 minutes.
Prepare the Whipped Cream Filling
- Whip the Cream: While the meringues are cooling, whip the heavy cream, powdered sugar, and vanilla extract in a chilled bowl until soft peaks form. Be careful not to overwhip, as this will turn the cream into butter.
- Chill the Whipped Cream: Refrigerate the whipped cream until you’re ready to assemble the pavlovas.
Assemble the Pavlovas
- Fill the Meringues: Once the meringue shells are completely cooled, spoon a generous amount of whipped cream into the center of each meringue nest.
- Top with Fruit: Arrange your choice of fresh fruit on top of the whipped cream. You can use berries, kiwi, pomegranate, or any other fruit that catches your eye.
- Garnish: For a finishing touch, you can garnish with a sprig of fresh mint for a pop of color and a refreshing contrast.

How to Serve
Here are some serving ideas to make your Mini Pavlovas even more delightful:
- Serve Immediately: These pavlovas are best served as soon as they’re assembled, with the crisp meringue and creamy filling creating the perfect texture combination.
- Plating: Place each mini pavlova on a small dessert plate, garnished with mint leaves and a drizzle of honey or syrup if you’d like to add extra sweetness.
- Pair with Tea or Wine: Pair these pavlovas with a light tea, champagne, or a refreshing white wine to enhance the flavors.
- Make a Pavlova Bar: Set up a fun “pavlova station” where guests can assemble their own mini pavlovas with a selection of different fruits and toppings.
Additional Tips
Maximize your enjoyment of Mini Pavlovas with these helpful tips:
- Room Temperature Egg Whites: Be sure the egg whites are at room temperature for better volume when whipping.
- Clean Equipment: Make sure your mixing bowls and beaters are completely clean and free of any grease to ensure the egg whites whip properly.
- Don’t Overmix: When adding the cornstarch and vinegar, fold gently so the meringue doesn’t lose its airiness.
- Low and Slow Baking: Bake the pavlovas at a low temperature to avoid cracking. The slow baking process is what gives them that perfect crisp shell.
- Add More Flavor: For a twist, you can infuse your whipped cream with flavors like vanilla bean, citrus zest, or a splash of liqueur like Grand Marnier or Chambord.
- Make Ahead: You can bake the meringues ahead of time and store them in an airtight container for up to 2-3 days. Just assemble the pavlovas right before serving to ensure the meringue stays crisp.
Recipe Variations
Consider these creative variations for your Mini Pavlovas:
- Chocolate Pavlovas: Add a tablespoon of cocoa powder to the meringue mixture for a chocolate version.
- Citrus Twist: Top with a combination of fresh citrus fruits like orange slices, grapefruit, and lime zest for a bright and tangy flavor.
- Tropical Pavlovas: Use tropical fruits like mango, pineapple, and passionfruit for a sunny, island-inspired version.
- Raspberry Ripple: Swirl some raspberry puree into the whipped cream for a burst of fruity flavor and color.
- Vegan Pavlovas: Make a vegan version by using aquafaba (the liquid from a can of chickpeas) instead of egg whites.
Freezing and Storage
Proper storage ensures your Mini Pavlovas stay fresh:
- Storage: Store any leftover pavlovas in an airtight container in a cool, dry place for up to 2 days . Avoid refrigerating the meringues, as they will become soggy.
- Freezing: Meringues can be frozen for up to 1 month. Freeze the unassembled meringue shells on a baking sheet and store them in an airtight container. When ready to serve, top them with whipped cream and fruit just before serving.
faq section
Mini Pavlovas are a fantastic dessert, but sometimes you might have a few questions before diving into the recipe. Here’s a handy FAQ section to address some common inquiries and provide tips for perfecting your pavlova-making skills!
- 1. Can I make mini pavlovas in advance?
- Yes! You can bake the meringue shells ahead of time and store them in an airtight container for up to 2-3 days. Just wait to add the whipped cream and fruit until right before serving to maintain their crisp texture.
- 2. Can I use frozen fruit for the topping?
- While fresh fruit works best for pavlovas, you can use frozen fruit in a pinch. Just be sure to thaw it out and drain any excess liquid to avoid soggy pavlovas.
- 3. How do I know when the meringues are done baking?
- The meringues should be crisp on the outside and slightly golden, with a hollow sound when tapped. If they start to crack too much, they may be overbaked, so be sure to watch them closely during the last few minutes of baking.
- 4. Why did my meringue crack or collapse?
- Meringues can crack or collapse if they are overbeaten or the oven temperature is too high. For the best results, bake them at a low temperature (around 250°F) and avoid opening the oven door during baking.
- 5. Can I make pavlovas without cornstarch?
- Cornstarch helps stabilize the meringue, giving it a smooth texture. While you can skip it, the texture of the meringue might be a bit different. If you don’t have cornstarch, you could try using a small amount of rice flour as an alternative.
Conclusion
Mini pavlovas are a delightful and versatile dessert that can brighten up any occasion. The crisp meringue base, rich whipped cream, and fresh fruit topping make for a sweet treat that’s sure to impress. Plus, with the option to customize the flavors and toppings, they’re a dessert that can be made to suit any taste or season.
Whether you’re making them for a special gathering or just to enjoy as a sweet snack, mini pavlovas are always a winner. Don’t forget to snap a photo and tag me on social media – I love seeing your delicious creations!

