Introduction
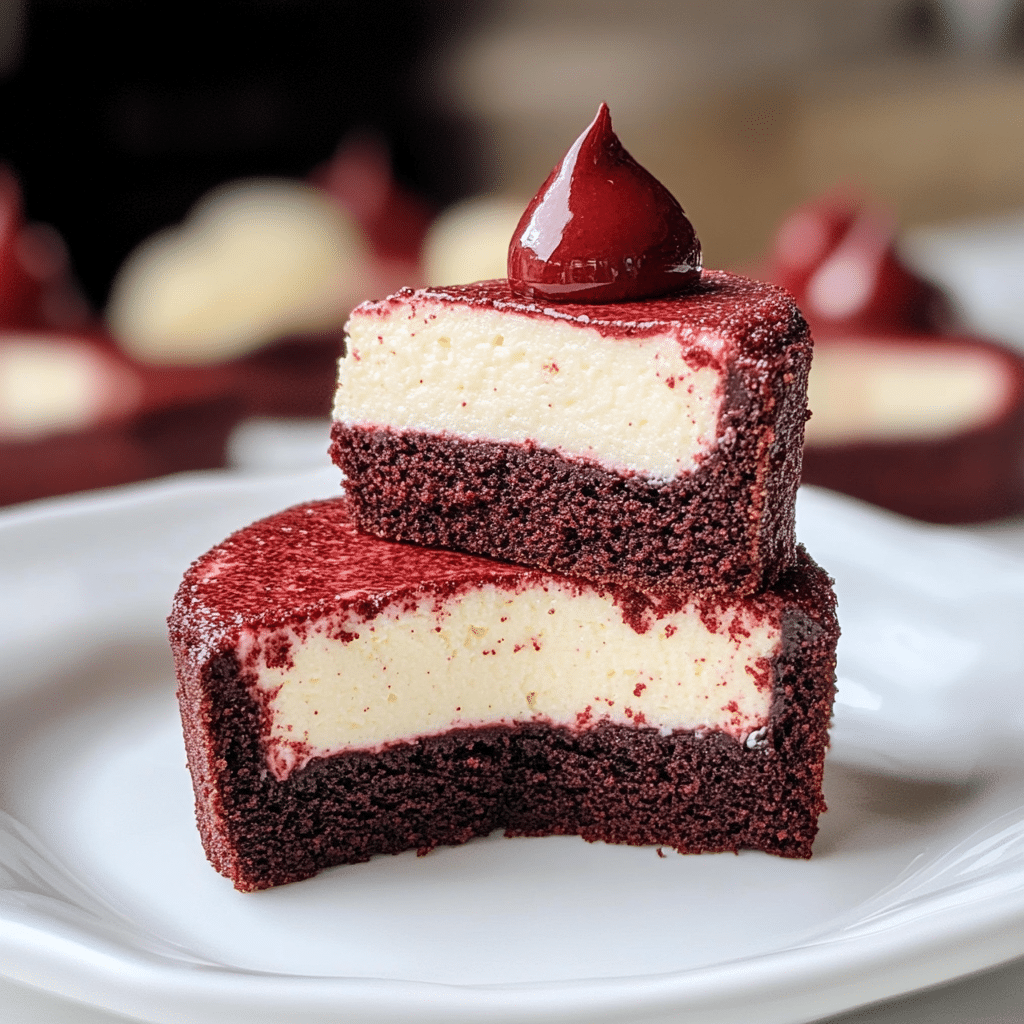
When it comes to indulgent desserts that leave a lasting impression, Mini Red Velvet Cheesecakes top the list. These bite-sized treats are a combination of rich red velvet cake and creamy, velvety cheesecake, all in one decadent dessert. Whether you’re hosting a party, celebrating a special occasion, or just craving something extraordinary, these mini cheesecakes will capture the hearts (and taste buds) of anyone who takes a bite. The beautiful red color, the luscious texture, and the slightly tangy cream cheese topping make these little delights irresistible. Not only are they a feast for the eyes, but the balance of flavors ensures that every bite is as memorable as the first.
In this recipe, we’ll walk you through the steps to create the perfect Mini Red Velvet Cheesecakes, from preparing the cake base to the luscious cheesecake layer and the finishing touches. These cheesecakes are simple to make, and the results are always stunning, whether you’re serving them at a holiday gathering or treating yourself to something sweet. So, let’s get baking!
Why You’ll Love This Recipe
There are many reasons to fall in love with these Mini Red Velvet Cheesecakes. Here’s why they’re sure to become a favorite:
- Elegant and Eye-Catching: The rich red color makes them the perfect showstopper at any event.
- Two Desserts in One: You get the best of both worlds—decadent red velvet cake and creamy cheesecake in a single bite.
- Portion Control: These mini cheesecakes are individually sized, so they’re easy to serve and portion out.
- Perfect for Special Occasions: Whether it’s a birthday, holiday, or just a special treat, these cheesecakes are always appropriate.
- Easy to Customize: You can personalize the toppings with whipped cream, berries, or even a drizzle of chocolate or caramel.
- Make-Ahead Option: Prepare these mini cheesecakes in advance and chill them overnight for a stress-free dessert on the day of your event.
- Kid-Friendly: While the flavors are sophisticated, kids will love the mini size and fun, sweet taste.
- Impress Your Guests: These mini cheesecakes are perfect for impressing guests with minimal effort—your guests will think you spent hours in the kitchen!
- Flavor Balance: The tartness of the cream cheese complements the sweet red velvet base perfectly, creating a balanced and satisfying flavor.
Preparation Time and Cook Time
- Total Time: 3 hours 15 minutes (includes chilling time)
- Preparation Time: 20 minutes
- Cook Time: 25 minutes
- Cooling Time: 1 hour
- Chilling Time: 2 hours
- Servings: 12 mini cheesecakes
- Calories per cheesecake: Approximately 320 calories
- Key Nutrients: Fiber: 1g, Fat: 20g, Carbohydrates: 25g, Protein: 4g
Ingredients
Gather the following ingredients to create your Mini Red Velvet Cheesecakes:
For the Red Velvet Cake Base:
- 1 box red velvet cake mix (or homemade mix)
- 1/2 cup vegetable oil
- 3 large eggs
- 1 cup water
the Cheesecake Filling:
- 2 (8 oz) packages cream cheese, softened
- 1/2 cup granulated sugar
- 2 large eggs
- 1 teaspoon vanilla extract
- 1 tablespoon all-purpose flour
- 1/2 cup sour cream
For the Topping:
- Whipped cream (optional)
- Fresh berries (optional)
- Grated chocolate or cocoa powder (optional)
Ingredient Highlights
- Red Velvet Cake Mix: The base of this dessert, giving it that rich, iconic red color and light texture.
- Cream Cheese: The key to a creamy and indulgent cheesecake filling that balances the cake’s sweetness.
- Sour Cream: Adds richness and a slight tang, making the cheesecake filling smooth and velvety.
- Fresh Berries: Optional, but adding berries brings freshness and color that contrast beautifully with the rich red velvet.
Step-by-Step Instructions
Follow these steps to create your Mini Red Velvet Cheesecakes:
Prepare the Red Velvet Cake Base
- Preheat Oven: Preheat your oven to 350°F (175°C). Line a muffin tin with 12 cupcake liners.
- Mix the Cake Batter: In a large bowl, combine the red velvet cake mix, vegetable oil, eggs, and water. Mix until smooth and well combined.
- Fill the Cupcake Liners: Spoon the batter into the cupcake liners, filling each about halfway full.
- Bake: Bake in the preheated oven for 15-20 minutes, or until a toothpick inserted into the center of the cake comes out clean.
- Cool: Allow the cakes to cool in the pan for 5 minutes, then transfer them to a wire rack to cool completely.
Prepare the Cheesecake Filling
- Blend the Cream Cheese: In a large mixing bowl, beat the cream cheese and granulated sugar with an electric mixer on medium speed until smooth and creamy.
- Add the Eggs: Add the eggs one at a time, beating well after each addition.
- Add the Flour and Vanilla: Stir in the flour and vanilla extract, mixing until just combined.
- Add the Sour Cream: Gently fold in the sour cream, ensuring the mixture is smooth and creamy.
Assemble the Mini Red Velvet Cheesecakes
- Top the Cakes: Once the red velvet cakes have cooled completely, use a spoon or small cookie scoop to add a generous dollop of the cheesecake filling on top of each cake.
- Bake Again: Return the muffin tin to the oven and bake for another 20-25 minutes, or until the cheesecake filling is set and the top is lightly golden.
- Cool and Chill: Remove from the oven and allow the cheesecakes to cool in the pan for 10 minutes. Then, carefully remove each cheesecake from the muffin tin and place them on a wire rack. Chill the cheesecakes in the refrigerator for at least 2 hours before serving.
Serve and Garnish
- Decorate: Before serving, top each mini cheesecake with whipped cream, fresh berries, or a dusting of cocoa powder or grated chocolate for a finishing touch.
- Enjoy: Serve chilled and enjoy the creamy, flavorful bite of your Mini Red Velvet Cheesecakes!

How to Serve
These Mini Red Velvet Cheesecakes are versatile and can be served in many ways:
- On a Dessert Table: Place them on a beautiful platter alongside other mini desserts for a festive and elegant display.
- With a Cup of Coffee: These mini cheesecakes pair perfectly with a cup of coffee or tea, making them great for afternoon treats or brunch.
- As Part of a Gift Box: Package them individually in clear cellophane bags with a ribbon for a sweet homemade gift.
- With Ice Cream: Serve with a scoop of vanilla or chocolate ice cream for an indulgent dessert experience.
- Garnish with Chocolate Shavings: A sprinkle of grated chocolate adds texture and extra flavor to each bite.
Additional Tips
To get the most out of your Mini Red Velvet Cheesecakes, here are a few helpful tips:
- Use Room Temperature Ingredients: Make sure your cream cheese and eggs are at room temperature to achieve a smooth, lump-free cheesecake filling.
- Chill Before Serving: Allow the cheesecakes to chill for at least 2 hours before serving so the flavors can fully develop.
- Check for Doneness: The cheesecakes should be slightly firm but still soft in the center when done baking.
- Customize the Topping: Feel free to experiment with different toppings, like caramel drizzle, crushed nuts, or a dusting of powdered sugar.
- Make Mini Versions: For bite-sized treats, bake the red velvet cakes in mini muffin tins and use less cheesecake filling for each one.
Recipe Variations
If you want to try something different, here are some fun twists on the classic Mini Red Velvet Cheesecake:
- Chocolate Chips: Add mini chocolate chips to the cheesecake filling for a touch of extra sweetness and texture.
- Lemon Zest: Add a bit of lemon zest to the cheesecake filling for a fresh twist that pairs nicely with the richness of the red velvet.
- Coconut: Add shredded coconut to the cake base for an extra layer of flavor and texture.
- Berry Compote: Top your cheesecakes with a homemade berry compote for added flavor and a burst of color.
Freezing and Storage
Proper storage is key to keeping your Mini Red Velvet Cheesecakes fresh:
- Storage: Keep leftover cheesecakes in an airtight container in the refrigerator for up to 3 days.
- Freezing: You can freeze these mini cheesecakes. After they’re fully chilled, wrap them tightly in plastic wrap and place them in a freezer-safe container. They’ll keep for up to 3 months.
- Thawing: Allow frozen cheesecakes to thaw in the refrigerator overnight before serving.
Special Equipment
You may need the following equipment to make your Mini Red Velvet Cheesecakes:
- Muffin Tin: For baking the cake base.
- Electric Mixer: For blending the cheesecake filling to a smooth consistency.
- Cupcake Liners: To keep the cakes easy to serve and remove.
faq section
When it comes to baking Mini Red Velvet Cheesecake, you might have a few questions along the way. To make sure everything goes smoothly, I’ve gathered the most common questions people ask and provided some helpful answers. From ingredient swaps to tips on storage, this FAQ section should address any concerns and help you perfect your mini cheesecakes!
- Can I make these mini cheesecakes without a cake mix? Yes, you can make the red velvet cake base from scratch! Simply use a red velvet cake recipe or substitute with your favorite cake mix. The important thing is to get that vibrant red color and soft, moist texture.
- Can I make these cheesecakes ahead of time? Absolutely! These Mini Red Velvet Cheesecakes can be prepared in advance and stored in the refrigerator for up to 3 days. They actually taste even better after they’ve had some time to chill and set in the fridge.
- How do I store leftover mini cheesecakes? Store leftover mini cheesecakes in an airtight container in the refrigerator for up to 3 days. You can also freeze them by wrapping each one individually in plastic wrap and placing them in a freezer-safe container. They’ll keep for up to 3 months.

Mini Red Velvet Cheesecakes
- Total Time: 3 hours and 15 minutes
Ingredients
For the Red Velvet Cake Base:
- 1 box red velvet cake mix (or homemade mix)
- 1/2 cup vegetable oil
- 3 large eggs
- 1 cup water
For the Cheesecake Filling:
- 2 (8 oz) packages cream cheese, softened
- 1/2 cup granulated sugar
- 2 large eggs
- 1 teaspoon vanilla extract
- 1 tablespoon all-purpose flour
- 1/2 cup sour cream
For the Topping:
- Whipped cream (optional)
- Fresh berries (optional)
- Grated chocolate or cocoa powder (optional)
Instructions
Prepare the Red Velvet Cake Base
- Preheat Oven: Preheat your oven to 350°F (175°C). Line a muffin tin with 12 cupcake liners.
- Mix the Cake Batter: In a large bowl, combine the red velvet cake mix, vegetable oil, eggs, and water. Mix until smooth and well combined.
- Fill the Cupcake Liners: Spoon the batter into the cupcake liners, filling each about halfway full.
- Bake: Bake in the preheated oven for 15-20 minutes, or until a toothpick inserted into the center of the cake comes out clean.
- Cool: Allow the cakes to cool in the pan for 5 minutes, then transfer them to a wire rack to cool completely.
Prepare the Cheesecake Filling
- Blend the Cream Cheese: In a large mixing bowl, beat the cream cheese and granulated sugar with an electric mixer on medium speed until smooth and creamy.
- Add the Eggs: Add the eggs one at a time, beating well after each addition.
- Add the Flour and Vanilla: Stir in the flour and vanilla extract, mixing until just combined.
- Add the Sour Cream: Gently fold in the sour cream, ensuring the mixture is smooth and creamy.
Assemble the Mini Red Velvet Cheesecakes
- Top the Cakes: Once the red velvet cakes have cooled completely, use a spoon or small cookie scoop to add a generous dollop of the cheesecake filling on top of each cake.
- Bake Again: Return the muffin tin to the oven and bake for another 20-25 minutes, or until the cheesecake filling is set and the top is lightly golden.
- Cool and Chill: Remove from the oven and allow the cheesecakes to cool in the pan for 10 minutes. Then, carefully remove each cheesecake from the muffin tin and place them on a wire rack. Chill the cheesecakes in the refrigerator for at least 2 hours before serving.
Serve and Garnish
- Decorate: Before serving, top each mini cheesecake with whipped cream, fresh berries, or a dusting of cocoa powder or grated chocolate for a finishing touch.
- Enjoy: Serve chilled and enjoy the creamy, flavorful bite of your Mini Red Velvet Cheesecakes!
- Prep Time: 20 min.
- Cooling Time: 1 hour
- Cook Time: 25 min.
Nutrition
- Serving Size: 12 mini cheesecakes
- Calories: 320 kcal
- Fat: 20g
- Carbohydrates: 25g
- Fiber: 1g
- Protein: 4g
Conclusion
Your guests will be wowed by the beauty and flavor of these Mini Red Velvet Cheesecakes. Whether you’re serving them at a celebration or enjoying them for a quiet dessert at home, they’re sure to be a hit! Remember, this recipe is simple, elegant, and versatile—you can get creative with toppings, mix-ins, and flavors. So don’t be afraid to make them your own and impress everyone around you with these delicious, mini masterpieces.
Don’t forget to snap a photo and tag me on social media—I love seeing your delicious creations!

