

Introduction
If you’re looking for a fun and decadent treat that’s perfect for any occasion, then look no further than Red Velvet Mug Cakes! These individual-sized cakes are rich, fluffy, and packed with the iconic tangy flavor of red velvet. Plus, they’re ready in minutes—no need for a full-sized cake or oven to enjoy a warm, freshly baked dessert! Whether you’re treating yourself to something sweet after a long day or preparing a surprise snack for a friend, these mug cakes are the ultimate solution for instant dessert gratification.
What’s more, the process couldn’t be easier. Just grab your favorite mug, a few simple ingredients, and let the microwave work its magic. It’s a treat that delivers the beauty and flavor of red velvet cake without the hassle. The best part? You don’t have to share unless you want to!
Why You’ll Love This Recipe
Here are just a few reasons why you’ll fall head over heels for Red Velvet Mug Cakes:
- Super Quick: Ready in less than 5 minutes—just mix, microwave, and enjoy!
- No Baking Required: No need to heat up the oven, so it’s perfect for quick fixes or last-minute cravings.
- Single-Serving: This recipe is ideal for when you’re in the mood for something sweet but don’t want to make a whole cake.
- Customizable: Add your own twist with frosting, chocolate chips, or even a dash of vanilla.
- Rich and Flavorful: The tangy, creamy taste of red velvet is balanced perfectly with just the right amount of sweetness.
- Minimal Ingredients: You don’t need much more than pantry staples to make this cake.
- Convenience: The microwave does most of the work, so you can indulge in your sweet tooth without waiting.
- Perfect for Any Occasion: Whether it’s a cozy evening alone, a dinner party, or a special treat for someone you love, this dessert fits the bill.
Preparation Time and Cook Time
- Total Time: 5 minutes
- Preparation Time: 2 minutes
- Cook Time: 2-3 minutes
- Cooling Time: No cooling needed—enjoy immediately!
- Servings: 1 mug cake
- Calories per serving: Approximately 350 calories
- Key Nutrients: Fat: 18g, Carbohydrates: 42g, Protein: 3g, Fiber: 1g
Ingredients
Before you start, make sure you have the following ingredients for your Red Velvet Mug Cake:
For the Mug Cake:
- 3 tablespoons all-purpose flour
- 2 tablespoons granulated sugar
- 1 tablespoon unsweetened cocoa powder
- 1/8 teaspoon baking powder
- Pinch of salt
- 3 tablespoons milk (whole milk works best)
- 2 tablespoons vegetable oil
- 1/4 teaspoon vanilla extract
- 1 teaspoon red food coloring (optional, but recommended for that classic red velvet look)
For the Cream Cheese Frosting:
- 1 tablespoon cream cheese (softened)
- 1 tablespoon butter (softened)
- 1/4 cup powdered sugar
- 1/4 teaspoon vanilla extract
Step-by-Step Instructions


It’s time to create your Red Velvet Mug Cakes! Just follow these easy steps:
Make the Mug Cake
- Mix the Dry Ingredients: In a microwave-safe mug, combine the flour, sugar, cocoa powder, baking powder, and salt. Stir to make sure everything is well-mixed.
- Add the Wet Ingredients: Add the milk, vegetable oil, vanilla extract, and red food coloring. Stir the mixture together until it forms a smooth batter. Make sure to scrape the sides of the mug to incorporate all the ingredients.
- Microwave: Microwave the mug cake on high for about 2 minutes. Keep an eye on it—if your microwave runs hot, you might need to reduce the time slightly. The cake should rise and set in the middle. If the top is still wet, microwave in 15-second increments until done.
- Cool: Let the mug cake cool for a minute or two before topping it with frosting. Don’t worry—this won’t take long!
Make the Cream Cheese Frosting
- Mix the Frosting: In a small bowl, whisk together the cream cheese, butter, powdered sugar, and vanilla extract. Stir until smooth and creamy. You can adjust the sweetness by adding more powdered sugar if desired.
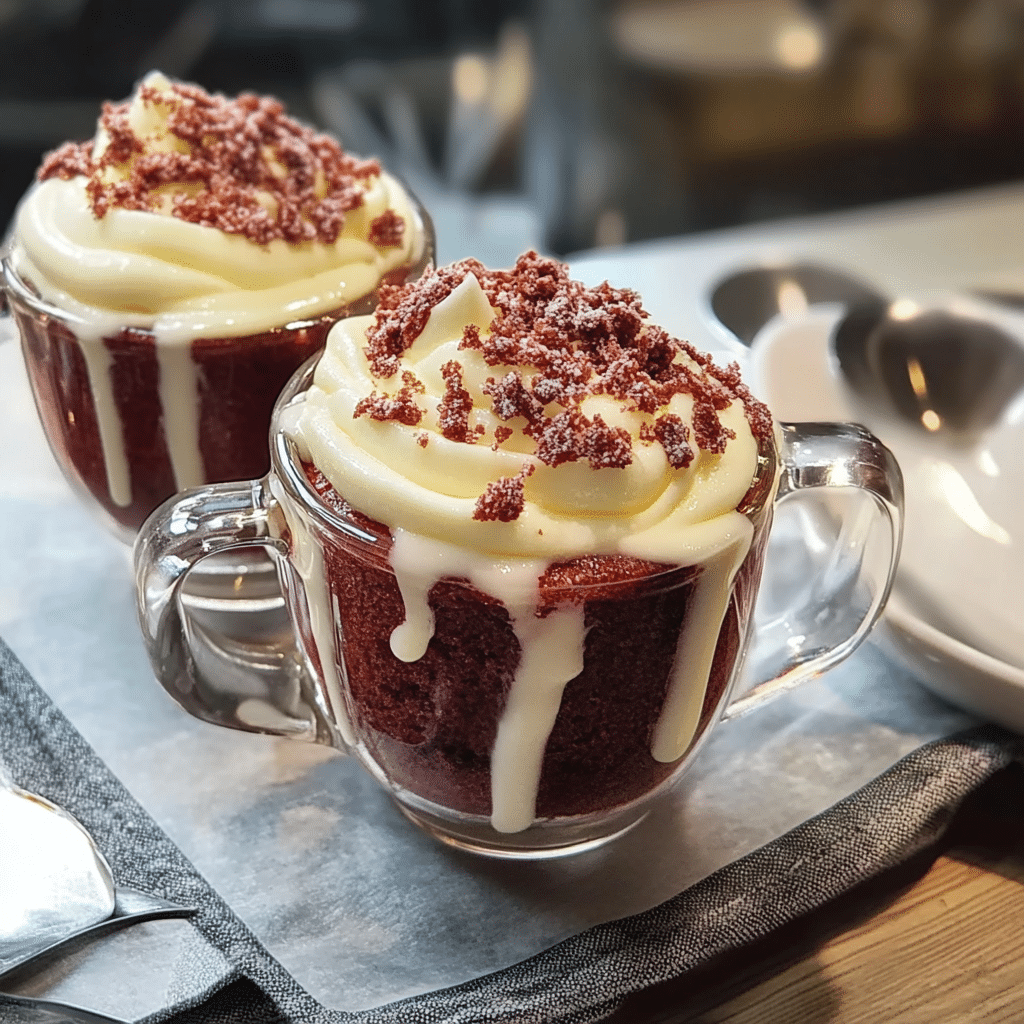
- Top the Cake: Spoon the frosting onto the mug cake, spreading it gently over the top. For a fun extra touch, you can even swirl it with a knife for a beautiful effect.

How to Serve
While this Red Velvet Mug Cake is already impressive on its own, here are some fun ways to serve and enjoy it:
- As a Solo Treat: The mug cake is already the perfect portion for a single serving, but you can pair it with a scoop of vanilla ice cream or whipped cream for extra indulgence.
- Gift It: Make this dessert ahead of time in a cute mug and gift it to a friend as a personal, delicious surprise. You can even include a small jar of frosting for a fun presentation.
- With a Drink: Serve alongside a cup of coffee, milk, or a sweet tea to complement the rich flavors of the cake.
- In a Mug Set: Pair it with a festive or personalized mug for a cozy gift idea. Who wouldn’t love getting a set that includes a mug and a tasty dessert?
- Top with Fresh Berries: Add fresh raspberries or strawberries to your cake for an added burst of color and flavor.
Additional Tips
Here are a few extra tips to make your Red Velvet Mug Cake even more fabulous:
- Don’t Overcook: Start with 2 minutes of microwave time and check the cake. If it’s still too wet, microwave in 15-second intervals. Overcooking will lead to a dry cake.
- Make It Your Own: Feel free to add mini chocolate chips or nuts to the batter for extra texture and flavor.
- Cream Cheese Substitution: If you don’t have cream cheese for the frosting, a simple buttercream frosting works just as well.
- Dairy-Free Option: Swap the milk for a dairy-free alternative, such as almond or oat milk, and use dairy-free butter for the frosting.
- Customize the Color: Want a twist on the traditional red velvet? Try using different food colorings for fun variations, like blue or purple!
Recipe Variations
Want to switch things up? Here are a few fun variations of the Red Velvet Mug Cake:
- Chocolate Red Velvet: Add extra cocoa powder to make the cake even richer and more chocolatey.
- Lemon Cream Cheese Frosting: Add a hint of lemon zest to the frosting for a tangy twist that pairs beautifully with the red velvet.
- Red Velvet Trifle: Layer the mug cake with whipped cream, chocolate chips, and cake crumbs in a small glass for a fun trifle dessert.
- Vegan Red Velvet Mug Cake: Use flaxseed meal as an egg replacer, and substitute with non-dairy milk and dairy-free butter.
Freezing and Storage
Need to store your Red Velvet Mug Cake for later? Here’s how:
- Storage: Since this is a single-serving dessert, it’s best enjoyed fresh. However, if you do have leftovers, cover the mug with plastic wrap and refrigerate for up to a day.
- Freezing: The batter can be made in advance and stored in the fridge for up to 2 days. Just microwave it as usual when you’re ready to enjoy.
- Frosting: The cream cheese frosting can be stored in an airtight container in the fridge for a few days. Just be sure to give it a quick stir before using.
Special Equipment
This recipe is super easy to make and requires no special equipment, but having these tools will make things even simpler:
- Microwave-Safe Mug: Choose a mug that holds at least 12 ounces to give the cake enough space to rise.
- Whisk: A small whisk works best for mixing the batter and the frosting.
- Spoon or Knife: For spreading the frosting on top of the cake.
FAQ Section
Here are some frequently asked questions about Red Velvet Mug Cakes:
- Can I use a different type of frosting?
Absolutely! You can use chocolate frosting, vanilla buttercream, or even whipped cream for a different touch. - What if I don’t have red food coloring?
You can skip it or use another color of food coloring for a fun twist. - Can I make this cake ahead of time?
While mug cakes are best enjoyed fresh, you can prepare the batter in advance and refrigerate it for up to 2 days. - How do I make this gluten-free?
Simply substitute the all-purpose flour with a gluten-free flour blend. - What size mug should I use?
A 12-ounce mug works perfectly for this recipe. Anything smaller may cause the cake to overflow during cooking.

Red Velvet Mug Cakes
- Total Time: 5 minutes
Ingredients
For the Mug Cake:
- 3 tablespoons all-purpose flour
- 2 tablespoons granulated sugar
- 1 tablespoon unsweetened cocoa powder
- 1/8 teaspoon baking powder
- Pinch of salt
- 3 tablespoons milk (whole milk works best)
- 2 tablespoons vegetable oil
- 1/4 teaspoon vanilla extract
- 1 teaspoon red food coloring (optional, but recommended for that classic red velvet look)
For the Cream Cheese Frosting:
- 1 tablespoon cream cheese (softened)
- 1 tablespoon butter (softened)
- 1/4 cup powdered sugar
- 1/4 teaspoon vanilla extract
Instructions
Make the Mug Cake
- Mix the Dry Ingredients: In a microwave-safe mug, combine the flour, sugar, cocoa powder, baking powder, and salt. Stir to make sure everything is well-mixed.
- Add the Wet Ingredients: Add the milk, vegetable oil, vanilla extract, and red food coloring. Stir the mixture together until it forms a smooth batter. Make sure to scrape the sides of the mug to incorporate all the ingredients.
- Microwave: Microwave the mug cake on high for about 2 minutes. Keep an eye on it—if your microwave runs hot, you might need to reduce the time slightly. The cake should rise and set in the middle. If the top is still wet, microwave in 15-second increments until done.
- Cool: Let the mug cake cool for a minute or two before topping it with frosting. Don’t worry—this won’t take long!
Make the Cream Cheese Frosting
- Mix the Frosting: In a small bowl, whisk together the cream cheese, butter, powdered sugar, and vanilla extract. Stir until smooth and creamy. You can adjust the sweetness by adding more powdered sugar if desired.
- Top the Cake: Spoon the frosting onto the mug cake, spreading it gently over the top. For a fun extra touch, you can even swirl it with a knife for a beautiful effect.
- Prep Time: 2 min.
- Cook Time: 2-3 min.
Nutrition
- Serving Size: 1 mug cake
- Calories: 350 kcal
- Fat: 18g
- Carbohydrates: 42g
- Fiber: 1g
- Protein: 3g
Conclusion
There you have it—your Red Velvet Mug Cake is ready in just minutes! This easy-to-make, single-serving dessert is the perfect way to satisfy your sweet cravings without spending a lot of time in the kitchen. Whether you’re celebrating a special occasion, indulging after a long day, or simply treating yourself, this cake offers a comforting and decadent experience.
The best part? It’s quick, easy, and perfectly portioned, making it ideal when you’re craving a slice of something delicious but don’t want to make a whole cake. The rich red velvet flavor combined with a soft, velvety texture is sure to impress. You can even get creative by adding a dollop of whipped cream or a sprinkle of chocolate chips on top for that extra touch of indulgence.
So, what are you waiting for? Grab your favorite mug, mix up the ingredients, and enjoy a little moment of sweetness just for you. Whether you’re curled up with a good book, watching a movie, or sharing with a friend, this mug cake is bound to brighten your day. Don’t forget to snap a photo and tag me on social media—I love seeing your delicious creations! Happy baking!


