Introduction
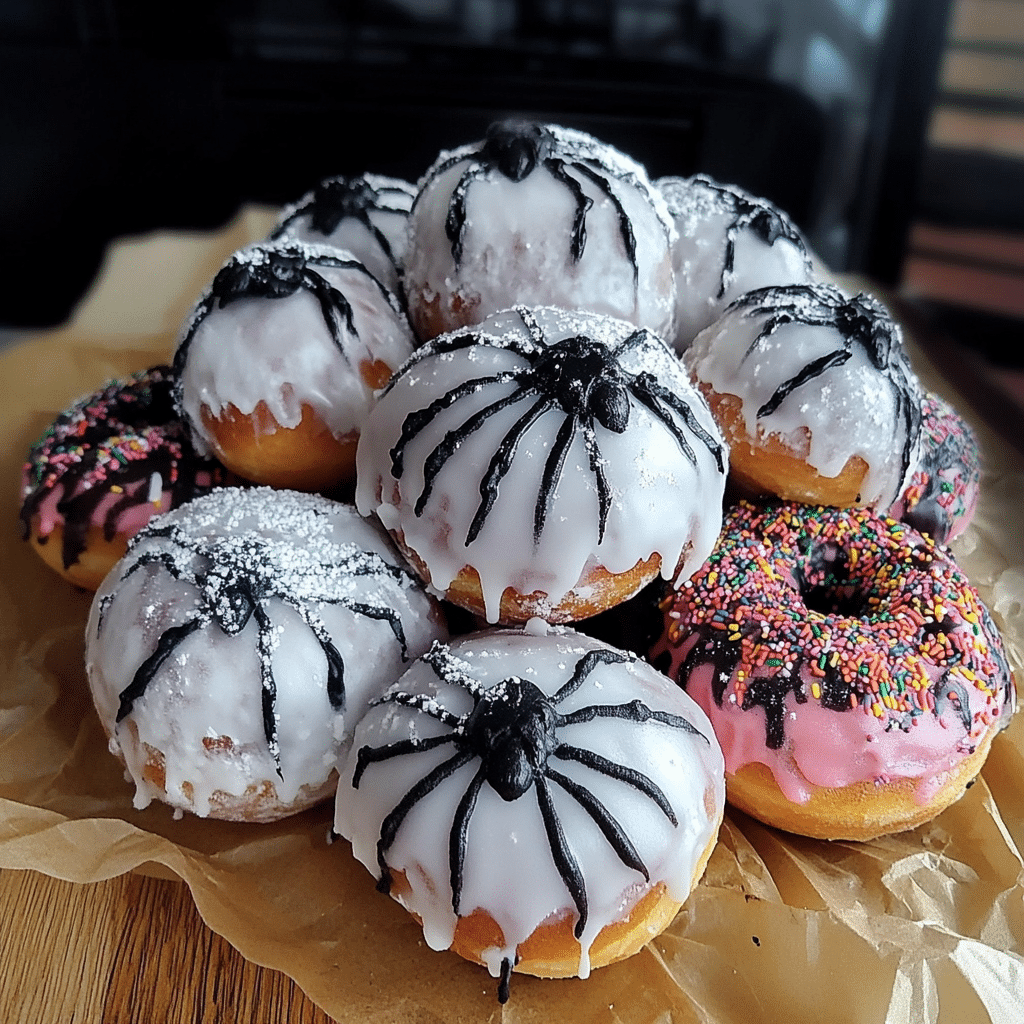
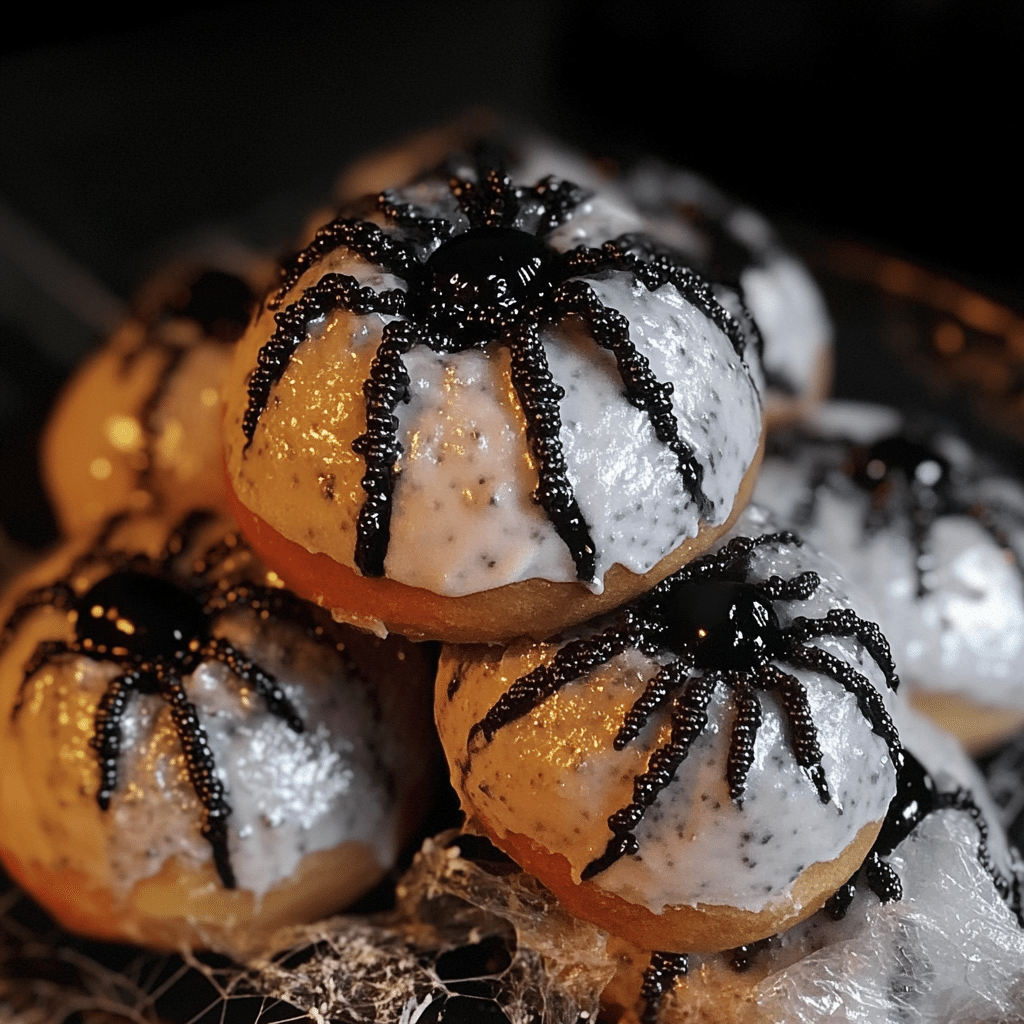
Looking to add a bit of creepy-crawly charm to your Halloween table? These Spider Eggs are a playful and spooky treat that’s sure to thrill (and maybe give a few goosebumps!) at any Halloween party. With donut holes as the “eggs,” a white chocolate coating for that ghostly look, and a drizzle of “webbing” to complete the eerie effect, they’re a fun way to get into the Halloween spirit. And the best part? You don’t need any fancy ingredients or tons of time to make these. Even if you’re new to the kitchen, this recipe is totally doable.
I first made Spider Eggs for my kids’ Halloween party a few years back, and they’ve become a must-have ever since. It’s amazing how something so simple can be such a hit! Watching their little faces light up—some with excitement, some with just a hint of horror—is the highlight of the night. Plus, they love getting involved. They each have their favorite part, whether it’s dunking the donut holes in chocolate or adding the “web” design. It’s become one of those family traditions we all look forward to every October.
These Spider Eggs are also super versatile. You can set them out as part of a dessert platter, give them out as party favors, or even hand them out to trick-or-treaters for a fun surprise. They’re cute enough for younger kids but creepy enough to appeal to the older ones (and adults, too!). So grab some donut holes, melt some chocolate, and get ready to bring these spooky treats to life!
Why You’ll Love This Recipe
Here’s why Spider Eggs are a must-make for Halloween:
- Perfectly Spooky: These treats look realistic enough to spook, yet taste deliciously sweet.
- Easy to Make: Just a few simple steps, with no need for baking.
- Kid-Friendly: Kids will love both making and eating these creepy treats!
- Party Ready: Perfect for adding a themed dessert to your Halloween spread.
- Customizable: Easily change colors or add candy spiders to amp up the spook factor.
- Make-Ahead Friendly: Prepare them the day before for a stress-free Halloween treat.
- Edible Art: A fun, hands-on activity for creating Halloween-themed food.
- Low Mess: Minimal cleanup since they’re simple to assemble.
- Great for All Ages: Both adults and kids will enjoy these unique treats.
- Budget-Friendly: Affordable ingredients make these treats easy on the wallet.
Preparation Time
- Total Time: 30 minutes
- Preparation Time: 30 minutes
- Servings: 24 spider eggs
- Calories per piece: Approximately 80 calories
Ingredients
You’ll need these ingredients to make Spider Eggs:
For the Spider Eggs:
- 24 powdered donut holes
- 1 cup white chocolate chips, melted
- Black decorating gel or melted dark chocolate (for webbing)
- Edible candy spiders or mini chocolate chips (optional)
Ingredient Highlights
- Powdered Donut Holes: Soft and sweet, they make the perfect “egg” shape for this recipe.
- White Chocolate: Adds a creamy layer, helping create the eerie look of spider eggs.
- Decorating Gel or Dark Chocolate: For drawing webs, adding a spooky touch to each egg.
- Candy Spiders: A fun addition that makes these treats look even creepier.
Step-by-Step Instructions
Here’s how to assemble your Spider Eggs:
Prepare the Eggs
- Melt the White Chocolate: Place white chocolate chips in a microwave-safe bowl and melt in 20-second increments, stirring in between until smooth.
- Coat the Donut Holes: Dip each donut hole in the melted white chocolate, using a fork to roll it for even coverage.
- Let Set: Place each coated donut hole on a parchment-lined tray. Allow the chocolate to set completely (about 10 minutes at room temperature or in the fridge).
Add the Webbing
- Decorate with Webbing: Using black decorating gel or melted dark chocolate, pipe thin lines in a web-like pattern over each coated donut hole.
- Optional Candy Spiders: If using, place a small candy spider or chocolate chip on top of each spider egg for a finishing touch.
How to Serve
Here are some creepy and fun ways to serve your Spider Eggs:
- Halloween Table Display: Arrange on a spooky platter surrounded by fake spider webs.
- Pair with Other Treats: Serve alongside other Halloween snacks for a festive dessert table.
- Individual Servings: Place each spider egg in a mini cupcake liner for individual servings.
- Trick-or-Treat Bag Filler: Wrap each egg in cellophane and tie with a Halloween ribbon.
- Cupcake Topper: Use Spider Eggs as a topper for cupcakes or cakes for a creepy decoration.
- Scattered on Table: Place the spider eggs in random spots on the table for a “nest” effect.
- DIY Station: Set up a decorating station where kids can add their own webbing and spiders.
- Gift Box: Arrange in a decorative Halloween box for a spooky gift.
- Themed Dessert Stand: Display on a tiered stand for a dramatic effect.
- Make it a Game: Use Spider Eggs as part of a Halloween scavenger hunt for extra fun.
Additional Tips
Make the most of your Spider Eggs with these helpful tips:
- Make Ahead: Prepare a day in advance and store in an airtight container for easy party prep.
- Use Quality Chocolate: Choose a high-quality white chocolate for the best flavor and smoothest coating.
- Use Dark Gel: For a more intense web effect, use dark decorating gel rather than chocolate.
- Work Quickly: Melted white chocolate sets fast, so have your donut holes ready.
- Add Some Color: For a unique twist, add food coloring to the white chocolate for different “egg” colors.
- Get Creative with Webbing: Experiment with different web designs to create a variety of spider eggs.
- Sprinkle with Cocoa Powder: Lightly dusting cocoa powder can give the eggs a “dirtier” spider-egg look.
- Keep Chocolate Warm: Use a double boiler to keep the white chocolate smooth while working.
- Add Texture: Roll coated eggs in coconut flakes for a unique, textured look.
- Halloween Display: Surround with plastic spiders or creepy decorations for a spooky setup.
Recipe Variations
Try these fun variations for your Spider Eggs:
- Colorful Eggs: Add food coloring to the white chocolate to make vibrant spider eggs.
- Gluten-Free Option: Use gluten-free donut holes if needed.
- Different Coatings: Try milk or dark chocolate for a different look and flavor.
- Spooky Sprinkles: Use Halloween sprinkles or edible glitter for added sparkle.
- Extra Webs: Add extra webbing lines to make them look more intricate.
- Spider Infestation: Attach several mini candy spiders to each egg for a “spider nest” effect.
- Filled Eggs: Hollow out and fill with whipped cream for a fun surprise.
- Crunchy Coating: Add crushed cookie crumbs to the outside for a dirt-like texture.
- Edible Eyes: Add edible eyes to each egg for a funny and spooky twist.
- Add Licorice Legs: Stick in small pieces of licorice to give the eggs spider legs.
Freezing and Storage
Here’s how to store your Spider Eggs:
- Room Temperature: Store at room temperature in an airtight container for up to 3 days.
- Refrigerate for Freshness: If it’s warm, refrigerate to keep the chocolate coating from melting.
- Freezing: Not recommended as thawing may affect the chocolate texture.
Special Equipment
You may need the following tools to create your Spider Eggs:
- Microwave-Safe Bowl: For melting the white chocolate.
- Forks or Tongs: To handle the donut holes without getting too messy.
- Piping Bag: For webbing, though a zip-top bag with a corner snipped off works too.
- Parchment Paper: To line the tray and keep the eggs from sticking.
FAQ Section
Here are answers to common questions about Spider Eggs:
- Can I make these with different donut flavors?
Yes, feel free to use chocolate, cinnamon, or other donut flavors. - Can I add filling to the eggs?
Absolutely! Hollow out the donut holes and add a bit of whipped cream or frosting for a fun surprise. - What if I can’t find white chocolate?
You can use candy melts or almond bark as an alternative. - How far ahead can I make these?
These are best made up to one day in advance to keep them fresh. - What if I don’t have decorating gel?
Use melted dark chocolate or food coloring pens instead. - Can I use a different type of chocolate?
- Absolutely! Feel free to experiment with dark, milk, or white chocolate, depending on your taste preference.
- How long do these treats last?
- Spider Eggs can be stored in an airtight container at room temperature for up to a week.
- Can I make these ahead of time?
- Yes, you can prepare the chocolate coating and fillings in advance. Just assemble the Spider Eggs the day before your event for optimal freshness.
- What if I can’t find edible googly eyes?
- If you can’t find edible googly eyes, you can use small chocolate chips, candy-coated chocolates, or even fondant to create your spider eyes.
- Can I use any type of candy filling?
- Certainly! You can use different types of candy like caramel, nougat, or peanut butter for varied flavors and textures.
- Are these treats gluten-free?
- Yes, as long as you use gluten-free chocolate and fillings, Spider Eggs can be a gluten-free option!
Spider Eggs
- Total Time: 30 min.
Ingredients
- 24 powdered donut holes
- 1 cup white chocolate chips, melted
- Black decorating gel or melted dark chocolate (for webbing)
- Edible candy spiders or mini chocolate chips (optional)
Instructions
Prepare the Eggs
- Melt the White Chocolate: Place white chocolate chips in a microwave-safe bowl and melt in 20-second increments, stirring in between until smooth.
- Coat the Donut Holes: Dip each donut hole in the melted white chocolate, using a fork to roll it for even coverage.
- Let Set: Place each coated donut hole on a parchment-lined tray. Allow the chocolate to set completely (about 10 minutes at room temperature or in the fridge).
Add the Webbing
- Decorate with Webbing: Using black decorating gel or melted dark chocolate, pipe thin lines in a web-like pattern over each coated donut hole.
- Optional Candy Spiders: If using, place a small candy spider or chocolate chip on top of each spider egg for a finishing touch.
- Prep Time: 30 min.
Nutrition
- Serving Size: 24 spider eggs
- Calories: 80 kcal
Conclusion
I can’t wait to hear how these Spider Eggs turn out for you! They’re such a fun way to get into the Halloween spirit, and I bet they’ll be a huge hit with friends and family. If you’re planning a Halloween party or just want to add a spooky touch to the day, these little treats are perfect for the job.
Feel free to get creative with the decorating, too! Add extra “legs” or maybe some candy “eyes” for an even creepier effect. And if you make any fun variations, I’d love to know! Please share your experience in the comments below—your feedback and ideas mean so much to me.
When you whip up a batch, don’t forget to snap a photo and tag me on social media! Seeing your creations always brings a smile to my face, and I’d be thrilled to feature some of your spooky Spider Eggs. Here’s to a Halloween filled with tasty treats and plenty of eerie fun!

