Introduction
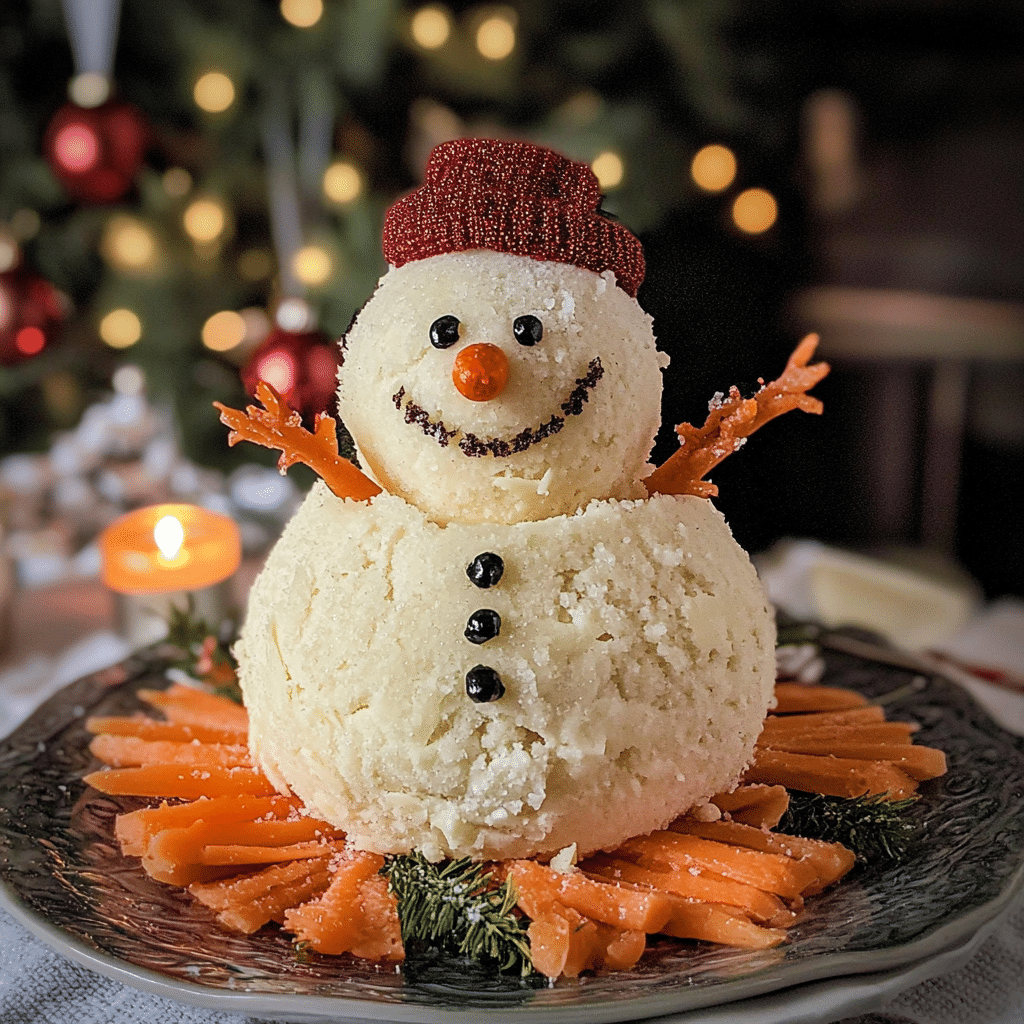
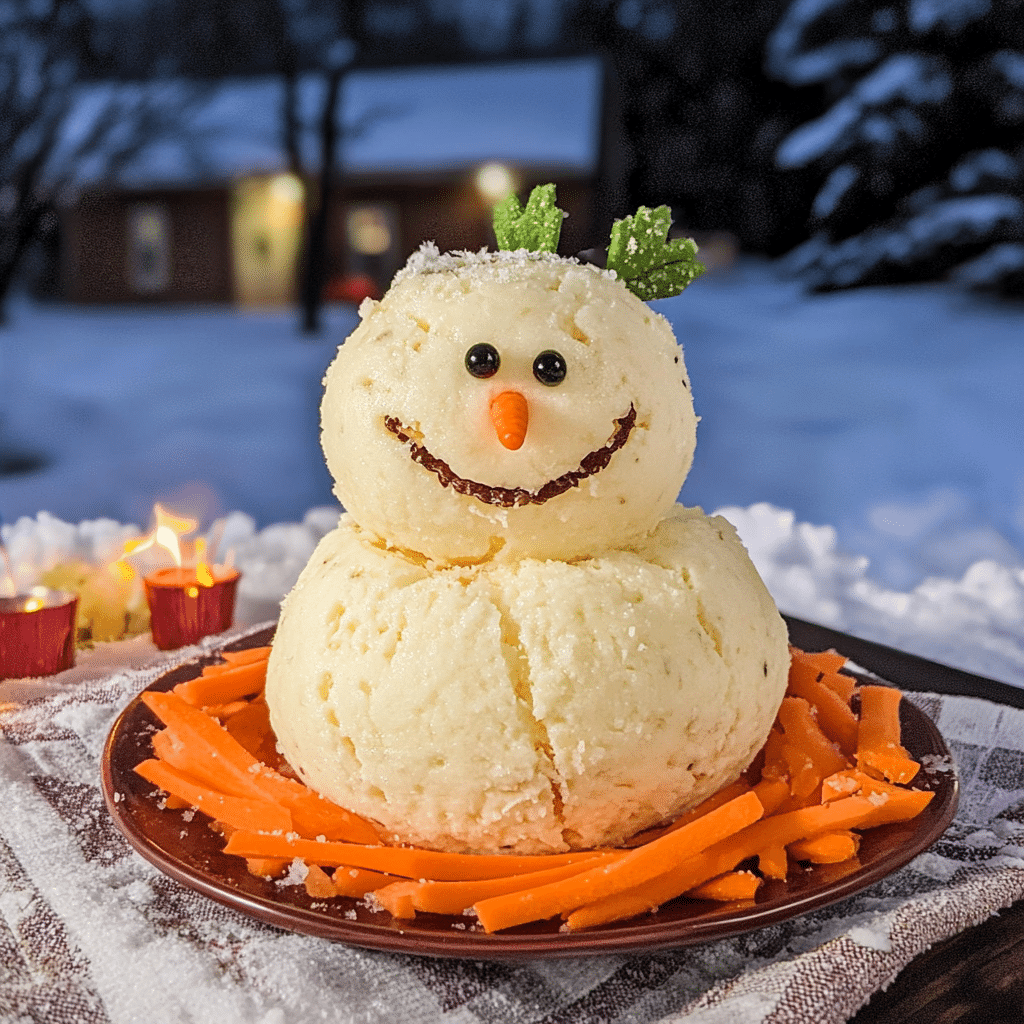
Looking for a way to add a little extra magic to your holiday spread? Meet the Snowman Cheeseball—an adorable, creamy appetizer that’s as fun to make as it is to eat! I love this recipe because it’s the perfect mix of festive cheer and delicious flavor. The best part? It’s so simple to put together, but it’s bound to get lots of attention (and compliments) at your gathering.
I first made this snowman cheeseball for a family Christmas party, and it was an instant hit. The look on everyone’s faces when they saw it was priceless. Not only does it look cute, but the rich, tangy cheese filling inside is totally irresistible. A blend of cream cheese, cheddar, and a few secret ingredients (hello, garlic and herbs!) makes it extra creamy and packed with flavor. It’s like a little bite of holiday magic in every scoop!
What I love most about this cheeseball is how customizable it is. You can adjust the cheese flavors to your liking—throw in a little blue cheese for an extra kick, or keep it simple with classic cheddar. Once your cheeseball is shaped into a snowman, it’s time to decorate! Think of using mini pretzels for buttons, baby carrots for the nose, and black olives for the eyes. Get creative with accessories like a scarf or tiny hat made out of colored veggies or even a small paper napkin.
Whether you’re hosting a holiday party, a cozy family dinner, or just want to add something fun to the appetizer table, the Snowman Cheeseball is sure to be a crowd-pleaser. It’s easy to make, super festive, and most importantly—delicious. Don’t be surprised if it disappears in no time!
Why You’ll Love This Recipe
Here are some reasons you’ll fall head over heels for this Snowman Cheeseball:
- Super Festive: This cheeseball is shaped like a snowman and decorated with classic holiday flair, making it the perfect centerpiece for your party spread.
- Kid-Friendly Fun: Kids will love helping to assemble the snowman or even eating the “snowman” themselves!
- Cheesy Goodness: The creamy, savory cheese mixture is packed with flavor and pairs perfectly with crackers and veggies.
- Simple to Make: This recipe is straightforward, with minimal prep time and easy-to-follow steps.
- Customizable: Feel free to experiment with different cheeses or seasonings to match your personal taste.
- Great for Any Skill Level: Whether you’re a first-time host or an experienced chef, anyone can make this fun dish.
- Perfect for Holiday Parties: A fantastic appetizer to share with family and friends during holiday celebrations.
- Make-Ahead Option: Prepare it in advance, and it’s ready to serve when you need it!
Preparation Time and Cook Time
- Total Time: 30 minutes
- Preparation Time: 20 minutes
- Refrigeration Time: 1 hour
- Servings: 12-15
- Calories per serving: Approximately 150 calories
- Key Nutrients: Fat: 12g, Carbohydrates: 3g, Protein: 6g
Ingredients
Here’s what you need to make your Snowman Cheeseball:
For the Cheeseball:
- 2 cups cream cheese, softened
- 1 cup shredded sharp cheddar cheese
- 1/2 cup ranch dressing mix (or your favorite seasoning blend)
- 1/4 cup chopped green onions
- 1/4 cup cooked bacon bits (optional but adds great flavor)
For the Snowman Decoration:
- 1 small carrot (for the nose)
- 2 black olives (for the eyes)
- 1 red bell pepper (for the scarf)
- 1-2 pretzel sticks (for the arms)
- Assorted crackers and veggies (for serving)
Ingredient Highlights
- Cream Cheese: The base of this cheeseball, giving it that creamy, smooth texture that’s so irresistible.
- Sharp Cheddar Cheese: Adds a flavorful tang and depth to the cheeseball mixture.
- Ranch Dressing Mix: This seasoning blend gives the cheeseball a delicious, savory kick.
- Bacon Bits: Optional, but the bacon adds a smoky, crispy element to the dish.
- Vegetable Decorations: Use simple ingredients like a carrot and olives to make your snowman come to life!
Step-by-Step Instructions
Creating your Snowman Cheeseball is easier than you might think. Just follow these simple steps:
Prepare the Cheeseball Mixture
- Mix the Ingredients: In a large bowl, combine the softened cream cheese, shredded cheddar cheese, ranch dressing mix, green onions, and bacon bits. Mix until everything is fully incorporated and smooth.
- Shape the Snowman: Use your hands to form the cheese mixture into two balls — one larger (for the body) and one smaller (for the head). Place the smaller ball on top of the larger ball to create the snowman shape.
Decorate Your Snowman
- Create the Face: Cut a small piece of the carrot for the snowman’s nose and press it into the center of the smaller cheese ball. Add two black olives for the eyes.
- Add the Scarf: Slice the red bell pepper into strips and wrap them around the snowman’s “neck” for a festive scarf.
- Make the Arms: Break the pretzel sticks into small pieces and place them on each side of the snowman for arms.
- Finalize the Look: Optional — add a small piece of pepper or another veggie for the mouth or buttons down the front.
Chill and Serve
- Refrigerate: Place your snowman cheeseball in the fridge for at least 1 hour to firm up.
- Serve: Once chilled, serve with crackers, sliced vegetables, or your favorite dipping items. Gather around and enjoy the fun!
How to Serve
Here are some festive ways to serve your Snowman Cheeseball:
- Holiday Party Centerpiece: Place the snowman in the middle of your snack table for everyone to admire before they dig in!
- With Crackers: Pair with an assortment of crackers or crusty bread for the perfect bite.
- With Fresh Veggies: Serve alongside crunchy veggies like celery, carrots, or cucumber for a lighter snack option.
- For Dipping: Set out some pretzels, chips, or pita for guests to dip into the cheesy goodness.
- In a Cheese Platter: Include your snowman as part of a holiday cheese platter for an extra festive touch.
- Gift-Wrapped for Friends: Wrap your snowman cheeseball in festive plastic wrap and gift it to friends and family.
- Mini Snowmen: Make smaller versions of the cheeseball for individual servings or mini appetizers.
Additional Tips
Maximize your snowman fun with these tips:
- Chill Before Serving: Let the cheeseball chill for at least an hour before serving to help it hold its shape and become easier to cut.
- Use Full-Fat Cream Cheese: For the best creamy texture and flavor, opt for full-fat cream cheese.
- Make Ahead: Prepare your cheeseball the day before your event and store it in the fridge. It’ll be just as delicious and less stressful to assemble on the day of.
- Customize the Decorations: Get creative with the snowman’s accessories! Use raisins, nuts, or even other veggies to add flair.
- Don’t Forget the Dippers: Have a variety of crackers, sliced veggies, and pretzels on hand for your guests to enjoy with the cheeseball.
Recipe Variations
Consider these fun twists on the classic Snowman Cheeseball:
- Add Extra Flavor: Mix in some finely chopped herbs like parsley or thyme for an added savory note.
- Spicy Snowman: Add a bit of jalapeño or hot sauce to the mixture for a spicy kick.
- Cheese Varieties: Try using a mix of different cheeses, like cream cheese and goat cheese, for a tangy twist.
- Sweet Snowman: Make a dessert version by using sweet cream cheese, vanilla, and powdered sugar. Decorate with fruit for a fruity snowman!
- Bacon-Free Option: Omit the bacon bits for a vegetarian version of this snowman.
Freezing and Storage
Ensure your Snowman Cheeseball stays fresh with these storage tips:
- Storage: Keep the cheeseball covered in plastic wrap or an airtight container in the fridge for up to 3 days.
- Freezing: You can freeze the cheeseball before decorating. Simply wrap it in plastic wrap, then aluminum foil, and store it in the freezer for up to 1 month. Thaw overnight in the fridge before decorating and serving.
- Refrigerate Leftovers: After your party, store leftovers in the fridge for up to 3 days.
Special Equipment
Here are some kitchen tools that will come in handy for making your Snowman Cheeseball:
- Mixing Bowl: For combining your cheeseball ingredients.
- Cheese Grater: To shred the cheddar cheese if you’re using block cheese.
- Knife: For cutting the veggies to decorate the snowman.
- Plastic Wrap: To refrigerate or freeze your cheeseball.
FAQ Section
Here are answers to common questions about Snowman Cheeseball:
- Can I use a different cheese for the base?
Yes, feel free to experiment with cheeses like mozzarella, goat cheese, or cream cheese with herbs for different flavors. - Can I make this cheeseball in advance?
Yes, you can prepare the cheeseball ahead of time, refrigerate it, and decorate it just before serving. - How long will it last in the fridge?
The cheeseball will stay fresh in the fridge for up to 3 days. - Can I freeze the cheeseball?
Yes, you can freeze the un-decorated cheeseball for up to 1 month. Just let it thaw in the fridge before decorating.

Snowman Cheeseball
- Total Time: 30 min.
Ingredients
For the Cheeseball:
- 2 cups cream cheese, softened
- 1 cup shredded sharp cheddar cheese
- 1/2 cup ranch dressing mix (or your favorite seasoning blend)
- 1/4 cup chopped green onions
- 1/4 cup cooked bacon bits (optional but adds great flavor)
For the Snowman Decoration:
- 1 small carrot (for the nose)
- 2 black olives (for the eyes)
- 1 red bell pepper (for the scarf)
- 1–2 pretzel sticks (for the arms)
- Assorted crackers and veggies (for serving)
Instructions
Prepare the Cheeseball Mixture
- Mix the Ingredients: In a large bowl, combine the softened cream cheese, shredded cheddar cheese, ranch dressing mix, green onions, and bacon bits. Mix until everything is fully incorporated and smooth.
- Shape the Snowman: Use your hands to form the cheese mixture into two balls — one larger (for the body) and one smaller (for the head). Place the smaller ball on top of the larger ball to create the snowman shape.
Decorate Your Snowman
- Create the Face: Cut a small piece of the carrot for the snowman’s nose and press it into the center of the smaller cheese ball. Add two black olives for the eyes.
- Add the Scarf: Slice the red bell pepper into strips and wrap them around the snowman’s “neck” for a festive scarf.
- Make the Arms: Break the pretzel sticks into small pieces and place them on each side of the snowman for arms.
- Finalize the Look: Optional — add a small piece of pepper or another veggie for the mouth or buttons down the front.
Chill and Serve
- Refrigerate: Place your snowman cheeseball in the fridge for at least 1 hour to firm up.
- Serve: Once chilled, serve with crackers, sliced vegetables, or your favorite dipping items. Gather around and enjoy the fun!
- Prep Time: 20 min.
- Cook Time: 1 hr
Nutrition
- Serving Size: 12-15 servings
- Calories: 150 kcal
- Fat: 12g
- Carbohydrates: 3g
- Protein: 6g
Conclusion
This Snowman Cheeseball is the perfect way to bring some holiday cheer to your table! Not only is it delicious, with a creamy, savory filling that everyone will love, but it also makes a fun and festive centerpiece for your holiday spread. Whether you’re hosting a party or just snacking with the family, this adorable snowman is sure to steal the show.
Feel free to get creative with the decorations too! Use veggies for buttons and a scarf, and maybe even a little cheese for the nose—it’s a fun way to get the whole family involved. Plus, it’s a simple, no-bake recipe that comes together in no time, leaving you more room to enjoy the festivities.
I can’t wait to see how your Snowman Cheeseball turns out! Don’t forget to snap a photo and tag me on social media—I love seeing your delicious creations! Enjoy every bite and have fun spreading the holiday cheer!

